Monday, February 25, 2013

The Grotesque squad starts to grow...


OK!  Here's our second grotesque.  I am trying to keep all of these roughly with the same set of colors.  The poses are so darn similar, and the casting was really nasty.  This one is one of the worst of the squad, with serious casting issues.


This figure has the standard close combat weapon.  I tried to do a few different things with colors... on the vials, tubes, etc.  Even the placement and amount of blood and gore.


The bases reflect the color scheme of the opposing space marine army.  Once I get to the Reavers and the vehicles, you will start to see some actual casualties on the bases, similar to the one on the big Chaos base I posted over the weekend.

The Reavers are supposed to be dueling with assault troops from this opposing force, a big part of the story behind this army.


Here's the first two Grotesques together!  Working on the Aberration now...  Stay tuned!


Minis and Murals, an Ilyad diorama...


As I was preparing the new area for filming the painting videos, I ran across a few CD ROMs with backed up files on them.  I figured that I already had most of these somewhere else, but it turns out that it was a veritable treasure trove of 'lost' images!

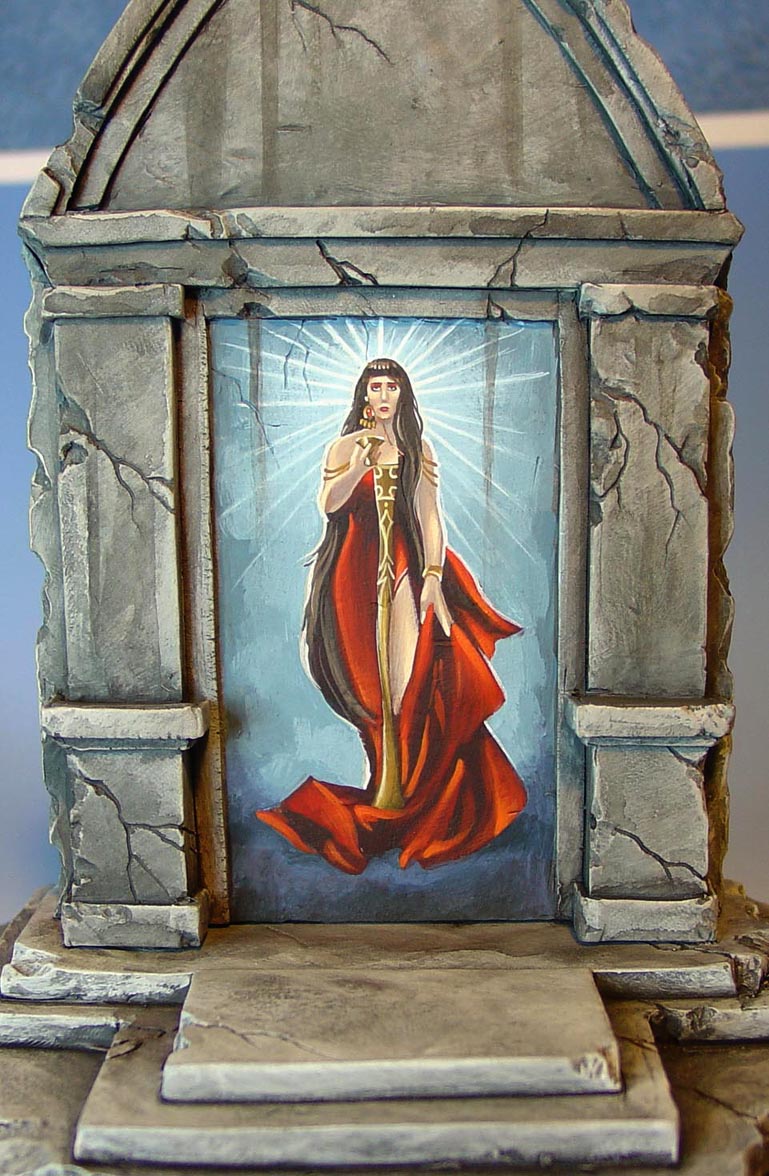
Among the galleries I uncovered was a set of images I had been searching for for over a year to put on the blog!  All I had found before this was some tiny little images.  Here are the original images that I shot of one of my favorite dioramas.  It's a mural, which is so much fun to do in miniature!


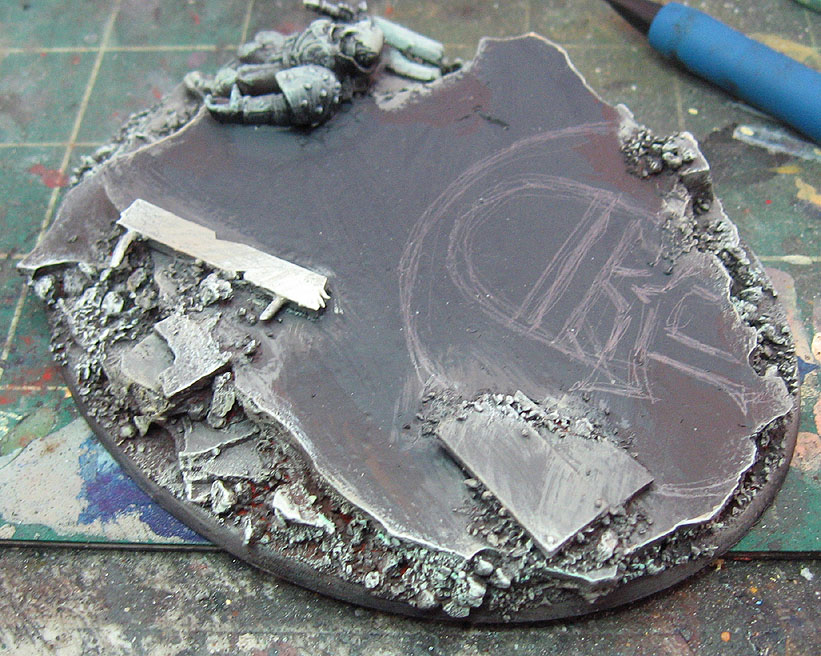
The figure itself is from Ilyad, and I will be posting some more images that show it a bit closer, and without the diorama.  As usual, this diorama was made with baked sculpey.


It was done in layers, like the lost shrine and the Anastasia dioramas.  I would do one layer, bake it, add some more decoration, bake it again, and so on.


One all those layers and details were complete, I took some carving tools to it and chipped away!


The vines are from Woodland scenics.  This is probably the best example of using that product.  It can be a little messy with the super glue, and you will get lots of stuff on your fingers in the process!  However, it really is worth it, as it truly looks like vines when you work it correctly.


This view shows you a nice look at how it interacts with the terrain piece.  It's a two part medium.  You attach the vines first, and then glue the 'leaves' later.  That's where things can get a little messy.


I would love to try something like this again using all the new weathering powders and pigments that I have now!


Perhaps I will try some things like this with the Raging Heroes figures... or some Kingdom Death figures...


Here's a few images of the mural:


I will post the images of the figure later tonight!  Stay tuned!


Painting the casualty...Part Two


Here's the rest of the experiment, painting the casualty.  I put down a basic layer of blue, and then some light grey on the other 'half'.  Some ochre was placed in a few accent areas.


Along the lines of the 'Shaded Basecoat', I lightened the blue, the light grey and the ochre all the way to highlight levels.


I put a little bit of fleshtone and some hair color on the casualty, using a bit of the darker hair color to restore some of the lines and shadows.


At this point, I started to do some glazing and shading of the rocks around the marble, as well as some of the debris.  I did the same on the casualty.  I didn't mind that the colors of the armor were dulled as a result, since that was a desired effect!


Can't have a casualty without blood and gore!  So, I mixed some Vallejo transparent red with Reaper brown liner into a batch of 'ardcoat.  This gave the 'blood' some shiny appearance, and also a bit of dimension, since the 'ardcoat is so thick.


It's important to vary the lightness and darkness with the blood, as well as it's opaqueness. Try to create some smears, some pools, and so on.  I like to make the edges of the pools darker, which means mixing a bit more of the dark brown liner.

The brown liner is semi transparent, like the transparent red.


Almost there!  Time to do a few cracks on the marble, clean up a few details on the casualty, and create the rust.


And the finished result.


Both of the bases together.


Sunday, February 24, 2013

Giant base with a casualty


Here's the last of the big bases.

This series has been an experiment on a few levels.  First, I wanted to see if this size might be better for the instructional videos that will show you how to paint marble and tile, as it might be a lot easier to see on these huge bases!

Second, I will be putting lots of casualties like this poor lad on my Adepticon Dark Eldar bases, and I wanted to try out some things.


So, like the others, I started out dark, and then did some lighter drybrushing with a cooler and a warmer light color.


I even put some on the casualty, just to get a feel for the lights and darks on the armor...


Then it was time to draw out the design...


Then painting in the black...


And taking the Intermediate blue to start putting in the marble texture.


It was lightened just like the previous bases with the USMS highlight.


And then the liner brush was brought out to get the finer and lighter veins.


Now it's time to start working on our casualty!


We will concentrate on him in the next post.  Stay tuned!

I have found on several of these big bases where I have the casualties that the Sanguinary Guard legs are fantastic for that lying on the ground pose.  I wish I had lots more!  They would make life so much easier for my casualties on the Dark Eldar bases.  I guess it is time to try to hunt some of them down on ebay...


Painting giant bases, part two


OK! now for the big finish!

Continuing with the painting of the big base, I was reaching the stage in painting the lightest areas of the marble.  I had switched from the #8 round to a liner brush.  This would not only allow me to get the very thin veins in the marble (and fine highlights on the logo design), but paint the cracks as well.


The liner brush is great for this, as it holds a lot of slightly watered down paint.  This lets you work across the surface with those fine lines.  You can see in this image that I did some highlights on those cracks.

I also started painting the vehicle bits.


Some rust is applied to the vehicle bits using the watered down calthan brown, followed by some vomit brown into that mix to lighten it.


Now it's time to glaze and tint the shadow areas of the rocks.  I put a series of glaze colors on the palette... black, sepia, green, etc., and worked the shadows darker and darker.


Once all the darks were finished, the base was ready to go!!


Of course, most of the base gets covered by the giant thing standing on top of it, but at least you can see it here. :-)


Stay tuned for the next base!


Saturday, February 23, 2013

Painting the giant bases: Part One


Time to paint those big bases!  Just like the other big base with the Iron Warriors theme, I drew out the design after getting a variety of dark, muted colors on the base.


Then I took a larger flat brush, and did some lighter drybrushing of the cork and rock areas, using a more reddish color and something that was more greenish for variety.


I painted some blue/black in the darkest areas of the design, to set up the lighter colors that are coming...


You can see the first layers of light colors to create the marble effect.  I used a #8 round for this part, scumbling and twisting the brush along the way to get the more random patterns.


Adding to the grey (Vallejo Intermediate blue) , I started to enhance the broader veins in the marble, as well as  bit more of the fine veins.  This was all done with the #8 round, as it comes to a very sharp point.


I began to add highlight USMC from Vallejo to that grey mix, both on the marble veins and the logo design.


I continued to enhance the lighter colors on all the patterns, adding more of the USMC highlight and switching to a liner brush to get some sharper and thinner details.


Stay tuned for the finish of painting the marble base!!