Monday, April 25, 2016

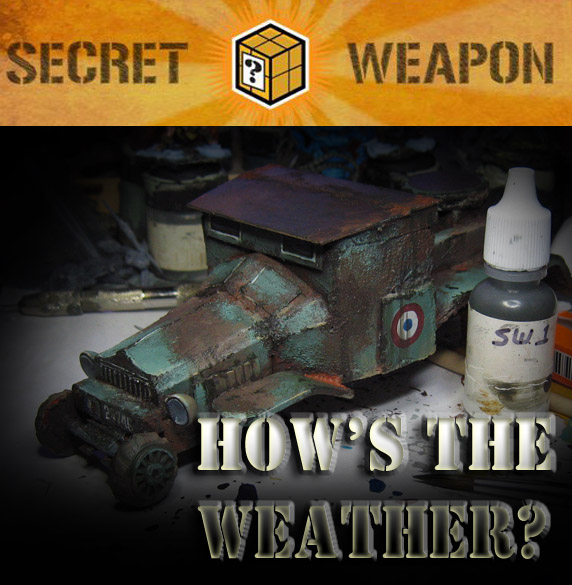
How's the weather?


Let's continue with the scratch sculpted Laffly truck.

This image shows that I have finally begun to apply actual 'regular' paint colors!

Yes, until now, everything used has been primer.  I believe this was a German Uniform Grey from Vallejo.  It was also painted on to most of the anti-tank gun and gun shield.


With each layer, a little more shape emerges.  As I mention all the time when I'm demoing this sort of thing. I like to cheat a bit with the placement of my lighter colors.  I try to place them strategically in areas where I want to have more paint chipping.

Doing so makes it a lot easier to show chipping, and the resulting rust streaks flowing down the diagonal or horizontal surfaces.


I wanted to try something with one of the new Secret Weapon paints to create some dried mud effects in a hurry.  As a reminder, I had very little time to paint these guys!  This meant trying to get the most out of every single application of paint.

I watered down this color, and hoped that it would sink down into crevices like a dark wash.  It did just that, because it is designed for just that purpose!  I dabbed away some of the excess on the raised parts of the tire treads, leaving the deposits behind.

I had all six tires dusted up in no time at all!  I'm sure this would work just as well on tank treads, so that's in the cards when the time comes for my own tanks.


I thought that I could 'kick up' some dirt deposits on a few areas around the tires.  There are no mud flaps on these, so I tried to anticipate where mud might be kicked up onto the bottom of the chassis.

Much more will be added to these when I get a few spare moments, including some weathering powder and crushed glass mixtures with realistic water.


That method would give areas like these even more dimension, as the mud would have some glossy moisture to it, and more 3D shape as well.


One way I knew I could save serious sculpting time on both of these vehicles was to paint in small details instead of actually sculpting them.  In this case, painting in the grille, headlights and vision slits on the cab gave a better sense of shape to the entire vehicle.

Ideally I would have liked to sculpt it all, but that was not the plan.


As I painted in those unsculpted details, I painted some insignia and markings.


While I could certainly add more later on, I felt that putting just a few hints here and there would break up the larger open surfaces, and make the green appear less monotonous.


This Secret Weapon color has become a favorite of mine, since it works wonderfully for so many techniques.  I am able to add paint chips, streaks, and even oil stains with this one color alone!

When it is thinned down, you get a fantastic greenish shade which you would not expect at first, since it is a brown after all.  However, like many of the new paints, it is designed to do more.  It is supposed to change color and tint when thinned down.  Quite handy!


There are a few different paints that work perfectly for rust as well.

I used this to enhance the rusted areas that I initially created with the orange primer, and to add some extra depth to some of the paint chips with rust streaks.


The underside of the chassis got one more layer of rusty paint once the wheels were glued on.


Paint chipping and rust were added to the gun and shield.  I am very glad that I magnetized this piece, since I could potentially use it as a regular gun emplacement or even a tow.

Stay tuned, because there is still some quick additions to do on this guy to finalize the painting.  I want to add some quick foliage and see what happens!  

Then I will be sure to get you some shots of the finished vehicle, and it's companion.

One of my favorite videos in my Painting Pyramid series that I created was A weathering and battle damage instructional video. It's 100 minutes long, and shows many of the same techniques you have seen.

This is a preview video that gives you an idea of what it's like:


Sunday, April 24, 2016

The Pink Cadillac, Part ONE


I thought you might like to see a very "down and dirty" paint job on the down and dirty, build 'em from scratch in no time Lafflys.

Just like the previous post, I will be emphasizing lots of "primer painting".  My first layers of paint, shading, weathering, etc, will be entirely of primer.

There are many benefits to this, as you get maximum adherence of paint to the miniature!  Since I have some super absorbent materials combined with much less absorbancy in the plasticard, it is quite important.


As always, I worked extremely fast.  This rapid application allowed me to get all kinds of wonderful, random mixing effects that are ideal for instant weathering on the bottoms and sides of a vehicle.

You can see what the mixtures of orange and black can yield.


This was carried up the sides of the vehicle... and every so often, I would dab some blobs of orange primer into the wet paint, creating interesting random rust patterns.


As I moved across the upper surfaces, I added a touch of the green primer with the black.  When I did the daubs of orange primer into this mix, I got even more interesting results!  I focused on areas where I had to most texture from the oxide paste, of course.

This was mostly done to hide the oxide paste, which had been used to hide any gaps or other flaws that resulted from the hasty sculpting!


As more pure green primer is painted over the original layers, I am already starting to get some nice blends.  And yes, you can use your fingers to spread out and mix the wet paints even more finely.


As I let the hull dry for a bit, I attacked the wheel assemblies.  These were caked in "mud", so plenty of orange primer was added.  Later, these will be given some dried mud colors for effect.


You can get a better sense of the overall effect that is building as I start to add some primer to the gun mount and shield.


I am reducing the amount of rust effects on the gun itself, since that sees more active use, and would not be exposed to the elements quite as much.

In the meantime, more lighter shades of green are building on the hull.  A reminder... this is all primer!  I won't have to worry about wearing the paint away on this guy!


For now, the roof is more of a black/orange mix, with additional blobs of the orange rust in key areas like the corners, etc.  I will be adding foliage to this section as well to break up the large, boring surface.


This episode draws to a close with a magnet sheet on the gun mount.  I want to be able to use the gun itself in an unmounted form for other games, so it is removeable. 

Stay tuned for the next exciting episode of painting the Pink Cadillac!!


Demos at Draxtar


As time moves along, and we make more and more trips to Draxtar Games in Batavia, I have started to figure out ways to conduct the sort of "spot demos" that I love so much.

These are literally spontaneous hobby combustion, where all of a sudden there is a group of folks watching a quick demo that I am holding on some aspect of painting.

With each trip we have made out to Draxtar, I have been able to figure out the best way to transport what I need for the kind of space in which I have to work.

These rapid fire scratch builds were done for a podcast which is being recorded later today.  I needed a few types of Laffly French trucks for a test game of Bolt Action.


The actual miniatures have not arrived yet, so I thought I would open up the laboratory again for a few hours and see if I could create something that looked like this out of a pile of pink foam pieces and plasticard.


Again, only a few hours was spent on these vehicles, which are more terrain than anything else.  They will probably be used as some kind of objective once we get going with the games and scenario construction.

The red oxide paste is normally used for basing and terrain, but I have also used it for corrosion texture on vehicles.  It also serves to strengthen the soft foam, and fill gaps.  There was little time spent on measuring anything... just cutting and gluing in rapid succession!


I wanted to demonstrate primer painting for all the Flames of War and Bolt Action players at Draxtar.  Sure enough, Rich, Rob, Paul, and a host of others were all there playing Flames of War!  


Here's the "Big Three", the primer colors from Badger.  Think of the concept in this way... if you have a red, a yellow, and a blue, you can make any color.  As odd as this sounds, the Black is my Blue, the Green is my Yellow, and the Orange primer is my Red.


I brought out a few beat up larger brushes, and set down to work.  In a matter of 17 minutes, I had all the surfaces not simply primed, but with plenty of rust and corrosion and even a little shading!


While that larger vehicle was drying, I did some more "primer painting" on a Flames of War Tiger and Char B Bis.  Again, all of these layers of 'paint' you are seeing are actually primer.  This means that it is very unlikely for paint to slough off the surfaces of these figures.


I often like to do these demos in "halves", so that the person can have a go at it themselves, but with one side as a template.  It's a little less daunting to try and translate that information to your own muscle memory. :-)


While those vehicles dried, I went back to my scratch built Bolt Action scale Laffly to demonstrate those same colors in a much larger size.  The principles are the same, but there are more elements that you can add in when it's twice the size... or more.


It was also gratifying to see those scratch built pink vehicles looking a lot like real miniatures!

I brought out some of the new Secret Weapon paints to do the camo patterns and even a touch of weathering.


This picture is probably worth a few words... if not 1000!  

It is these types of projects that I am trying to have on hand for the google hangouts.  I think that people could get quite a bit out of watching 30-45 minute spot demos such as these.

Obviously, I want to do more intensive class structured events in the hangouts, but to practice and perfect the platform, I'd like to begin with lower impact, more informal sessions like these.


Many more elements are to be added to the vehicles.  A great deal of freehand, foliage and weathering are yet to come.  I have not been able to experiment with leaves or even tree branches placed on vehicles as camo, so yet another experiment is in progress!

Another series of step by step articles will be done on the Laffly W15T tank hunter over the next few days, so stay tuned!!


Saturday, April 23, 2016

Chop Chop!


For this Mantic Games Salamander, I thought it would be fun to use the traditional turquoise color scheme that we have all seen on the GW Lizards for many years.


Ironically enough, I only painted one Skink/Kroxigor unit in that turquoise color scheme.


I have been trying to come up with a very different set of colors on each of these Salamanders, to show how the same figures can look radically different with a simple change in palette!


Stay tuned for the last of the two handed weapon versions... this guy will have some nice OSL on him!


Red Sonjia


Here's another Red Box Games warrior for you.  It's got the same red tunic as the other "elite" warriors, as these more heavily armored warriors have been designated.


Any time that you bring in that sort of a color with snow base treatment, there is a direct challenge in balancing that very warm color with that snow.  The red has to be "cooled down" as a result.


That works out for the best, as in the effort to cool down the reds, you are also muting them.  Blues and greens were used to shade the red in those shadow areas.  


That also kept the colors from getting to vibrant... too warm.  It's important to keep in mind that the overall environment that the figure is standing among will help you make a lot of your color choices!


Friday, April 22, 2016

Wolf's Bane, part 2


This is the second of the four new Wereshewolves from Raging Heroes.  All of them were quite amazing to paint, allowing me to try all kinds of interesting new color combinations.


The first wolf that I posted was in mostly cooler colors, as if to represent the figure walking around in moonlight.  As you know, I like to try new things all the time, so warm colors carry the day for this wereshewolf.


The dramatic posing means that I can do some very fun basing as well.  Bark and branch is a perfect method for matching the bits of rock that come attached to most of the set, and telling a story with the base.


Of course, the next wereshewolf is painted in yet another color scheme, so stay tuned!!


A Ghost of the Past


Here's one more Army of the Dead!

It's very fun to put the finishing touches on some of these figures, which have been sitting in a box nearly 80% painted for a very long time.


Just like the first couple of figures, I tried to vary the glowing colors.  Some sections are more greenish, but others tinted more blue.


I also added the semi-opaque glaze of the rusty brown shade, which was mixed with Vallejo flesh wash to get it down into all the crevices.


For an eternally cursed army, they are a lot of fun!

He's also here: