Wednesday, September 2, 2015

Calling the winds


This classic Iron Wind Metals figure was a practice run on some new paints.  I was testing them on transparency, opacity, and the way they would interact with some of my glazes, liner paints and clear pigments.


I also tried out the new fall foliage grass mix... that's always fun!


She's also here:


Tuesday, September 1, 2015

Bright Lights in the City


A few posts back, I showed you some images of the new boardwalk sections.  I also mentioned some house rules that we had created for them.

They were very simple.  Iy you begin and end your movement on the boardwalks, you get a plus one to your movement.  This is to represent the fact you don't have to "watch your step" as you might on the dirt road. :-)


From a visual standpoint, I was hoping that the streetlights would make the town have defined avenues, creating a "down the street" panorama similar to this!

I loved having the train station and the church at both ends of the street.  This main street is not any longer than the roads we have done in previous games, but it definitely makes it look more impressive.


These new sections clearly doubled the overall length of boardwalk which we had to work with.  However, as I postulated in that last post, the original short sections would be absolutely crucial to make other structures such as the buildings fit in much better.


Also, the hope was that figures could utilize those posts for cover.  In the past, when a figure attempted to take advantage of the additional movement, they were completely exposed to close up and long range fire.

Thus, such a rule has not been used in any game since.


This images shows the poles themselves on the street side, as opposed to being right in front of the building.  The idea is to create more opportunities for cover, especially from buildings on the opposite side of the street.

You can also see that I try to stagger the placement of those opposing buildings, so it's almost impossible to shoot from one into the other.  It will also do a better job of blocking those "hero" shots where someone shines a laser through 3 buildings and says "I can see him".

Adding the furniture to the interiors will also help with this a great deal.  It will certainly make fighting inside the buildings WAY more interesting.


I've also got some new structures which will spice up the town a bit.  The first I will add is the Blacksmith's shop.  It has some "outdoor" elements that should be right out of a movie!


I absolutely loved this view!!


If you look closely at this image, you will see some cards and miniatures out on the table.  Coming soon, you will see Episode One: Desperate Times, Desperate Measures.  It's a fight between the dreaded Outlaws and the Holy Order of Man.  Stay tuned!!!!


The testing continues!


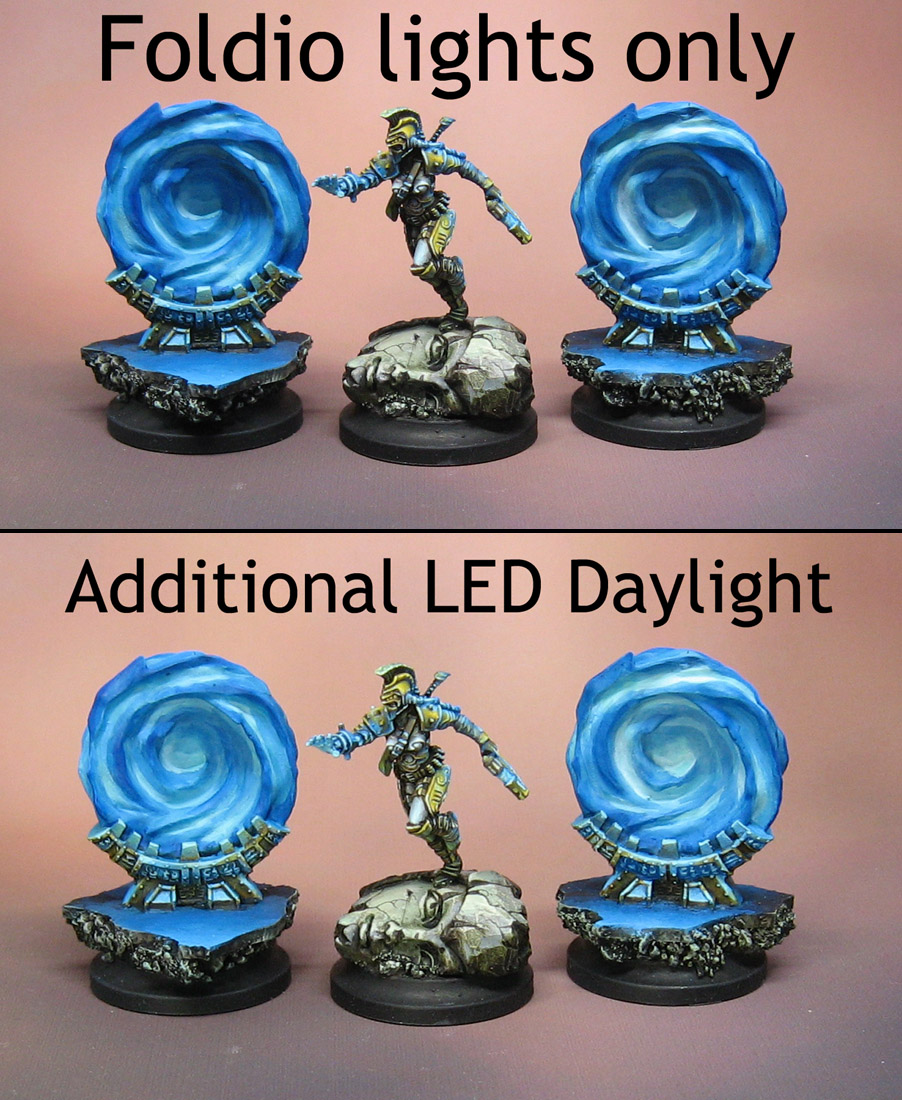
Here's another round of tests on the Foldio Studio.

These images were shot using my old setup, which I have determined should be used for large scale things such as group shots and terrain.


They were taken using my normal three light arrangement... one from above, and one from each side.

These three lights tend to eliminate the shadows cast by the other lights, depending on the pose of the figure in question.


I bring this up now, because the following set of images will demonstrate the advantages of the new Foldio studio.  The ability to raise or lower the intensity of the lights turned out to be a much bigger advantage than I anticipated.


My previous attempts at using these mottled backdrops had a tendency to burn out the middle tones of the figures.  The faded, misty backdrops did this a little less, but I wondered if the intensity pf my lights could be causing this.

I tried to move the lights further away from the figures, but that led to more shadows being created, both on the figure and on the backdrop.  You will notice here that no such shadows occurred with the Foldio.


Since I could dim the lights, I had a better chance to avoid that burnout effect on the mid tones.  Instead of moving lights around, I could tone down the brightness of the lights, and not add those shadows.


There's a variety of reasons I wanted to use these backdrops.  First, I hoped to create more of a theme with my images, but there was another practical matter.

Sometimes the figure I am trying to photograph has a great deal of the cyan, or sky blue color.  This tends to make the figure blend into the backdrop.  Many of the figures I have painted with the blue glow run into this issue to some degree.

It would be the same as if I were photographing the RJ-1027 glow on a reddish backdrop.

She's also here:


A side by side of two backdrops, with the one on the left having been done with the Foldio setup.


Monday, August 31, 2015

Where the Buffalo roams


This is one of the first "regular" miniature shot with the Foldio studio.  As I mentioned yesterday, I have been doing all kinds of tests with lighting, backdrops, etc.


The positioning of the lights does make it very interesting, as it is quite different from my normal setup.  After my last few sessions, I believe that I will use the Foldio for smaller figures like this White Buffalo from the WWX Warrior Nation.


Now that I am shooting a lot more large scale items such as terrain (as well as all those group shots!), I will try to keep the original setup in place for the 'big stuff'.  I have another post coming tonight with some side by side comparisons as I tried to see what would happen with the more dappled Hangar 18 backdrops, as opposed to the misty versions.

Stay tuned!


A New Chapter Unfolds


Some of you may have seen the original post that I created about the new Foldio portable studio, and that I wanted to see how it might work under a variety of conditions.  I have taken it on the road with me a few times since then, and learned a few things about it.

I will put a link to the original post at the end of this one, so you can see the unboxing.

In the meantime, here's what it looks like with one of the Hangar 18 backdrops in it.  I did have to trim it down a bit, and make some adjustments with the placements of the magnets that hold it up.


There are two bands of  LED lights, which have dimmers on them, so you can really control the amount of light that is emitted.


This is what I got when I took some pictures with the regular light bands.  They were set at around 60-70% of power.

While I liked the result, and the camera seemed to pick up good detail, there was a distinct 'shadow' which was cast due to the light coming from only one direction.

Normally, I like to have light coming from at least three different directions.

You can see some of my other posts regarding this in the photography section of the blog.


To compensate for this shadow effect, I brought out a few of my other lights which I use to shoot battle reports.  While the above image is fine for times where all I can bring is the photo booth itself, I also wanted a secondary area where I could get regular images.


Here's a side by side of images shot with the standard setup, and then with my extra LED daylight bulbs.  The lower image looks a lot more like my standard type of lighting.


Now for some views of the Judgment heavy support with the additional lights... shadows eliminated.


In this image, I moved the light further down, creating a different lighting.


Here's the link to that original post:


Sunday, August 30, 2015

The Gods of War


Crocodile games have been making fantastic miniatures for many years.

There are a wide variety of sculpts, of humans, creatures and more.  


There are a number of different genres within the line as well.  The original War Gods of Aegyptus, as pictured here in the form of the chariot and runners.


There is also the new War Gods of Olympus, represented by the female figure with the shield.


Each sculpt is very consistent, and they are always very solid.  There are not a lot of multi part figures... or at least that is kept to a minimum.  If it does have a few pieces, it is split in easy to deal with parts.


The line is all metal, which does appeal to me.  Heck, I still have my large collection of metal files, and they need something to do!!


Oh yeah... almost forgot.  For those of us who still like "Ranks and Flanks" style games of movement trays and blocks of troops, one version still exists.  That would be found here at Crocodile Games.


It's certainly something that I'm looking forward to exploring myself, and hopefully that will play out on these pages, just like my Wild West Exodus journey!


In the Urban War, you need an Angel


This figure was used to create the Freehand Designs video of the Painting Pyramid series, and it was just the perfect choice.  I could show a variety of designs, such as the pattern on the wings, the tattoos on the skin, and even the numbers on the base.


The Archangel figures have been a favorite of mine for many years.

Here's a link to the Urban War home page.  You can see more examples of their figures on the blog, as I also used some Viridian figures for the Painting Camo Patterns video, as well as some Junkers for painting reds.


She's also here: