Tuesday, June 16, 2015

Cloak and Dagger


Sorry this is so late, folks!  Between all the crazy storms and the Hawks, I was spending a lot of time turning off electronics and moving things to the basement as the tornado sirens were going off.


I thought it might be fun to have the Dark Sword minis all in one place, so that the various robes, foliage and color schemes could be compared.


Each one had its own unique set of foliage as well.


As for the cloaks, you can get an idea of how I like to carry through the shading.  Having the fine detail and wonderful sculpting of the folds was great, and made my life a LOT easier.


It's also important to have color variations on these relatively large expanses.  Sometimes it meant more gray, or adding some brown, or even tossing in an opposing color to create interest or tone something down.


The view from above definitely gives you a nice look at all three bases.


While all three of these were painted with a relatively muted color scheme, I was still able to get some separation between each one.  Some greens were a bit warmer and saturated, mixing in yellow to lighten them, while others had more of a grayish tone.


The view from above also demonstrates how I tried to get some additional contrast via the foliage.  The figure on the right is a good example, with the bright red flowers next to the muted green cloak.


I hope you enjoyed this set!  There are more Dark Sword figures on the way!!


Monday, June 15, 2015

Foliage and metal...


Here's another one of those classic Dark Sword figures. As usual, a lot of nicely sculpted details.  Not only does it make it easier to paint things such as the hair, face and hands, but the metal parts are also much easier to work with.


The tree is a fun piece of foliage, which is surprisingly resilient and tough.  It was just the thing I was looking for with this piece.


I also combined it with another vine set.  It seemed to go quite well with it!

She's also here:


Man on the run!


Or should I say Beastman.  Yet another in the Mierce Miniatures series.


I didn't realize that I was experimenting with a few different colors for skin tones, mostly due to the fact that I only used paint jars that were actually sitting in front of me ;-)


I don't recall any names of those colors off hand, but I can say that they were more saturated that what I have been using lately.  In fact, the yellows and the reds which I mixed together for the main base were pretty bright.

It was the use of the lighter seafoam greens which toned it all down, and kept it from getting too nuclear :-)


Sunday, June 14, 2015

Elegance in the West


When I first got this figure from Reaper Miniatures, I thought it was a neat miniature, and it would make a great civilian when I start playing my Warrior Nation posse in Wild West Exodus.

I didn't expect to enjoy painting it so much, or to get such an interesting result!

Since I want to introduce this greenish color to my official Warrior Nation figures, I was very pleased to see how the warmer 'kelly' green juxtaposed with the warm tans, umbers and siennas.


If I can continue these sets of colors on my hired hands Braves and Scalpers, I think I will have a very interesting looking posse!  Stay tuned.


Seeing the world in Miniature


That would be Miniature 13.  They recently launched a successful kickstarter, and they have been hard at work producing all the miniature since!

Here are two of the first miniatures, which were very nice casts!


You can see that having great concept art can lead to very nice figures to paint.


And here she is in miniature.  I made a base which I thought would continue the setting which was established by the sculpt itself.  I am going to paint her in these colors, which means we will have a very fun set of side by side images coming!!


It was very easy to get these figures assembled, which is always a plus.


And now a look at the other figure.  He is standing on a 40mm base.


You can even leave the cloak off the figure, so that you get to see all the work on the tail and back plates.


Another sculpt that will join the previous figures.  I love the lines on this!  There's a fantastic flow to the chest and arm details that will make them very easy to paint.


So, check out Miniature 13, and see what they are all about:


Saturday, June 13, 2015

Hoof and axe


Today we have the beastman champion from Mierce Miniatures.


It was fun getting to paint mass amounts of blood effects on the weapons of this group!


Three down, seven to go!


A surprise in every corner


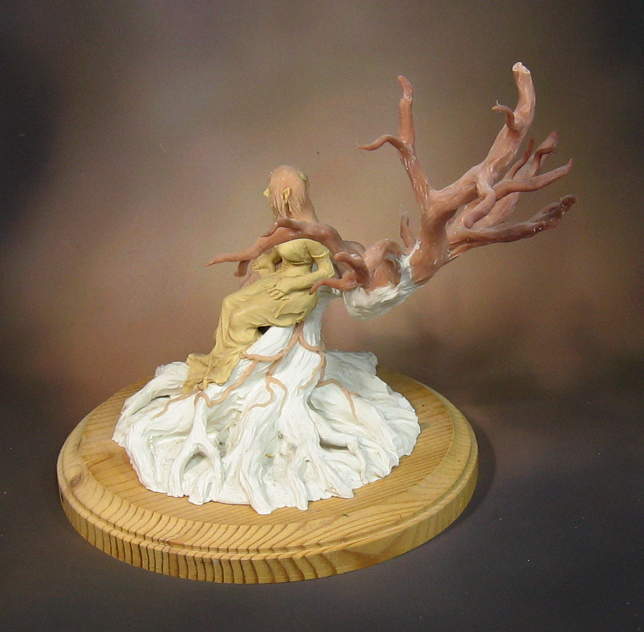
While I do remember starting this sculpt years ago, I quite literally bumped into it the other day when I was looking for something else!


I never finished it, but it probably had as much to do with lack of a finishing material, such as Apoxy Sculpt.  What you see in these images is a number of layers of sculpey over an armature.


I would approach this very differently now.  It would have been made mostly of tin foil as a solid armature, and wrapped in thinner layers of Apoxy Sculpt.  This would certainly have kept the weight down!


As it is, this is pretty heavy.  You can see that the back of this piece still has a number of layers to go.

Sculpey can be baked multiple times, as long as you are careful about it.


I was going to sculpt some fairy wings on the back of it, but I may or may not follow up on that.  Perhaps I could even make them out of a transparent material, as I won't be baking this any more.

Whatever additional sculpting to be done will be completed with Apoxy Sculpt and green stuff.


I will also be adding a lot of intertwining vines around the tree branches.


You will get a kick out of this... until I started taking pictures of these angles, I didn't even realize I had sculpted a face into the tree!

My guess is that I stopped working on this over ten years ago, so I think I can be excused for the memory lapse. :-)


The Apoxy Sculpt is a great material on larger scale pieces like this, since it is very easy to smooth it out by adding water to your finger or sculpting tool.  This breaks down the top layers a bit, and the surface becomes like a liquid.

So, it ends up with a very thin layer of 'slime', which dries very smooth.


It's also very strong, and it will lend additional strength and support to the sculpey sections.


I have a lot more experience sculpting smaller details now, so, I am looking forward to completing this at some point!


I have some of the "color shaper" tools which I tested last summer at Convergence.  Those will be very handy!!


I will be sculpting a lot of filligre on the dress and other areas, adding jewelry and possibly some leaf patterns.


The DVD gives you a sense of how large this is.


I will be sure to take lots of images of this when I do finally get around to completing it!

Stay tuned...