Tuesday, October 10, 2017

Have Club, will Travel


I am not sure who makes this figure (my guess has been Mierce), but it was an interesting one to work on.  With larger, open areas of exposed skin, I could try a few subtle color combos to make those places more interesting.  That meant including purples, blues, greens and so on alongside the warmer tans and peach tones.


While this was in effect a "limited palette" exercise, I used a full range of colors to make sure that some reddish colors were more or less saturated.  As I always say, contrast is not just light vs dark, or even opposite colors.  Temperature contrast and saturated vs grayed down colors also counts as contrast!


I think you can see in one of these images that the branch he is holding actually has a nest at the top, with eggs spilling out!  That was a hilarious touch, and there is even a bird sticking its head out of the branch.  Very cool!


Since I knew that I would be adding plenty of green foliage added to the base, I had to account for those colors while I was painting the figure.  You can see how the greens contrast against him, especially where the darker greens make the lighter skin tones stand out a bit more.


Monday, October 9, 2017

Heading into town


As we expand our early war Bolt Action locales, it is time to move from the countryside to a somewhat more urban environment, ultimately leading up to full fledged city style boards.

In this series, I will try to show how to build your terrain to take advantage of all the fantastic graphics that can be found on battle mats like this great cobblestone mat from TableWar.

I want to show how to make your terrain mesh as well as possible with the mat, but also be flexible.  It would get very boring if you simply set up the exact same table game after game!


Here is the mat that I am working with.  You can find that here:


Since roads are very important in games of Bolt Action, I wanted to create lanes for vehicles to move and deploy rapidly.  At the same time, I wanted to create "blind alleys" and other hidden zones that will make urban combat as hazardous as it normally is.

This town will have a variety of intact and ruined buildings so that I can rotate them in an out, and create very different environments using this single mat.  I have a modular church under way to go along with these structures.

You have already seen the series on how the ruined buildings were created and painted, that was a series that began here:


I will be making some "blocking terrain" as well, such as that crater.  How else would all those buildings be in such need of repair without having a few craters!  You can see that it also matches some graphics on the mat.  The ruined buildings will be concentrated in areas where the mat has images of wood piles and smashed stones.


There will also be plenty of places to hide, take cover and set ambushes.  The mat will be moved around in various directions to best take advantage of the modular buildings, as well as the walls and tree stands.


You can see these relatively wide thoroughfares... but my intent is to make some piles of bricks and other rubble which will impede movement through them.  Some of these might even be altered by extra sandbags, etc, to make a stronger fire position.

Those will be done as individual step by step articles, just like a post on how I made the telephone poles.


Matching the texture of the mat is very important, and I tried to do that on the 'bases' of my buildings.  In essence, this is a sidewalk.  I used a pen to carve in the texture of cobblestones, taking care to match the sizes and shapes of those on the mat itself.


It didn't tale very long to get this texture on the entire sidewalk, and I was very pleased when I set it down on the mat!!


When I got down to street level, I realized that all the little odds and ends that I will be using are going to add a lot to this scene.  I have furniture, street lamps, road signs, mailboxes and more!


The piles of rubble will also make a very tough environment for vehicles to move around unhindered.  I also have some fountains and other decorative elements which should make these open areas more interesting.


Stay tuned for much more on this terrain board, the buildings, scatter terrain, and eventually some battle reports!!


Sunday, October 8, 2017

The Old Timer


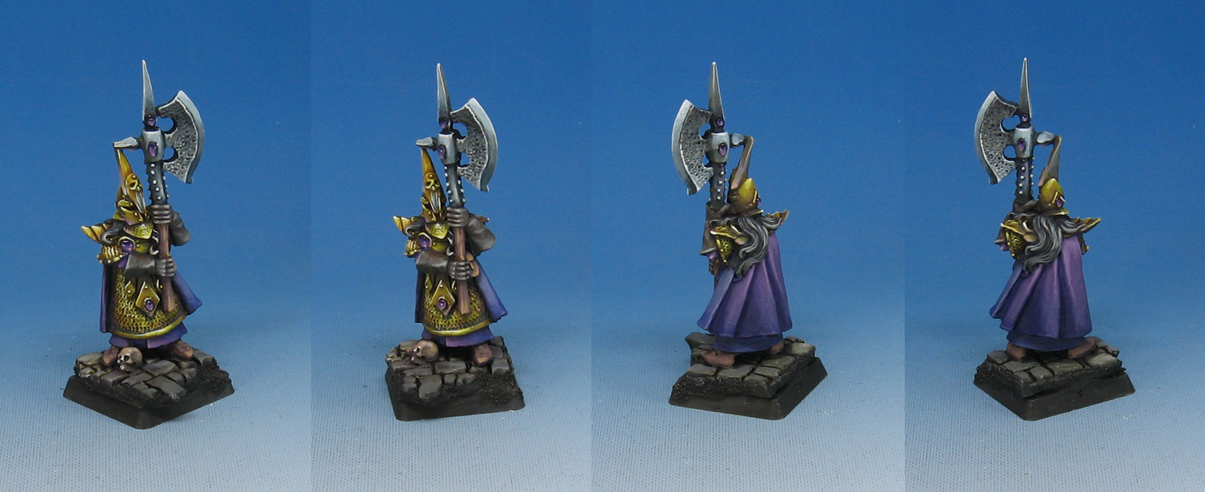
The previous ancient Dark Elf posting determined that these figures are indeed over 20 years old.  While it is very challenging to apply current techniques to something long since out of print, that is very interesting!

It definitely breathes new life into them, and forces you to adapt techniques that are normally used on something that it finely sculpted and cast.  The amount of detail and precision on a typical figure of today is astonishing by comparison.

These figures were also never intended for things like NMM, so finding those vital areas of reflected light and color are more difficult.


He's also here:


Saturday, October 7, 2017

Tangled Web


Black Scorpion Miniatures is a line that I ran across by accident, and I am very glad that I did!

They have lots of fantastic sculpts, from western theme (how I found them in the first place), pirate and even Blood Bowl teams.  The pirate figures are very interesting, since they have several factions.  The dwarf and goblin pirates have lots of character, as well as the undead pirates.


The female characters are also very fun, and this witch with her kitty familiar were quite nice.


You can tell that these were all sculpted by hand with traditional green stuff, which is also a rarity these days for companies making new releases!  Here's the website:


I thought that I would have some fun and make the cloak transparent.  This way I could add the spider web touches.  It posed a challenge with the skin colors, as the transparent black meant that the skin colors would be tinted greenish or blueish gray.  I had to ad plenty of pinks and purples to balance that out.


Friday, October 6, 2017

A Bird in Hand...


This massive bird from Mierce Miniatures posed all sorts of technical and logistical challenges.  First was tackling the basing.  He is originally meant to stand on a piece of resin, but that was going to be replaced by my "Bark and Branch" method.

I have a link to the original basing that was done on a facebook live session here:


Painting him was a challenge due to so many similar colors on so many broad surfaces.  Getting variety was key to keeping it from getting too boring!


I have a video on the initial painting session using the new Secret Weapon weathering paints here:


As usual, a lot of unusual color mixtures were required to create that interest, especially in those all important "Mid Tones".  This half way area between light and dark is where about 60% of all the colors on a figure tend to fall, which means that you have to play around with muted mixes of opposite colors, and incorporate greens and other tones that you would not ordinarily associate with feathers!


Thursday, October 5, 2017

Droud


As I have mentioned before, Siren Miniatures are packed with all kinds of details, and this was no exception.  It seemed like a very simple dwarf, until I started painting it!  Every time I turned around, there was another sneaky element lurking.


It does make it more enjoyable to paint when you have crisp detail.  I believe at the time I was also working on other much older figures that were just the opposite, where everything had to be "painted in".  That was no fun at all by comparison!


I used another Secret Weapon base on him, to make it seem like he was running over the body of a fallen foe.  As I was working on this, I was also painting monsters and historical figures... taking advantage of similar colors, even though the figures were drastically different in genre.


He's also here:


Wednesday, October 4, 2017

Attack of the Ents


This massive treeman was a challenge just to put together, much less paint!


I think there were at least 22 "branches" that had to be glued in place.  These had to be positioned in a way that was realistic, but also less likely to break.  I didn't want too many pointing straight up, or out to the sides.  You can see that more than one branch actually points downward.


The other reason I did this was to make the upraised "arm" seem more threatening, as opposed to a mere collection of branches among the whole canopy.  I used some Woodland Scenics foliage on the base and the branches.  This is the same material that I have been adding to my historical figures, especially the large gun emplacements and weapon teams.

I used my typical shaded basecoat/glazing method, the very same one that I used in my Painting Pyramid video series.  It is always quite ironic when I paint a treeman, as the figure that was used in the glazing video was in fact a treeman!

It was the perfect subject for a glazing video.  The best way to get the colors and shading down into the unending crevices is through glazing, and this also allowed me to shift colors rapidly and easily.  Endless layers of lighter colors would have taken a tremendous amount of time.