Friday, December 23, 2016

Dark Sister


I did a series of conversions to create Hecatrix Blood Brides for my old Dark Eldar army which were a lot of fun, and worked out pretty easily.  This involved chopping off the hands of a few metal Dark Elf figures, and putting a splinter pistol in their place!


It certainly created the effect that I wanted... they were certainly different from the regular Wyches, but conveyed the feeling they were a good deal nastier.


She's also here:


One more look from ground level!


Thursday, December 22, 2016

A few Steps


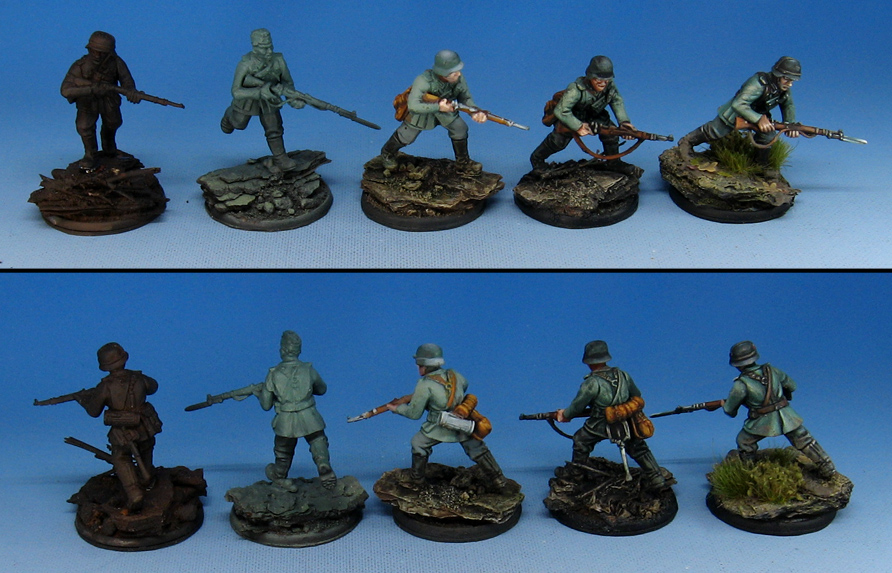
This article is basically a preview to future, more genuine step by step articles that I will be working on.  I realize these figures are all different poses, but thus is the nature of Bolt Action armies!

None of my figures have two poses or equipment sets that are the same, but that's almost more important, because you need to be able to adapt and translate a color scheme across a wide variety of poses to paint an army... just like this early war Heer force.

In this image, you see the most basic steps side by side, from the initial primer painting to the glazing to the finish.

The "center" figure shows the ends of the Shaded Bascoat stage.  This is very crucial, because from there I work with a variety of glazing and tinting to get to that all important uniform color.


When I first start applying the primer, I am using a Badger airbrush, mixing the Badger black and orange primers together.  This creates a default underpainting, which I can let show through, or paint over completely if need be.


The next stage is done by running a few different primers and colors through the airbrush, depending on the army.  Since the early war Heer are in the field green, I emphasized those colors more, creating a lighting pattern along the way.  I worked in lighter shades, mostly with various primer colors.

Badger has six different primer colors, in black, white, grey, yellow, green and orange.  This means you can get a wide array of colors, using nothing but primer!  Heck, it worked so well on the vehicles, I thought it would be just as effective on the infantry.


To get to the Shaded Bascoat stage, I went in and added mid to light tone colors in specific areas, such as the rifle, face, hands, and other equipment.  This takes very little time, but is great for setting up those later glazes and tints!  I can also use the greenish colors as the underpainting, making the skin colors seem more realistic.


The fun really begins with the glazing!  This is where I can not only add shadows and darks, but tint the uniform parts as needed.  For instance, a blue/black glaze was applied over the helmets and the boots.

This is a much faster way to paint armies, and it means that you don't have to sit there and struggle as you are layering up paint on 10-15 figures at a time, hoping that your paint does not dry out, run out, or the kids are trying to set fire to the dog, etc.

I get interrupted in my projects all the time, but I can step away for months from a given project and never lose my place, so to speak.  I can pick up where I left off, no matter where that might be.


To finish off the figures, I go back into the middle tones, add a broader array of tones, more highlights, and make other adjustments.  I also add any decals or freehand insignia, the mud effects, and so on.

Last but not least, the flock!  Again, I will be doing several more articles on these various stages, along with google hangouts and you tube videos.


Here's a side by side of the very beginnings and the completion.  It's amazing how just a few key steps can make a very fun result, and not drive you insane along the way!  I have had a great deal of fun painting all of these historical figures, to which the Shaded Basecoat and glazing methods are extremely effective to render.  Stay tuned for much more...


Wednesday, December 21, 2016

Mighty Stripes


This pattern of markings was an experiment for the Skink and Kroxigor unit that never was!  I loved my Skrox units, as I called them (they were also referred to as the Foot Cavalry).

I liked the idea of the stripey Skinks, but the pattern proved to be too pesky to translate to the various types of Skink figures that would be in the unit, as well as the Kroxigors.

At that time, only the old metal Kroxigors were available, and this pattern didn't work very well on those sculpts.  The amount of thick heavy scales and spikey bits made it quite impractical!


There were a number of these older Skink archers that were given sculpted shields, like this fellow!

Here's a little peek at what my Skink and Kroxigor units looked like:


Tuesday, December 20, 2016

The Wolverine


This Mierce beast was quite a different challenge for me.  When I first saw the figure, I thought it was a bear, but I was told that it was in fact a wolverine.


I had to do some Google searches to locate reference images of those wolverines, which have some unusual markings.  It was tricky to translate those colors to this specific sculpt, since wolverines have more of a badger shape, and less like a bear.


Painting this lighter "ring" around the shoulders and haunches involved a few color transitions, blending reddish browns and tans into that lightest color.  This is where the difference in shape was problematic.


I'm sorry that I didn't include any of those reference pictures in this post, but I figured that you could get a wider array of pictures if you conducted your own google search.


The face was pretty nice, though, and the claws were in a nice pose too.  These ground level views show that off nicely!


Monday, December 19, 2016

Maximum Effect


This machine gun team is part of the early war BEF that I have been working on.  It's the first of the completed weapon teams, and yet another example of the Mig AMMO mud applications.  As I have mentioned before, this adds a great deal of additional texture.


Adding the mud and spatter helps to make the figures appear more in tune with the scenery, since that same color and texture moves from the ground to their boots and so on.


Once the foliage is placed on top of this mud, it looks even more natural. 


There were a lot of extra shovels in the plastic British kit, so I used them on the weapon team emplacements.  The idea was to make it appear that the position was freshly dug.  I found right away that the AMMO heavy mud piled up in the area around the shovel is very convincing as freshly turned earth!

To make it even easier, AMMO has various heavy mud products... including turned dirt!  Very handy!!


Sunday, December 18, 2016

This Little Piggy


The Mierce Miniatures big critters return!  Once again, all part of the massive army painting that involves figures from a number of different companies.


He is relatively large, since he is standing (or leaping) on a 60mm base.


The base was made with tree bark, with Vallejo stucco medium spread out to create snow piles.  Just like the previous winter bases, I had to match what had gone before.  This meant that I could not use the crushed glass method or other techniques.


You can get a better look at those in these views.  


To see more of the Mierce Monsters in that section of the blog... here's a look at some from the past:


Saturday, December 17, 2016

Sister Power


We have one more Sister Seraphim from the old Adepticon 2014 tournament army!  This is an out of print figure from the I-Kore VOID range.  I don't believe this is part of the Archangel set, however.


As you can see, the wings are done quite differently, with a harsher, more angular design.


The base is the same green marble on which all of the sisters were based.  A very fun set to make!


She's also here: