Sunday, December 18, 2016

This Little Piggy


The Mierce Miniatures big critters return!  Once again, all part of the massive army painting that involves figures from a number of different companies.


He is relatively large, since he is standing (or leaping) on a 60mm base.


The base was made with tree bark, with Vallejo stucco medium spread out to create snow piles.  Just like the previous winter bases, I had to match what had gone before.  This meant that I could not use the crushed glass method or other techniques.


You can get a better look at those in these views.  


To see more of the Mierce Monsters in that section of the blog... here's a look at some from the past:


Saturday, December 17, 2016

Sister Power


We have one more Sister Seraphim from the old Adepticon 2014 tournament army!  This is an out of print figure from the I-Kore VOID range.  I don't believe this is part of the Archangel set, however.


As you can see, the wings are done quite differently, with a harsher, more angular design.


The base is the same green marble on which all of the sisters were based.  A very fun set to make!


She's also here:


Friday, December 16, 2016

Chillin' Out


The deep freeze outside the front door moves inside with another winter German infantry figure from Bolt Action.  These guys are extremely interesting to paint, and a fun change from the large amount of early war Heer infantry.


The usual method of Shaded Basecoat and glazing was used, but with a slight twist... I had to be sure that I set up effective zones for the placement of the snow effects.  This meant setting up some darker areas, obviously, but also a few places where the color was warmer or cooler.


If I wanted to get some contrast between the snow and the figure, but not have too extreme of a difference in the light & dark contrast, I could make the clothes a warmer color, thus presenting a contrast in "temperature" to the cooler, more neutral snow.


I am also attempting to apply this methodology to applying snow on vehicles.  These guys are a bit simpler to take on first!  Since I have spent a lot of time over the years walking around in large and small snowstorms alike, I have tried to mimick what I have seen on my own clothes.

It's remarkable just how much snow can accumulate on a person in a few minutes!  Ironically, the better insulated you are, the more that snow will pile up.  That principle is represented here by the snow piled up on his pack, hat, and other surfaces facing the sky.

The outside temperature and the consistency of that falling snow will affect the sticking power of that snow, so I am trying to determine in my mind what those conditions are for the entire army.  Is it around 25-30 degrees, or is it a much colder 5-15 dergree snow.  Those are quite different!

I am constantly amazed at how the lightest of snowfall... just a fraction of an inch, can turn the entire city white if it is cold enough.

Stay tuned for much more on these winter armies!  Soviets and even Americans await....


Thursday, December 15, 2016

Sauron's Champion


One of the interesting elements of the Lord of the Rings game was the workings of cavalry.  In addition to a more accurate representation of the power of a cavalry charge, death was not automatic for both rider and horse.


This was even more pronounced in shooting, where it had to be decided if either the horse or rider were hit.  If the horse was indeed struck, the rider would dismount, instead of instantly being killed.  However, this meant you needed something to represent that character on foot!

This is that representation, mirroring the weapon, shield, helmet and the freehand designs on the back of the cloak.


This group was particularly dedicated to Sauron, so the Eye came to battle along with them on the cloaks of their leaders.


I went with a bit of an alternative color scheme for my Easterlings, using this deep blue robe to designate special characters, leaders, etc.


Wednesday, December 14, 2016

Temple Guard


This Saurus Temple Guardian was made with a few different kits and bits.  The body is that of a 'regular' Saurus warrior, with the head and shield from the Temple Guard sprues.


The weapon is the shaft of a normal Saurus warrior, with the Temple Guard piece on the top.  The Temple Guard arms were far too beefy to simply use their original halberds.  It would have been impossible to make that look like it belonged... a bit like a Saurus arm on a Skink!


So, this was a fun way to use up bits that I already had, and extra Saurus bodies that were no longer needed.  It also made a nice, unique pose for a Temple Guard unit!


He's also here:


Tuesday, December 13, 2016

Tank Buster II


This was a very interesting combination project, which utilized the 47mm Anti-tank gun from Mad Bob Miniatures and some converted metal French miniatures from Warlord Games.


The crew figures are converted from the standard  French infantry box.  One of them was loading a rifle, and with a bit of cutting and chopping, I was able to place a shell in his hands!


I borrowed a few other hands from the plastic British infantry set, such as the pointing hand for the gun commander.


I have done a few other articles on this piece, showing how I made the base, and images of the unpainted, converted figures.  The shells that you see on the ground are polystyrene tubing, which was cut and filed to shape.


Prior to the application of the foliage, I used the Mig AMMO mud products to create that second level of texture.  I have discovered that placing the lighter and heavy mud on the bases is very distinct from the painted sand and gravel, and has such a similar feel and texture to actual mud, I just had to use it!

This can look extremely muddy, but that is toned down once the foliage is placed on top.  At that point, it is more of a suggestion of upturned dirt and mud!


I leave you with these final images.  Once again, I suggest checking out Mad Bob Miniatures, for all sorts of early war vehicles and artillery pieces!


Monday, December 12, 2016

The 300


Time to check out the next color scheme for the Gates of Antares Algoryns.  Once I started making bases using the mosaic tile texture roller from Green Stuff World, I thought of this Spartan Hoplite theme.  

Just like the previous ice theme, the faceted armor is ideal for some gold/bronze non metallic metal


The keys to the NMM technique are not very complex... high contrast and lots of reflected light/color.  You can see in these images that parts of the metal appear reddish, while other areas are a greenish gray tone.  This is the kind of thing that makes the armor look metallic, as opposed to nicely shaded yellow armor.
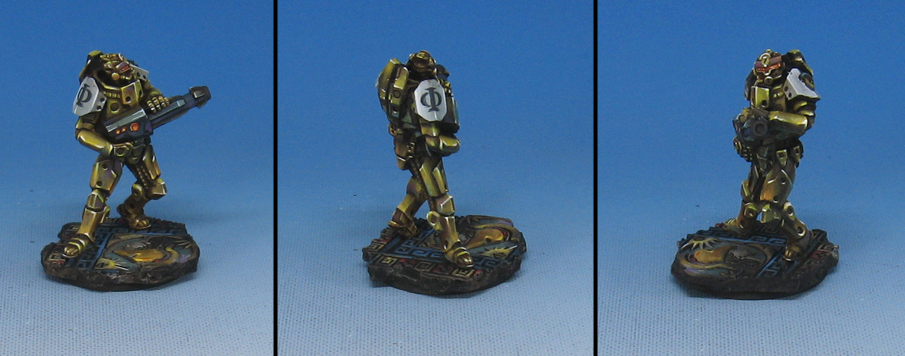

High contrast is also essential, as is reflecting the "environment" around the figure.  In this instance, the base.  These views give you a better look at the texture of the base.


The shoulder symbol was taken from the base, of course.  There are enough textures available from that mosaic tile roller to create unique bases for an entire army!


Here's a few ground level views to show you the shading and glazing of the armor on the legs.  Just like the armor on the back, the tones change from reddish to greenish.  I even used some fluorescent paints in the mix to give the colors and extra boost.  That is vital when you want to indicate gold, which tends to be extremely vibrant.