Friday, May 6, 2016

Roll out the Runes!


I think it was about a month ago when I profiled the new Green Stuff World texture rollers, and I never got a chance to post any images of the first test bases!

Right now, I have about 6 or 7 different texture rollers.  This was the first batch, purchased directly from Green Stuff World.


For the demonstration, I wanted to use a stronger, firmer sculpey clay.  The gray extra firm is perfect, because it is not rubbery like the Sculpey III.  While it is more robust than the original white sculpey that I normally use, it is still designed to be carved somewhat easily.


Here's a quick review of the process.  I rolled out a slab of the clay onto a ceramic tile.  This is a much better surface for baking, as it won't make your cookies smell like sculpey, which baking on a cookie sheet will do.  Also, those tend to flex and the sculpey gets too hot.


I did the usual sculpey shelf style bases as a quick test.  I have some cork underneath the sheets of broken sculpey.


You can see that I was able to make a number of bases, and still have clay left over!  I also added some sand and gravel around the edges and seams.


A few Secret Weapon skulls were added for some extra imapct!


I have a few ideas for painting these bases.  I want to try some glowing runes on a few of them... at least the ones which are underneath a magic user! :-)

There are many more articles to come, showing additional textures and more complex/elaborate basing methods.  I just wanted to get these on screen for you as quickly as possible!


Thursday, May 5, 2016

Colossal Chaos!


Here's an interesting figure from a while back.


I wanted to take some new images with the backdrops and photo booth, hoping to capture many of the details which have not shown up in previous attempts.

This is a massive 72mm figure, which required me to sculpt a substantial base for it.  It was made out of apoxy sculpt and green stuff.


I was attempting to represent all four of the chaos gods, not only in the freehand on the figure, but in the base as well!  Hopefully that all shows up in these new pictures.

The obvious design is to the Blood God, but there's also a hint of Nurgle down at the foot of the base :-)


This side shows the Slaneesh influence in the freehand, but there are some Tzeentchy tentacles on the base too.


It's harder to see, but on the horses fur I attempted to do some light blue spots to get that Tzeetch influence on the mount itself.


The view from above gives you another perspective on the base...


While these low angle views give you a sense of how gigantic this is!


I tried to include a variety of tones on the sword blade, and on the skin tones of the rider.  A little bit of everything went into those!


One more peek at the Khorne and Slaneesh freehand...


And a shot that lets you see a bit more of the rider's armor.


To truly show you how big this is, we have a 28mm Lord of the Rings elf in the picture.  That is, if you can even find him :-)


Wednesday, May 4, 2016

Draft Day


Every Blood Bowl team needs a good thrower, and look who just got himself a top slot in the draft!


This was an old metal Warhammer Orc, who had some 40k pieces added.  The arm and plume were from the 40k side, and the ball was sculpted from green stuff... curing while I sculpted the robe/tunic.


He had a lot of dynamism to the pose, so I had considered a blitzer position for him, but his lack of pre-existing armor made me think he would represent the lower armor thrower a little better.


We shall see how this latest addition does out on the pitch!


True converts: the old made new


This set of Kabal warriors might have been my favorite unit in the whole Dark Eldar army.


At the time, the new Dark Eldar figures had just come out, but I had a large batch of sprues of the original plastics.  Those definitely showed their age, but I was curious if the two sets could be combined.


There were a few reasons I wanted to try this... not the least of which was cost savings by stretching out the special weapons!  If I could put the additional special weapons on the older figures, I would have that many more of the new versions to fill out numbers.

However, I ended up using more and more of the old timey figures!


By combining the little bits like knives and blade points, I could make them quite spikey and nasty!


The new heads also fit well on the old versions, which was great!  I could also put the new arms and weapons on these old frames, and that made me very happy!


I loved the old head crest on the helmets, so those were saved for officers.  It made for a very unique looking unit.


One last view of the Kabal Warriors.  The older legs and torsos also allowed me to put more of that critical freehand pattern on them, and thus I could match all the other parts of the army... vehicles, grotesques and such.

I do have some group shots of the Grotesques, so I will get you those images too!


Tuesday, May 3, 2016

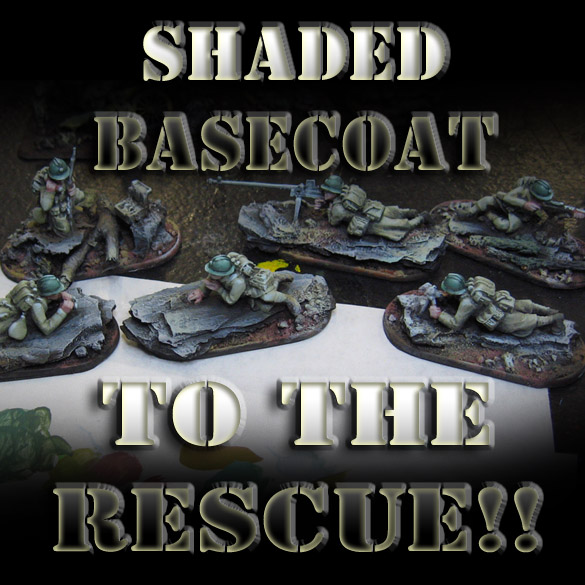
Shaded Basecoat to the Rescue!!


You have all heard me go on and on about Shaded Basecoat, and the many reasons why I use/developed this technique.

The list is pretty long... increased speed, simplified color palette, you can be interrupted for long periods with less consequence, and more.

I'm going to profile one of the reasons which is discussed less, and that's when you don't have the "correct colors" at your disposal.  In this instance, I completely forgot all the paints that I wanted to bring to our last Draxtar excursion!!

I was not a happy camper, because I had set up most of what you see here when the unfortunate discovery was made.  There was even talk of turning around and heading back.

However, there are some paints on a carousel available for people to use, so I thought this could be a teaching moment for all involved!


I grabbed what I could find that I thought could be useful.


I figured it might be best to focus primarily on some of the Bolt Action special weapon teams.  I took the reddish flesh tone and did a little application on the bases as well as parts where skin was showing.


That was lightened with the only light colors that I had, which was the seafoam green and a very light blue.

I also took the grey color, mixed it with a little Secret Weapon blue wash to tone it down, and began working on the rocks.


You can see that I am developing the rocks and the weapons with that blue/gray mix.


Once I had the grays as light as needed, I started to mix up some colors for the greatcoats and packs of the soldiers.  A brownish green is required, so I mixed a mid tone and then made it lighter with the seafoam green.

For those not familiar with the Shaded Basecoat, the idea is to start at the halfway point between the lightest and darkest colors, and then lighten it with simple mixes until you reach your highlights. 
Keep in mind, this is not drybrushing, and I am working with the bigger #8 round craft brushes. 


A little more shape emerges as I get lighter and lighter on the coats and packs.


As I reach the highlight color on the coats and such, I must always be mindful of the next stage... that is, all the glazing and tinting which is to come.  The Shaded Basecoat and Glazing go hand in hand.


As this article has shown, I have used very few colors, and done very simple shading.  All the complexities come in through the glazing, which will not only get me the darker tones, but allows me to tint things like the coats and packs to be more brown or more green with simple tinting.


The helmets are a basic blue green, and then lightened with the light blue.  All the while, I am trying to be aware of the future glazes...


We now reach the end of that Shaded Basecoat phase.  This, along with the Glazing techniques, are available on video directly from me via USB drive or dropbox, and also from Kings Hobbies and Games.

Those videos go into great depth on both techniques, and show you new ways to approach painting your minis.  You can contact on facebook if you wish, or through the blog!

Stay tuned for much more!


The Red Wave


Hey, it must be time for some group shots again!  Fun times in the photo booth with a batch of the Red Box Games figures.


There are more figures that are part of the group, but this is what I could fit easily into the booth.


I added a few of the command figures in these shots...


The view from above shows how I tried to balance the warmer colors of the tunics with the snoa and metals.


This set shows the female characters...


And the guys.


One more look at the command figures!  There are still more to come, so stay tuned!!