
As you loyal Wappellians know, I don't often get the chance to paint in two dimensions!
This was a very unusual painting for me, since it was in a style that was definitely not mine! The one time I do a 'regular' painting, and I use an entirely different method. Go figure.
There have been times where I have, in the course of my miniature painting, been asked to replicate the styles and techniques of other painters who had worked on previous minis as part of a big project, and so on. It's never easy, since you have to try to discern what they have done, and how they did it, by strictly looking at the final result. Again, never an easy task.
I knew this would be a very interesting challenge for me!
Things got started with some yellow, yellow ochre, and a little Cadmium red (makes if go fastah!)
Working quickly, and with one of my worn down #8 miniature brushes, I set down the darker reds and oranges first, and worked up to lighter yellows...

Look familiar? Sometimes, the more things change, the more they stay the same. :-)

I worked the yellows even lighter with the introduction of some titanium white, trying to keep that 'layered' look, but avoiding the temptation to smooth out and hide every brush stroke! I had to constantly remind myself not to do that.

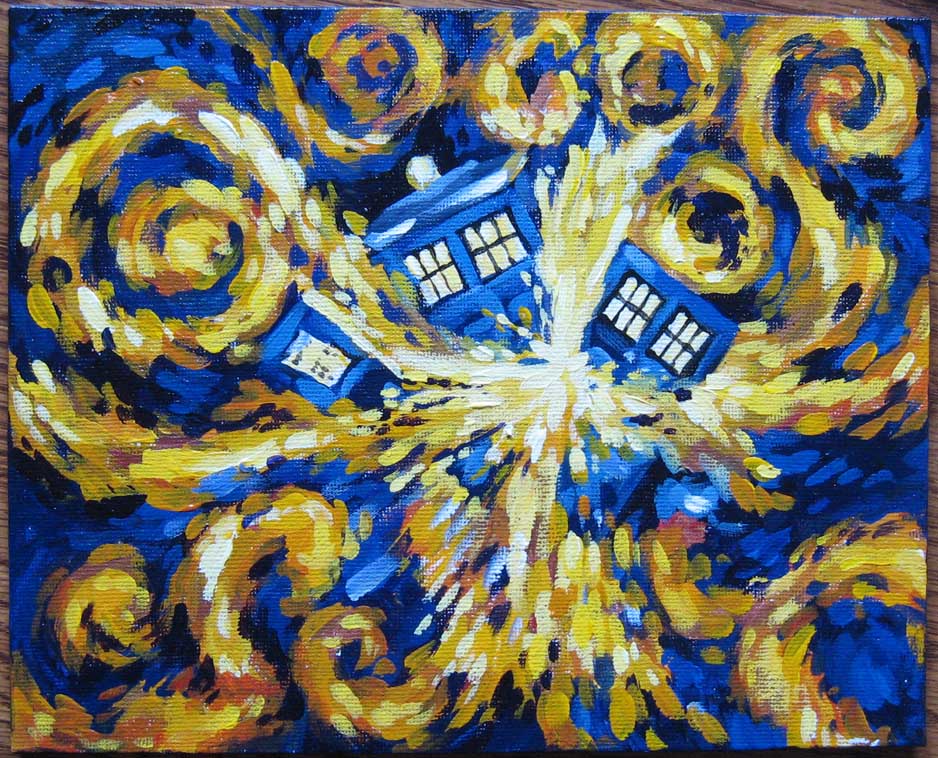
Now it was time to get some of the darks in here. I had some deep purple, cobalt blue, and cerulean blue. You can see more of the lighter cerulean blue in the Tardis, while the purple was used in the 'sky' portion. This was important, since the purples in the blueish sections would mesh a bit more with the reds of the spiraling flames...

Almost completely covered. You can see that I used 'negative space' painting around the spirals, meaning that I painted around those lighter areas with my dark colors. This is actually a watercolor technique.

OK! Time to work on that Tardis! I mixed in some white with the cerulean blue to pull out the door shapes, and worked on the windows. I did make sure to get just a touch of yellow into all that, to keep the white from being chalky, and to reflect the explosion a bit.

I went back into my red/yellow mixes to blend in the spiral flames with the darker purples.

Here I put in some more sharp dark edges in places to define the explosion a little more. I wanted the hardest, sharpest edges to be in that center of interest. This can (and should) be done on miniatures as well. I always try to establish "focal points" such as these.

A little more blending, a little more light yellows added to the firey spirals.

I work some more lighter blues into the sky portions, creating a little more depth, and following the directional strokes of the yellow/orange spirals to reflect and enhance that motion.

Some more lights introduced in various areas for interest, a coat of gloss varnish, and POOF! Exploded Tardis, Van Gogh style! :-)
That is one of my all time favorite episodes of Doctor Who.
ReplyDeleteAh, it was far and away my favorite. :-) Can't get enough of it!!
DeleteYou are taking commission from Daleks now ?
ReplyDeleteThe economy is hard these times..
Exterminate resin as a miniature manufacture substance? Yes!
DeleteNice replication! I trust the paint is piled thick and high in true van Gogh style.
ReplyDeleteYes... that's what made it such a challenge! Tried so hard to hide them...
DeleteOh wow, this is awesome work! Best Exploding Tardis reproduction I've seen!
ReplyDeleteSome questions: What kind of paint did you use for this? And how long did it take you to do this?
Awesome, awesome work! I wish I could paint like this.
Many thanks!
DeleteI used standard acrylic paints. It was probably 2-3 hours to paint...