Friday, January 13, 2017

Making a solid case


I am often asked how I transport all these armies of mine around, so here's a peek!

Long ago I tried to do the foam case thing, which was expensive, time consuming to pack and unpack, and kept everything inside completely invisible.  This would sometimes lead to me taking the wrong army, or worse yet, an empty case!

The stuff inside was not very well protected either, because the act of taking them out and packing them back in again rubbed the figures against the foam, with the result you would expect.

It also took forever to pack things up, as I had to remember where each figure went, like Satan's jigsaw puzzle.

I think it was 2009 when I began magnetizing my armies, and putting pieces of metal or something for them to grab onto in cases.  When I was introduced to these stacking cases from Sterlite, I thought that they could be pretty amazing.


These are pretty roomy (you will see when they have figures inside), and interlock very well.  They come in a set of two, just like this.


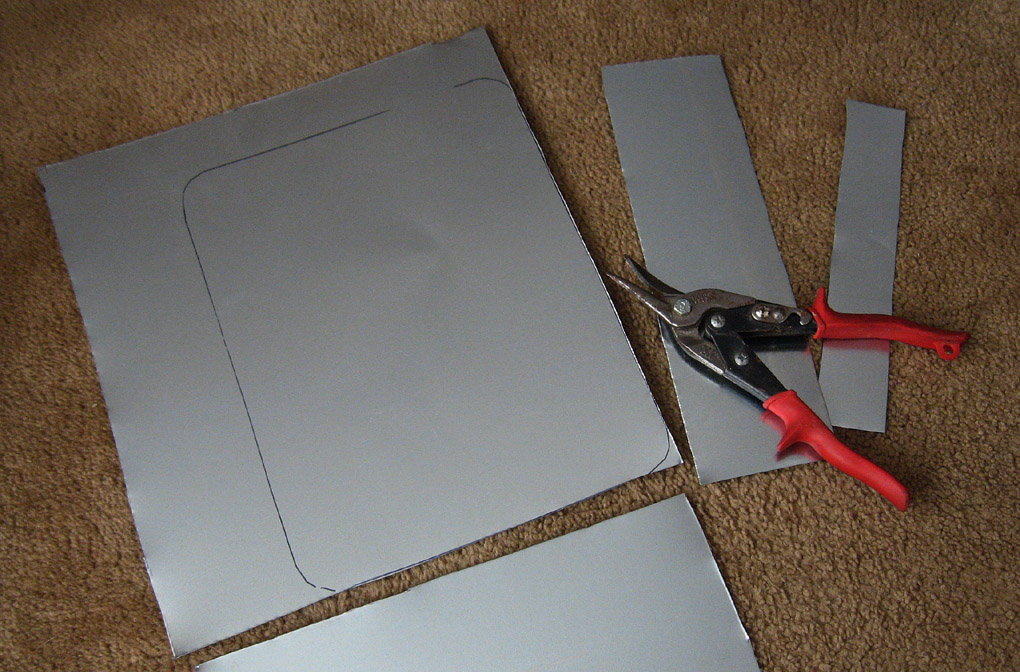
When we had our furnace replaced last winter, I took minor solace in that I was able to "requisition" a large chunk of left over sheet metal.  You can find smaller pieces at any kind of home improvement or hardware store.  There are even pieces of metal at Hobby Lobby these days.

A pair of tin snips is all that I needed to cut them.  I have a few "directional" tin snips left over from construction days many moons ago.  These bend the metal in a certain direction as the snips cut through the metal... especially away from your hand holding the snips!


Since I wanted the option of using these for other tasks, I attached the sheet metal to the case with heavy double sided tape.


Success!  Sheet metal solidly ensconced in the case, ready for magnetized miniatures.


And voila!  Army guys!  Specifically Norwegian and French Foreign Legion troops from Gorgon Studios.  There are over forty figs in here, with room for many more.

I will do a separate article on magnetizing the minis, but for now I can say that refrigerator style magnet sheets work very well.  They have a self stick backing, and they have the correct 'balance' of holding power.

That is, they stick just enough to keep the minis in place, but not so strong that you will rip the figure from the base!  Believe me, that has happened to me with other much stronger magnets.


Now for some armies.  You can easily fit 1000-1200 points of Bolt Action figures in just one case, or a few Warmachine armies, etc.  Definitely enough to hold a few Blood Bowl teams as well.


Since I can see through the boxes, I can tell from a distance which army is inside, and I can take the one that I need, instead of guessing or having to write on the case.


It is very easy to deploy an army directly from these cases, and also put them back in.  Since there is minimal handling, you probably give years of additional life to your hard earned paint jobs!


Did I mention stacking?  Yes you can, and in any order.  The tops will fit on any other Sterlite set.  I have gotten these at Target, but also on Amazon.  

One piece of advice I will offer is to be aware of weight.  Stacking 5 cases filled with metal minis will be very heavy, and put a lot of strain on the handle.  If I have a bunch of cases with me, I use a very small folding luggage trolley that holds them all together, and means that I don't have to carry them around by the handle.


Another advantage of that stacking ability is space savings.  I have made a stack of containers 12 cases high, which takes up almost no room... but holds hundreds of minis, vehicles, paint, brushes, tools, rulebooks and much more.

Better yet, these cases usually cost around $10 per pair!!


Thursday, January 12, 2017

Foot Sloggers


An army needs more than just vehicles... it needs boots on the ground!

In this case, another early war Heer infantryman for the France '40 campaign. 


I used the Mig AMMO mud products on both the uniform and the base, a process which you saw in a step by step post a few weeks ago.


Here's a peek at the base, with some Hangar 18 foliage added.


More of these lads will be showing up in Google painting Hangouts, so stay tuned!


Wednesday, January 11, 2017

Saurus Fury


Here's another Saurus warrior, mounted on a base made with the Green Stuff World Mayan ruins texture roller.


The green/tan scale color was one of the very first adopted for the old Lizardman army.  Back then, each Saurus unit could be given a 'mark', which would change their combat stats.  

For instance, I wanted to give one unit a mark that would have made them frenzied in close combat.  That unit was going to be painted in a blueish black with glowing orange weapons.


This unit was going to have a mark which would make them aquatic or move through forest more easily, hence the green coloration.  These views give you a better look at the base.


Once more, here's a look at the original Shaded Basecoat technique!


Tuesday, January 10, 2017

Oil and Steam


Well, I don't have all the images from the oil glazing stage, but that's because I had no idea this would turn into a step by step when I was painting it!  

This is more about another concept, and that is painting with 'regular' acrylic paint over oil washes.  Some people were very quizzical when I told them that I was using oil and acrylic at the same time on figures.  I thought this might clear things up a little.

In a sense, oil and water can indeed mix...


When I did the oil glazes, I had the usual Shaded Basecoat setup, with the lights and darks already laid out on the figure.  All I was doing with the oil washes was shading and tinting.  This was done with a mixture of filters, panel line washes, and darker washes.

These glazes were done exactly the same way as I normally execute my acrylic glazes, but with a key advantage.  With oils, the drying time is quite extended, and this allows me to remove any amount of that wash that I please, thus revealing the lighter Shaded Basecoat beneath.

Now for the nifty part... when I began using the standard acrylic colors over these oil washes, those washes were still quite fresh, and definitely not dry!

You can see that it is possible to paint right over those washes.  I discovered that I gained a major advantage in the ability to push around the acrylic paints once they had been applied, because they were "sliding around" on a film of oil. :-)


Yes, I know this sounds crazy, but it was something I had discovered by accident when I was working on the Bolt Action vehicles.

I was able to keep right on adding layers of the acrylic paint, and I was also able to maintain the darker, more worn feel.


As I started adding more lights to the metal surfaces, I had my oil washes still wet on the palette, which meant that I could always go back in an glaze over the top of the subsequent acrylic layers.


I did that in this image, using that splotch of greenish brown wash that is to the right of the figure.


As more lights are added, things begin to take shape.  I only used 4 acrylic colors to paint the rest of the figure, as the previously applied oil washes had provided most of the tinting!


In areas where I wanted a more distinct color flavor, I introduced some very opaque acrylics.


I continued to take the still wet oil washes and use those to continuously tint my lighter acrylic applications.  This is very evident in the greens of the cloth.  The oil glaze was a great shade of warm, dark green (normally meant for tanks) which really worked well.


Here he is, nearly complete!  I continued to add more spectral highlights, along with a few darker shades in the deepest shadows.


Purples and pinks were introduced around the face and certain parts of the musculature to provide a little extra interest, and act as a compliment to all those greens.  By the way, purple and green mixed together is my favorite way to create interesting grays!

By combining those two prevalent colors to make a gray, more color harmony was gained, as opposed to simple grabbing a jar of gray paint.  A major advantage in mixing your own colors!


I used a few tall grass tufts from Green Stuff Word for a little texture, and add some warmer, lighter colors to the rocky base.


I hope you enjoyed this very unusual article.  You can see the very simple means used to create what seems like very complex effects.  Some craft brushes, a makeup applicator to remove the oil washes, and so on.

Stay tuned for much more mixing of oil and water!!


Monday, January 9, 2017

Leading from the front


Winter returns with an officer from the Bolt Action winter German command set.  I liked this figure, since I saw many different avenues to approach painting him.  


I could not resist including the sapling behind him, since I thought that it would break up the fur color/texture on the fur coat a bit... especially with some snow applied.


As with the other winter German troops, I used the Secret Weapon crushed glass method.

Here's a link to the step by step article on that:


I will keep working my way through the set of winter Germans, and then get you the group shots!!


Sunday, January 8, 2017

Hex Based


Hey folks, it's time to check out another Isorian, and another base made from Happy Seppuku moulds.  I was looking for something fun and unique for these Gates of Antares figures, and this seemed to do the trick.


As I have mentioned in other posts, I had a lot of fun coming up with this color scheme.  The transition of the colors on the figure, along with the object source lighting, were a great change of pace from the vast majority of muted, limited palette figures I paint these days.


Here's a better look at the base.  I will be doing some more specific basing articles on future Gates of Antares posts, so stay tuned!


Saturday, January 7, 2017

The ruins come to life


While I have posted a number of articles showing how to use the Green Stuff World texture rollers, I don't often show finished miniatures on them!  I suppose I just forget to make special posts and just mention it in passing.


For rebasing my Lizardmen, I chose to utilize the Mayan Ruin texture roller.  This was just a few fragments of the sheets that I baked, but that's all it takes to create a fantastic setting for this Oldblood figure.


Here's a link to the original Mayan Ruins article:


I really enjoyed seeing it with the foliage! That reminds me of something which I hear people having a difficult time with, and that is visualizing how something will look several stages down the line.

When I first saw the rollers... this is how I viewed them!  Realizing that I wanted to paint the aged and worn look on the baked sculpey piece, I knew that the greens of the foliage would provide the primary color interest.  There is just enough texture to these rollers that it only required some wet into wet glazing to achieve that aged appearance.  I did go in with some semi-transparent mid tone color afterwards to sharpen edges and put it in line with some of the grays used on the figure.

Here's a link to the Green Stuff World webstore:


He's also here: