Monday, June 20, 2016

Subway in the Swamp


Getting around in the swamp is usually a real pain.  Maybe you have an air boat or something... but those are kinda fragile. And they don't hold ten gun toting hired hands!


That's where creating your own subway comes in really handy.  With this fine machine, you can drill your way right through those pesky Cyprus roots.


This ingenious vehicle is a creation of the very inspired Confederate  Rebellion from Wild West Exodus.


This heavy support vehicle is designed to burrow it's way under and BEHIND enemy lines.  Just what you would expect from an army that has heeded the words of Jefferson Davis, choosing to abandon the cities and take to the swamps.


In addition to the ability to drill safely beneath enemy lines and show up where they least expect, there are three different weapon options.

Soon, you will be seeing much more from the Confederate Rebellion, so stay tuned!!


Sunday, June 19, 2016

The Wolf Pack


The Wereshewolf Pack, that is!  At last, the images of the entire group.


As I have mentioned before, my goal was to have some differences in color scheme on each one, without having them look out of place together.


While there are two 'basic' color schemes... a grayish and tan coloration, there is a difference in the overall lightness of each 'set'.  Also, I tried to vary the shadow colors.


The head/hair area was another spot where I could create some differential.  You can see a large difference on the heads of the two grayish Wereshewolves.


Where possible, I tried to get 'opposing' colors in the shadows.  The figure on the far left shows this very well, as you can see the greenish shading in the darker areas.


All four of the bases have some unfortunate victims!


The foliage was done a little differently on each base, since it seemed like a good laboratory to try out some new materials!


I believe that this set of four is now available on the Raging Heroes website.


One last look at the pack!!!


Saturday, June 18, 2016

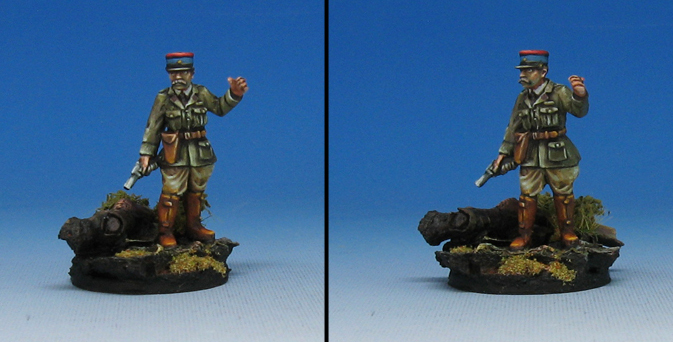
Meet the Major


Here's another member of the officer corps.  As I mentioned before, putting those extra points towards the higher leadership bonus has been very important.  A unit that can't do anything for 5 turns because it is pinned early is almost worse than losing the order die outright.


These figures also have some interesting character to them as well!


While these bases are smaller than most of the kind I've worked with lately, I am still trying to make some interesting little vignettes for them.


Hopefully this commander will lead the way to victory in the next report!! Stay tuned.


Friday, June 17, 2016

Defender of Empire


Meet Octavia from Kabuki Miniatures.

Just like all sculpts from that line, there are a lot of nice sharp details, which make them very nice to paint.  This one was fun to balance out the various shades of gold, along with the reds.


As you can see on the cloak, I tried to have a color transition of a cooler red to something more warm.  Even more so is the transition from a more muted grayed down red to a very pure red.  In this case, Reaper's Clear Red.


The stone of the base made a very nice contrast to all of these warmer colors!


I tried to reflect some of the stone color into the golds of the shield, and also on to the skin tones.


Thursday, June 16, 2016

Kickin' up Dust


This is a figure that we snagged at Adepticon from Knuckledusters.


She's a very fun steampunk western style figure that would be perfect for some Deadlands RPG :-)


It's been a while since I got a chance to use the Reaper clear paints for magentas and reds, so this was a great chance to get back into those, and use all the more muted browns and tans as a contrast.


She's also here:


Dragonfly


Here's one of those classic Sandra Garrity sorceress sculpts.  A fun type of Reaper miniature which we painted very often when we first started painting.


I had a good time with the spell dragon, trying out a combination of the Reaper clear paints and the Vallejo fluorescents.  It worked out quite nicely, as the both paints are highly pigmented yet super translucent.  This makes for some very nice glazing, and enhancing the glowing effect.


She's also here:


Wednesday, June 15, 2016

Sacrifice of Heroes


As you saw in the previous episode of this battle report, the German reinforcements had come in earlier than I thought, and in the worst spot.  Still, the commitment had been made, and the advance would have to press on no matter what.


At the same time, attacking aircraft pounced on the artillery battery.  While I had kept one Lorraine behind for anti-aircraft cover, there were not enough, and repeated attacks continued to grind down the battery.

In the future, even more AA support will be left behind!


Sadly, the flanking maneuver pulled off by the Panzers would claim a prominent victim.  Charles himself!  Alas, he was caught out in the open, and no amount of evasive actions would prevent his Somua from being destroyed.


There could be no time to dwell on such a loss, with the far objective just one turn away!  The Somuas and the Hotchkiss units were sent forward.


At last, one of the objectives was in sight.  It was being guarded by just one Panzer T-38.  If that could be taken out, the sudden death factor might be enough to secure a French victory!


But just as hope was beginning to dawn for the French tankers, multiple units of German light tanks speed onto the battlefield.  While they had little hope of destroying the heavier Somuas, the Lorraine transports would prove an inviting target.


Try as they might, the Somuas were not able to take out these lighter vehicles, despite point blank firing!


The German guns struck home on the unit of infantry in their transports.  Several were destroyed, forcing the occupants out into the open.


This seemed to be a disaster, but the intrepid machine gun toting infantry were undeterred. They promptly rallied, and immediately launched an assault into the town!  

As it happened, they had approached from a lightly defended part of the town, which meant they could overwhelm the few defenders in the area, and claim control over the western half.


Suddenly, the forward objective was now threatened by a pincer advance from infantry.


The contest of act and react continued as the light German tanks bypassed the town to take on the exposed MG unit which was approaching the pinned down German infantry holding the second objective!


The battlefield was now a swirling maelstrom of destruction and confusion.  What was a front line was now the rear, and flanks seemed to have no consequence.  A deadly merry go round!


With all of their timely reinforcements on the board, the Germans could now attempt to isolate certain units and grind them down.  While it had been a relative stalemate to this point, these later moves would prove to be too much for the overstretched French units to handle.


Eventually the impact of all those reinforcements was felt in a devastating way.  With the troops out of the Lorraines, the threat of ant-aircraft fire was gone, leaving the skies open for one last air assault.

This, in combination with the fast moving scout vehicles and tanks meant that the vital objectives could not be taken.  Valiant sacrifices were made... perhaps precious time was gained by this action.

One can be sure that more attempts shall be made to stave off complete disaster!  Stay tuned.