Sunday, May 22, 2016

Meet Your Doom!


As I mentioned when I made the first post with the images of the completed Mechanicum monster tank... there are many more to show!


This set focuses more on the opposite side, and from above.


A reminder of how giant this is... the wheel assemblies are all the size of a land raider.


Among the many tricky aspects of the vehicle, the articulation joint in between the two sections was right up there!


It is a call joint encased in two halves of a star shaped object.  I could not glue that together, because that would have made it impossible to ship without risking serious damage.


Ultimately, it was sent in 3 big parts.  This upper view helps to show all the subtle shading that was required on the weapon section.  I tried to paint as many sections before assembly as possible, but much of it had to be in one piece so that the shading could be kept consistent.


Had I done each bit of the gun individually, it's very likely that those three dishes would have had too many variations.  This view would have really shown any anomalies!


As would this one.


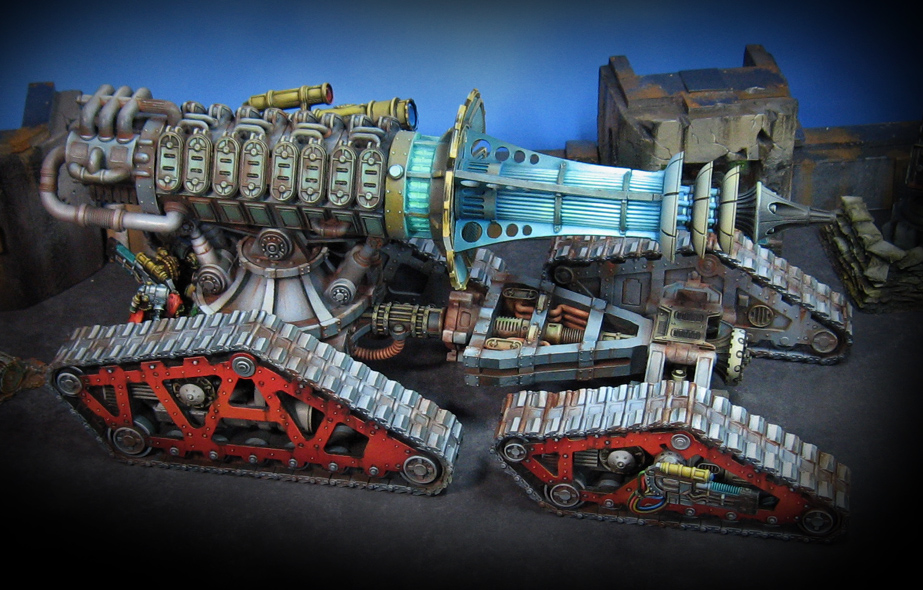
I think this view lets you see the blue tints that I added to the forward wheel section with the blue weathering powders.


You might even be able to see some of that blue powder on the front treads as well.


The massive pieces on the back of the gun mechanism were very hard to handle while I was painting, since they were pretty unwieldy.  I also had to make sure I was not scraping the paint off all of those tubes!


Do you remember the Work in Progress pictures that showed the painted pilot's platform?  You can see just the smallest hint of that here.


The last post will have some images that focus on isolated sections of the monster, which I think it called the Ordinatus.  Hopefully those will give you a sense of how it all works together. 


Saturday, May 21, 2016

A Band of Bowmen


Time for a six pack of First Age Elves!


While the poses are very similar to one another, I tried to get variety where possible, in minor areas of freehand, as well as the horizon lines on the NMM gold helmets.


These back views will show you those variations in the designs.

When you look at them from a distance, your eye blends all the designs together.  Once you get closer, you start to realize the differences.


Finally, I made a few different foliage placements for a touch of individuality.  Just like the freehand, from a certain distance it will all look like stones and brush.


Upon closer examination, there is a bit of flowers on some, leaves on another... and simply grass tufts here and there.

I hope you liked these group shots!


Friday, May 20, 2016

Medium Sized


While I was waiting on some laundry the other day, I tried to get some work done on the medium howitzer for my French Bolt Action army.

I could not find one anywhere in 28mm scale, so I knew that I was going to have to sculpt my own.  I had plenty of Flames of War examples to work from.  Using the 75mm gun as a sample (which I also have in Flames of War scale), I was able to make something that would work well enough on the table.


I have plenty of plasticard and polystyrene tubes for work with.  In this case, I had an extra flying stand, which I cut down to fit... and sanded on one side.


I kept adding additional details to both the gun shield and the barrel assembly, using strips of plasticard and flat polystyrene pieces.


The wheels had to be simplified from the original versions, to save time.  I cut out some sculpey pieces, and used the polystyrene strips to make some spokes!


More bits of the tubing was used to make the elevation mechanisms to the side of the barrel.


I used the thinnest of the tubing to make more details on the gun shield, which will look very nice once it is painted!  These smaller extra things will make it more convincing... using weathering to cover any flaws.


I had to abandon my original plan on the stabilizers, changing to a heavy square shaped polystyrene tubing instead of carved pink foam.  The foam would not have been strong enough, even though it was much easier to create the shape that I wanted.

Also, I wanted to be able to use super glue for everything.  If I brought in the foam, I would have to use elmer's glue, which is not as strong of a bond.


The added benefit of the change was the nice detail of a hinge on each stabilizer where it attached to the gun shield!


To make the stabilizers look more like the Flames of War example, I made these additional details on the top and sides.  Once again, these are going to be the little things that will make it all seem more convincing!


I could not find my very thin plasticard, so I took some blister pack cards and wrapped them around the wheels.


Time for rivets!  Just as I did on the pirate bases, I sliced the polystyrene tubes into tiny coins.

I put them on the wheels first.


They would also be the last detail on the stabilizers as well as the gun shield.


Time to hold my breath and see if it all went together as I hoped!!


Presto!  A new Medium Howitzer in under 2 hours!!!  Here it is next to the Flames of War 105mm gun which I used as a template.

Stay tuned for the finished pictures, as I have it alongside the Bolt Action 75mm gun for a comparison.  It's being painted now!!


Thursday, May 19, 2016

Hell has arrived


Now for the moment you have all been waiting for!  Apparently I took a number of photos of the completed vehicle, so I will be making at least one more post... perhaps two. :-)


I did forget to have a miniature or two around this to show you how enormous it really is, but I think the surrounding 28mm terrain is adequate.


Those tiny plasma cannons that you see are full sized plasma cannons!  The rear tracks are easily bigger than those of a Land Raider.


The main gun mount is not glued in place.  It is actually possible for it to rest in the designated slot, while the four hydraulic pistons hold it in place.


From ground level, it gets even bigger!


I suppose that I should mention the gun itself does not rotate.  It looked like it might when I first saw the pieces, and the circular mount.


The sandbags in the right hand corner can easily hide a 28mm human sized mini, if you want a size reference.


These overhead views probably give you a better sense at how open and exposed all the parts are, creating a lot of extra work.  


What's more, it is a lot of work that is likely to never be seen, unless you are unpacking it!

However, you might be able to detect some of the blue powders that I used on the forward wheel assembly just under the glowing gun.  It's just a tiny hint, and I feel that not even an airbrush could have done that subtle of an effect.

I scrubbed that dusty pigment deep into the existing paint, so that it did not look as if it were simply "dusted" on.


This is why I wanted to have those areas of minimal weathering effects, to break up those endless spaces of gray.

Many more images to come, showing how this articulated, a few close ups of hard to see areas, as well as some front and rear views.  Stay tuned!!


Wednesday, May 18, 2016

My first death ray laser!


Some of the most challenging parts of this monster were the largest.  This was the heaviest of all the pieces, even without the extra pipes and tubes!


I had to keep the colors on this relatively simple, due to the nearby object source lighting on the gun itself.  I didn't want the viewer to get too caught up in this maze!!


Slight weathering began on the other pieces as well, so that it would match the previously painted vehicles.  Also, with this many exposed parts, the weathering was the only real method of preventing a sea of endless grays!


Sometimes it was difficult to orient the pieces to tell which way gravity might affect them.  Again, I felt that a few rust and grime streaks here and there would give a low level boot to areas that could get very monotonous, without drawing undue attention to them.


The main coupling/gun carriage really benefited from a touch of rust and streaks.


Did I mention that this came in a few pieces?


As some of these sections were assembled, I came to the conclusion that I would not be permanently gluing the giant gun or the front wheel assembly in place.  Not only would it be nearly impossible to ship, but taking it to a game or tournament would also be very hazardous.


I continued with a little more weathering as these sections were assembled, because as I did this, more context was provided for me as to how much or how little weathering might be needed.


The monster begins to take form!


Had this been a more standard, closed in vehicle, I would have completed the painting in my usual methods.  With all the exposed parts and difficult angles created by them, I had to use my very rare "powder painting" techniques to complete the process.


This was not used exclusively for weathering, as some might assume.

In fact, this was intended to create more shading in difficult to reach areas, or even more light!  Here you see me mixing a variety of powders, including some Secret Weapon pigments, to paint the housing on the front to rear wheel assembly junction.  

I used the pigment fixer from Secret Weapon to turn the powders into a liquid paint.  This was great, because I could get it into an impossible to reach area, push the powders around with my fingers, and more.


You can even smooth out some blending by mixing the powders together, and painting with them


This was my favorite bit, taking the Secret Weapon blue pigment and working on the glowing gun.  I had set everything up by painting in the lighter shades, even using the Vallejo fluorescent paints.

Now I took the blue pigment and shaded some of the hard to reach areas.  However, where the base colors of the metals or whatever was darker, that same powder created a very nice subtle glowing effect!

I even hit the cooling panels on the left side of the image with this powder color.  Instant glow, but very toned down.  A tiny bit of this powder shade was also placed on the vehicle parts directly below it.

They are so minimal, you may never pick them out.  However, that small hint was all I was after.

I took as many pictures of the completed tank as I could, so I will process those and make a post or two for you all to see!! Stay tuned.