Saturday, April 9, 2016

Making your own leaves


Now to the final part of the grand experiment!

We were fortunate enough to get in on the restock of the Green Stuff World leaf punch, and this seemed to be the ideal opportunity to try it out!

I began by making some quick ivy/vines along one edge of the mural wall using the Hangar 18 leaf product which you have seen a number of times already.


I was just about to punch a number of leaves, when I realized that I could make my life a LOT easier by painting the paper first!  Also, by painting it different shades, I could have a very nice selection of colors to choose from.

It's much easier to paint them here than when they are glued to the surface... especially on a fragile vine!


You must be sure that the paper is thin enough.  I learned the hard way that thick paper cannot be cut.  Also, it's not a bad idea to paint the paper on both sides, so that you don't have to turn them all over.


In a matter of minutes, I had a great collection of leaf types and colors.


First I glued them to the floor, mixing the lighter and darker shades together in clumps.


This is the crucial part... getting them onto the vines.  I wanted to get more color variation on these vines, and some size differential as well.  In this instance, it is quite important to paint both sides of the leaf first!


I even glued a few stray leaves to the wall, trying to add as much interest and texture as possible.  If I wanted to spend more time refining this, I could go in and paint veins on these bigger leaves.


One quick preview shot of the completed wall, mural and vine!  Now to finish off the two miniatures...

Stay tuned!


Friday, April 8, 2016

Painting the Mural


Now things are going to get very interesting!!

My original thought for the mural was going to be the usual angelic visage, painted in the classical style.  While this is something I would have enjoyed very much, a random thought crossed my mind to try something quite different.

Given the kinds of documentaries which had been playing in the background for all the endless hours of preparation for Adepticon, Byzantine architecture had been featured on more than a few of them.

As a result, I thought that a more stylized art form would be more interesting in appearance, and certainly a greater test for me.

A quick search revealed a number of great images, but I had to choose one that would be more simple, and less iconic.


I had to sketch the design out quickly, making sure that it would not only fit, but be large enough to translate with the two figures in front of it.  If the image was not taller than the two minis, that could be a visual nightmare.


The first colors were blocked in, as I would do on any miniature.  I was not sure if the red would have to be taken out for another color... perhaps even white.


The only red on the two Elohi is the flaming sword at this point.  What little cloth they have is blue, to match the robes of the mural.  I still was not sure at this stage, but that is the advantage of the Shaded Basecoat technique, even in 2D!


Slightly more definition emerges, and the idea of putting some actual metallic gold comes to mind.  That works very well from the start, and it expands to other areas besides just the halo.

That touch of metallic will create an ideal center of interest, boosting the already high level of light and dark contrast of that spot.


More details are pulled out of the wings.  The side benefit of this color is that they will now look very similar to the miniature's wings.  Both figures are holding flaming swords, which are casting reddish glow on the wings.


Just as I would on any miniature, I work in more shadows, and hit more highlights to build shape and substance.

Some slight blueish gray color is added around the head and wings to sharpen the contrast, and make the character pop out from the wall a tiny bit.  I am working on the face area in more detail as well.


I decided to put a scepter in the right hand, using gold there as well.  The face gets even more detail.


I started working in more depth on the hands, which was very difficult.  Instead of painting them as 'normal', I had to stick with the more stylized versions, in a way that was very alien to me.  It's very strange how some parts of this were easier than anticipated, and the oddest parts proved challenging.


I guess that's the whole point of experimentation!

From this point, I had to begin considering how much contrast to put in the "clouds" the character was standing on...


I thought this view might be interesting for you.


I decided to boost a few more light shades on those clouds.  That kind of grayish blue should make a nice backdrop for the flaming swords, but also mimic the colors of the armor on the minis.


I used that Secret Weapon dark paint again to re-weather the surface of the mural.

My original plan was to try the crackle medium as well, but time and my allergies kicking in meant I would be more limited in scope.  Watery eyes, sneezing and scratchy throat was a challenging enough environment.

That is still a plan for future murals such as this, and perhaps even on some vehicles.

We're not done yet, folks!!  Stay tuned for the next episode, where we get some foliage and even our own custom cut leaves to finish off this piece.


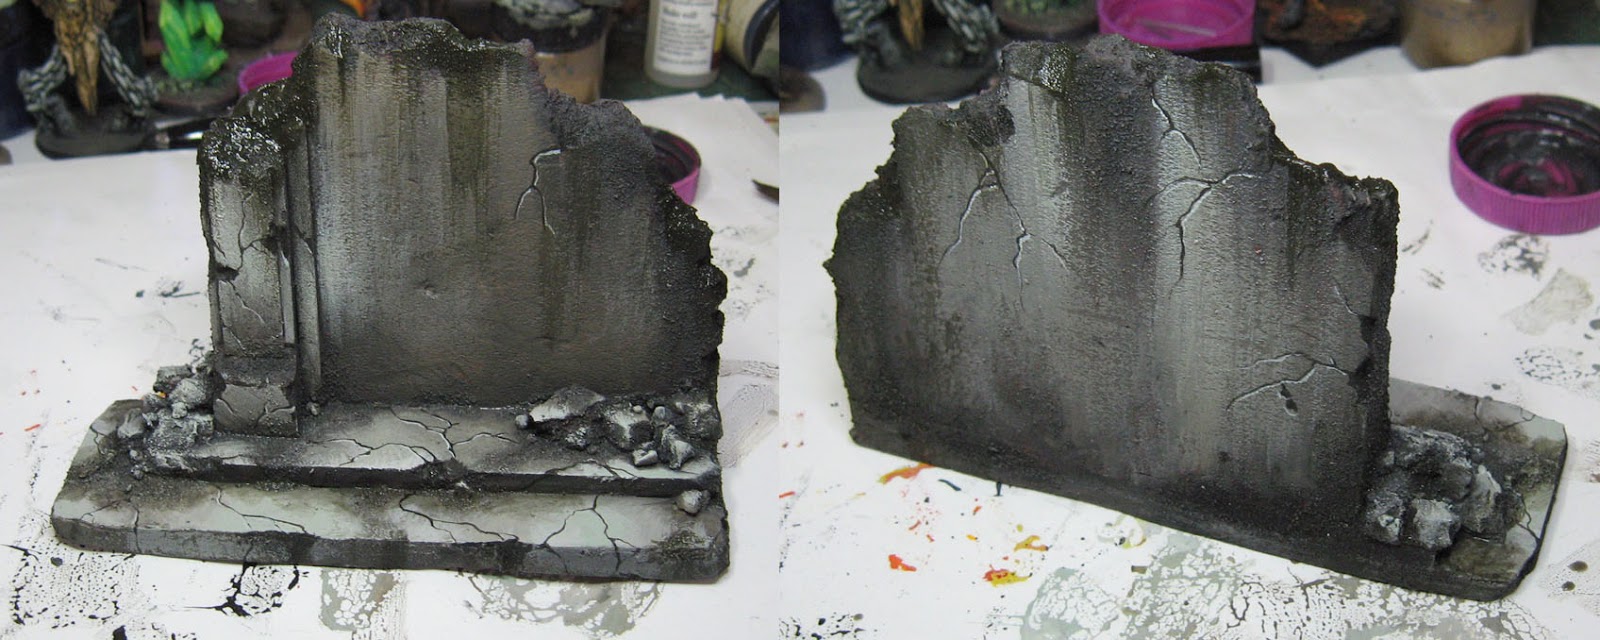
The Great Wall of Wappelville


This little project is a test of multiple materials.

I am making a movement base for some Kings of War Elohi.  Two of them will be placed on either end of this multibase.  In between them, I want to paint a mural.  Finally, I wanted to conduct some experiments with the new Green Stuff World leaf punch!!

A wall and floor vignette was created using the same kind of pink foam that you have seen me use on many other projects.  It is very thin, but quite strong.  Also, it takes paint very well.

Oxide paste and glue were used to adhere the pieces together, and provide texture.  Some plasticard was used on the floor section so that I could super glue the miniatures.  Otherwise, the glue would eat right through the foam!!


The first layer was a mix of a few primers, green and black, followed by a touch of Secret Weapon tan.


These layers were gradually lightened, adding a few different colors in to the mix.  Some had more tan, but other mixes had a little greenish tint.  I did this to keep the wall surface from getting too monotonous. 


The final highlights could not be too bright, because I want my focus to be on the mural... not broken stones.


A few cracks were painted in on the floor and wall, attached to some of the chunks I had carved out with the exacto knife.


Those cracks were given a few highlights.  Again, the focus is on the mural, and there was no point to painting them over that part of the wall!


A little staining was added towards the top of the wall with the very dark Secret Weapon weathering paint.


Here's a sneak peek at what's coming next... the step by step of the mural itself!!!

Stay tuned...


Thursday, April 7, 2016

Action!


The action begins with the first color test miniature for my French Bolt Action army!


As interesting as it's been painting the French in 15mm scale, moving up to a more typical 28mm...


I had been messing around with these in the Hobby Lounge at Adepticon, so it was fun to finish one off.  There were a number of areas where a color scheme had to be settled upon.


More on the way, so stay tuned!


Wednesday, April 6, 2016

Lesson Plan


Time to show all the Space Puppies together!


As I mentioned in previous posts, these were done as private demonstrations to give an in depth detail on how to go about painting them.


It was an exploration into one on one Google Hangout classes, which I think could be a very interesting experience!  While we still want to create the multiple attendee versions, I have noticed in my experiments that each of those persons could be watching me on a very different platform!


It wasn't until Rich and I spent a number of hours tryout out all these possibilities that I saw the advantage of the one on one aspect.  Doing so would make it much easier to coordinate, even allowing for some "test hangouts" between us so that I can be sure how well you can see what I am doing.


During the last major test before Adepticon, Rich tried 3 different platforms, of increasing scale.  First, he began with his phone, followed by his computer.  Each was an interesting and different result.

Finally, he bluetoothed the signal to a giant TV, and that was a whole different world!


Right away, I imagined this being a potential issue for the multiple person hangouts.  Depending on what a person might be using to watch it, the difference could be massive.


While I can always do a "pre check" on each person before the start to identify how they are viewing me, it might be too difficult to settle on a lighting or focus mechanism that will work on such disparate platforms.


Testing will continue now that we have returned from Adepticon.  I also want to expand these tests to other people in other time zones, so there will be some Facebook announcements asking if people want to participate.  The idea would be to get as much live feedback as possible to lighting, focus, sound, and other technical elements.

I think it could be very fun along the way as well!!


Beetle Mania!


Meet the latest monster from Mierce Miniatures... Thacladan, Mound Beetle.

Here's the finished mini next to the concept art.


He's standing on an 80mm base for sense of scale.


This is one of a series of brand new releases from Mierce that's on its way!


The views from above show the massive shell-like wings.


Check out their other monstrous creatures on their website: