Thursday, April 28, 2016

Raise the Masts!!


As promised, the next episode in the pirate theme bases, showing the addition of the masts.

The first article showed all of the various sculpey pieces, including these rolled tubes.  I try to have a nice selection of widths, so that I could also have broken yard arms in addition to the thicker masts.


Since these are being made for someone else who will be adding the figures later on, I had to guess at what might be put on a given base.

This is important, as I try to avoid having the broken mast be the same height as the figure.  Shorter or taller than the figure is ideal, because two items of the same height in such a confined space is a poor composition.

You can't always avoid this, but it is not a bad rule of thumb to work with.


The broken section of the mast is carved away.  I try to let the sculpey break in a natural way, creating its own pattern.  It is best to have one part of the break be deeper than the rest, to show either a weak spot in the wood, or the interior wood grain.


To make things go a little quicker, I began with the wedge tool.  In the past, I have only worked with the scoring tool of a narrower gouging tool, but I felt like I wanted a stronger texture on these masts.


After working my way around the mast with the wedge carver, I took out a flat carving tool, and did some broad shavings around the mast to tone down parts of the texture.  This was much quicker that the scoring tool method... and you can see how much the texture was smoothed out.


I had some very thin plasticard on hand to create some metal rings on the mast.  You could even use paper, but that sometimes tends to bend and kink rather than wrap smoothly.


Some super glue was applied to the area, and the strip was wrapped around it.


A second, thinner strip was added further up the mast to make it more interesting.  You could hang wooden pegs from this, or even some rope coils if you really wanted to get fancy!


Once the masts are complete, it's time to glue those guys down!

The next episode will cover the quick addition of some gold coins, and some spikes on these metal strips that were added to the masts.  Stay tuned!


Wednesday, April 27, 2016

The Board Walk


Let's continue with our pirate theme bases!

If you are going to do an entire unit or army in this style of basing, it is always a good idea to get as much variety in your bases as possible.  Of course, some of this will be determined by the "footprint" of each figure, but this post shows a few variations on the original bases.

This is a more oblong shape than the base you saw in edpisode 1.


The cuts around the edges of the boards was a little more severe than the first base, so I had to be careful when cutting into the sculpey not to go too deep too fast, and crack it.


As before, the planks were carved with the wedge tool.  Keep in mind that you can have a much more shallow texture by using the very sharp scoring tool that I showed you in the previous post!


When you are making larger bases, such as this 40mm, don't make the same mistake I did in the past and make the planks bigger!  Yes... remember to keep them the same size as those on your smaller base, and just include more of them!


This is another unusual shape for a 30mm base.  It is designed for a figure that has a wider footprint.


This collection of 30mm and one 40mm base gives you a decent idea of how you can create a nice variety of shapes.


Sometimes I like to add another plank over the top for interest.  However, always keep in mind that you better leave a place for the figure to stand!  Of course, you could always place a couple of planks on the base and have a figure who is running (up on one foot) perched on top of the wood pile.


This works pretty nicely.  When it's painted, the top board will be a different shade, and that will make it stand out a little more.


The 50mm base could have many different options, such as a rope coil, cannon balls, and so on.  I will just create a nice set of planks first.


Voila!  A nice set of bases, all ready for extra touches!  The next post will show how I like to make masts for the pirate bases, so stay tuned!


How to Walk the Planks


You have seen some pirate theme bases before on the blog, but I thought a fresh article could still be useful!

As usual, the wood carving tools will be essential.  They are also very very inexpensive!  The carving tools generally come in a set of ten or twelve, with a number of different edges.  A few of them are fantastic for carving sculpey... and even hard to reach mould lines on resin figures.


The other handy tools are exacto knives, pliers and this scoring tool designed for carving into plasticard.


I have baked sculpey in a variety of shapes.  The sheets were pulled through a clay extruder (aka pasta machine), while the tubes were rolled on a ceramic tile.  Everything was baked on the ceramic tile in a regular oven.


Let's get started!  I usually break off pieces of sculpey that are similar in size to the base they will cover.


Save those extra pieces!  These are always handy when you want some extra broken tiles or shattered bricks...


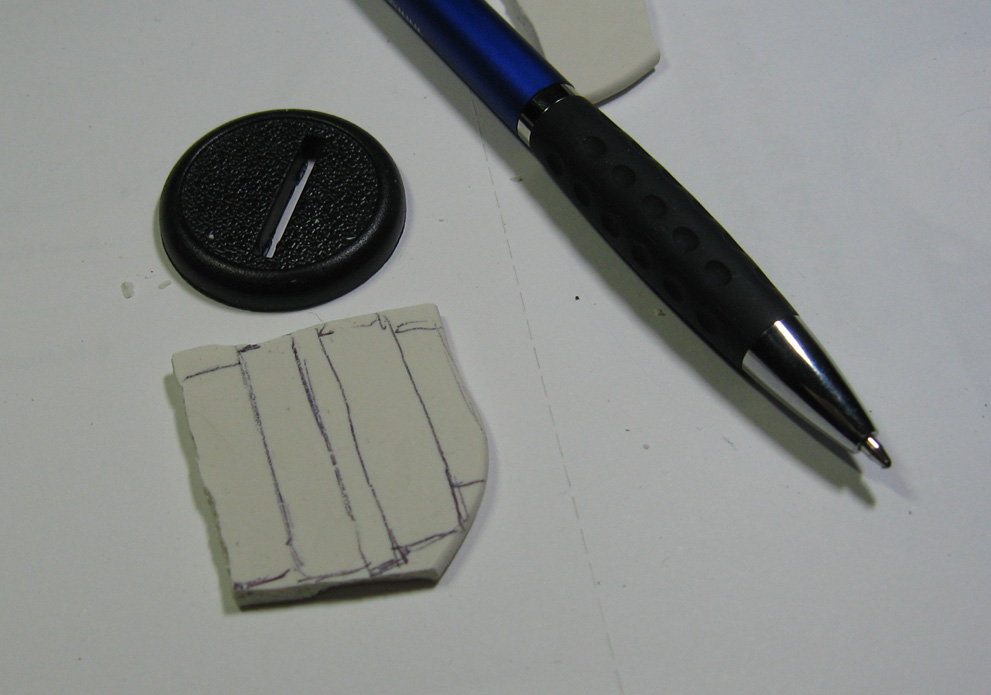
I marked out the planks with a pen, so that I would know where to trim the edges.  Be sure to vary the width of the planks where possible.


The exacto knife is used to cut away that excess...


And the 90 degree wedge carver is the perfect tool for cutting out the plank lines.  These need to be somewhat deeper cuts, as the texture of the wood grain should be more shallow.


Here's what it looks like with all the planks defined.  The other reason I draw out these lines is to keep from missing one or two.  This happens a lot with complex tile patterns!  If I still see lines, I know I forgot to carve something.


Carving the wood grain might take some practice for you.  Also, you need to change the direction of that grain on each plank, because they are all different pieces of wood!

You can even put some knots in the grain, and build your pattern around that.


Looking good!  I will take the wedge carver and make sure that the wood grain pattern which reaches the edges of the sculpey sheet get a bit of texture as well.

You could also carve some nail holes at the end of each plank too if you like.


This is the conclusion of part one.  I enjoyed this kind of basing so much, it was one of the 12 basing videos that was part of the Painting Pyramid series!

That video covers not only wood textures, but making barrels and treasure chests.

You can find that one here:


There are many more episodes to follow!  Stay tuned to watch me create masts, coins and more :-)


Tuesday, April 26, 2016

The Great Crystal Forest


Today we have the next objective marker from The Edge Awakening series.  The last crystal and stone marker was done in a classic green, so I thought I would paint this one in classic reds!


Just as I did with the green crystals, I tried to vary the shades as much as possible, so that some of the reds would be cooler (more blueish) and others more yellow, or warmer.

When you have a very repetitive surface set like this, it's very important to have that variety of color shades, or it will get quite boring to look at.


This set of images gives you a scale reference, and a view down into the crystal patch...


Side by side with the green crystals.  Here's a link to one of my Painting Pyramid videos, called Green with envy.  It's one of five "color theory" videos I made concentrating on specific colors.

I cover Reds, Blues, Yellows, Greens and even Gray!  They are available as a set from Kings Hobbies and Games.  A link to the video preview:


and to Kings:


One last picture to show what the crystals look like next to an actual miniature!

Again, these were part of a recent campaign by The Edge Awakening.  Two more markers await, so stay tuned.


The First Age


This is a little different color palette for you.  If you recall the recent ruminations here about new palette influences and what had been my palette for years, this guy tells a story.


This bright blue and gold NMM was a "go-to" kind of color combo for me.


I think you can see a substantial difference between something like this and the more muted earth tones and grayed down color palettes of recent pieces.

It's not to say that I am not using bright colors.  In fact, I use far brighter tones now than I ever did before!  Much of that is in the form of the Vallejo Fluorescent paints, but it still counts!


He's also here:


Monday, April 25, 2016

Lady in Red


Here's a quick pause from all the trucks and weathering!

This latest batch of barbarians would look very nice on an RPG table, that's for sure.


I still think they would be fun on a multibase for a marauder style Kings of War army.


These are also the new snow bases that were made with tree bark, and then a gesso/heavy gel mixture to create the snow banks.  The snow banks were subsequently painted to match all the older pre-made bases from this project.


There are many more of these to come, so stay tuned!