Tuesday, January 14, 2014

Two of a kind


Here is a fun comparison between two marvelous Raging Heroes miniatures.
On the left we have Skaryaa, a Dark Elf character that has a ton of different arm and weapon options.


On the right, we have a sci-fi version on the character which I have painted up for my Dark Eldar army.  She is called Skaarlys, and she has just as many arm and weapon options.


Both miniatures are incredible, of course.  Tons of detail, which makes them so much easier to paint.


While they may seem dainty, they are very solid figures... both are metal.


Back to Skaarlys...


And Skaryaa...

Visit their website to see much more!!


Monday, January 13, 2014

Punchy Dwarf...


RotterFest 2014 continues with some dwarves.


Squats as slugs!


For some reason, there are 3 dwarves, instead of two, like all the other races.


Off to the dugout for some Ale!


One more base...


This in an 'in-progress' base that will be used for a Nurgle demon.  It is a design that I sculpted years ago.  I think I used it for one of my Grey Knight characters back in the day...

The original base was done the usual way, with Sculpey and polystyrene tubing.


I made a one piece mould of it, which means every so often I can cast one up for myself. :-)


Also, I posted another preview video to YouTube:

Sunday, January 12, 2014

Slime & Scales


OK, here's the second Lizard Rotter!  Fun times :-)


I tried a few new color combos on this, probably in places you won't notice.  However, they will feature more prominently on some future minis.  This was a mix of a slime green with a rusty red color.  While this works nicely for some putrid effects, it will also come in handy for gold NMM!


I also mixed that color with some purples, and that proved to be interesting as well.


Secret Weapon Plinths... part one.


I have a huge batch of the Secret Weapon Plinths, and I am finally getting down to painting some of them!  I really like them a lot, and there is a huge variety to choose from.

There is another post in the Secret Weapon products section that has images of all of the different types.


I didn't want to put any kind of static grass or flock on this yet, so that you could get a decent idea of what it looks like with nothing more than some paint.

I will be painting some designs on the sides for the miniature which will be sitting on top of this later in the week!  Stay tuned.


Saturday, January 11, 2014

Chop chop!


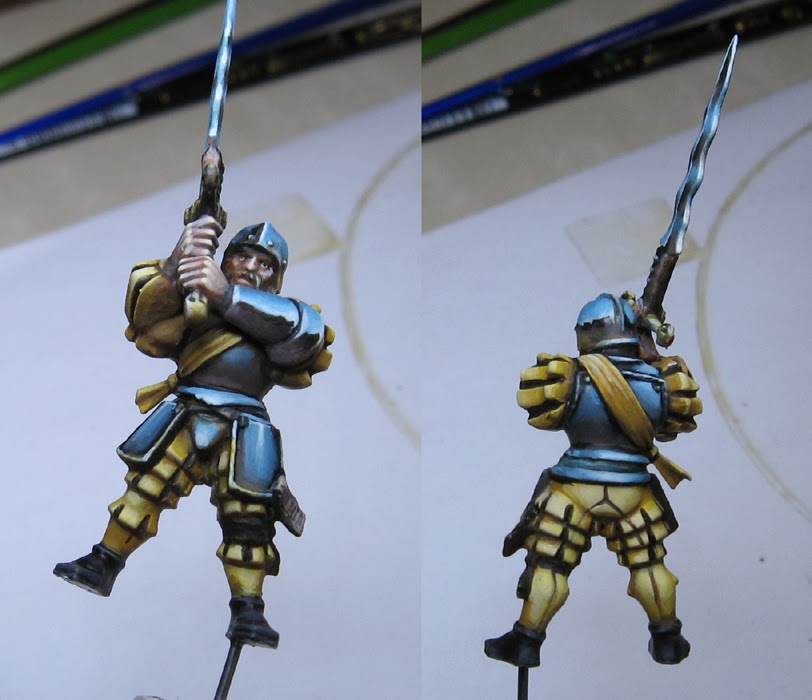
Yes more squiggly swords.  In fact, that's what I may call them from now on.  Just not Squiglers, I think.  In the next few days I will have to show some of the images taken of the movement tray...


There are not many guys with helmets in the unit, but one every so often made a nice difference in color and variety of pose.


More to come!


Some in progress pics for you...


Hey folks... I just happened to have the camera nearby, so I snapped some images as I was painting another Greatsword.  The LED lights really work much better for these kinds of things.

This mini is in that Shaded Basecoat stage that you hear me talk about so much.  Notice the filbert brushes nearby!


Yes, that is a Cool Whip container lid.  I have used far more bizarre things for a palette, I assure you!  

As always, the idea behind the Shaded Basecoat is to start lighter in order to set up the subsequent glazes.


In these next few images, you will see some of that glazing and shading.  Sometimes I use glaze colors such as the GW glazes or Secret Weapon washes.  There are times I will just water down paint.  Sometimes I will mix in glaze medium to thin down a color.


More dark glazing... but also tinting.  I am trying to get a variety of warm and cool in the yellows, but also establish the darker blues on the armor.  Later, I will do some 'light glazes' on that armor for both the sky and earth portions... but especially on the earth colors.


These crazy curvy blades are a nightmare, but an interesting challenge!  The 'light glazes' can really help here, since they are basically semi-transparent lighter colors.


More lightening of the metals, but more warm earth tones continue to be added.


With many of the armor shades well on their way, I started working more on the yellow.


Can't forget the base!  I tried to have some green here, so that the blueish colors would not be the only place on the entire mini where you would find cooler colors...


More definition on both the metal surfaces and the yellow.  Sharper edges near blended edges help to create that hard/soft edge contrast that is vital to make metals.


Here is how it stands now.  More work to be done.  Also, the Army Painter brush on dullcoate will help to eliminate some of the shiny areas.  Those are created by the various materials that I use and mix together.

Stay tuned for the big finish!