Wednesday, October 3, 2018

Ground Attack


As soon as I saw the Song of Ice and Fire game (and how the figures interacted with the movement trays), I knew that it would give me a chance to try my "Bark and Branch" basing method on something completely new!

In the past I have either multi based units for Kings of War, or made decorative square bases for Warhammer armies that fit side by side on a tray.  This would be very unique, as I would have to match individual round bases to fit in an overall tray.  An added challenge is to make it possible to 'drop in' the heroes or banners as well.

I started out with some of those characters here...


Once I knew I wanted to have that look, it was time for the unit itself.  I positioned the figures into the tray, and started to get pieces of tree bark ready.


Just as I did for the special characters, I sliced off a few figures from their round bases with a razor saw.  I always use a rubber Jeweler's block to make that process easier and safer.

A hole is drilled in the foot, and a pin in place.  The oxide paste is used as mortar, like usual, and a drop of super glue as well to press the flat tree bark in place.


A bit of glue and oxide paste is placed on top of the bark so that I can add a few pieces of gravel and some fine sand.


The pin holds the figure in place on the base, and he is set back into the tray.  I few more figures are also taken off their bases, but not too many.  First, this will save some time, but it also gives each figure a slightly different height, instead of each one finding a convenient rocky outcrop to stand on!


To get the different levels, I used just the Oxide paste and some glue to place smaller bits of bark (usually what was broken away from the larger pieces) into that mortar.


I worked my way around the tray, sometimes putting almost no tree bark on a given base.  The idea was to make it seem like there is a pattern to the rocks, instead of those perfectly even spaces out crops!


With all the figure bases complete, the next challenge begins, and that is matching the tray to the bases.  It can be very easy to "lock" your figures in place, so you will need to be very careful as you apply your glue and paste.


As the paste can start to set up quickly, I mix a bit of white glue with it, and that extends the work time of the material slightly.  You also don't want to get too much glue, gravel and bark into the slots, etc.


Where there are base that have a figure standing on a piece of bark, I try to arrange some bark around that surrounding area.  Also, as the special characters tend to be standing on out crops, I try to have more pieces of bark on the front row of the tray.
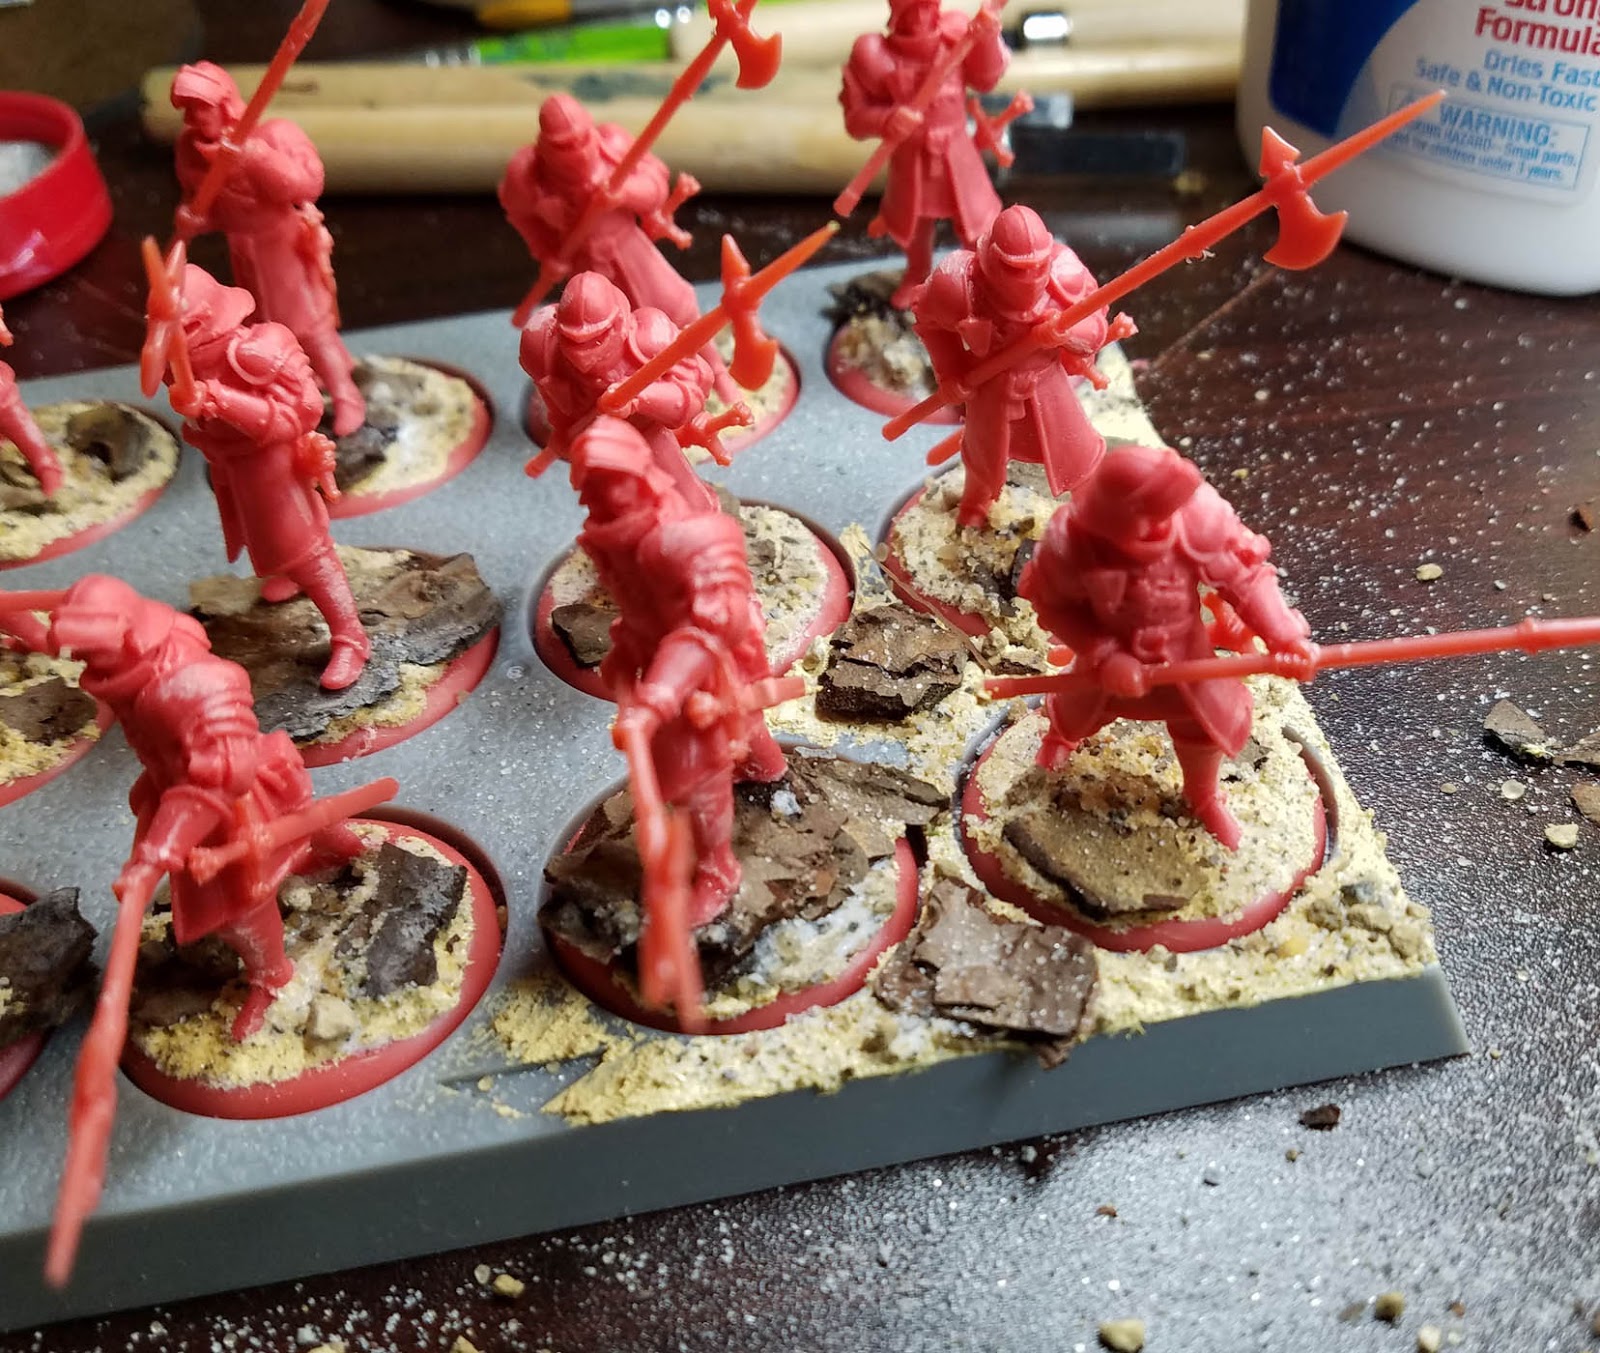

You can see that I am working my way through the unit, until the entire tray is covered.  There are some areas that have very little bark or even gravel.  This is where I can either add snow or some kind of flock.


The completed tray!!  I will be doing many more of these as I get the figures ready for playing.  Tutorial videos will be created of this process as part of the Army Painter pledge level on the Patreon Page.  In fact, next month's video series (about 12-14 hours of lessons!) will feature an Ice and Fire unit.

Each series begins with basing, as you see here.  I will then take you through the process of creating color test figure, and then the rest of the unit.

My goal is to show you several ways of painting your figures, some in NMM and others using Metal Medium to create a TMM effect.  Then I will paint other units in oils!

That is all available on the Patreon Page at the $15 level:


Tuesday, October 2, 2018

Lord of Slaughter


Another new series of videos are about to be added to the list of tutorials... Creature Caster!

These large beasties are highly detailed and that makes them perfect for creating how to videos.


Here's an example of a test video that was done in a Facebook Live session:


Since the parts are very interchangeable, it allows me to paint these in smaller sections, so I can still get them on camera despite their overall size.


This is one of several that are under way right now.  In this instance, I am working with acrylic paints.  I have a few others in progress that focus on oil painting.


Obviously I made good use of my Vallejo Fluorescent paints, injecting them into each color that was added, which enhances the saturation by quite a bit.


There will be a few different levels for the Creature Caster pledges, including one for the miniature itself!  You will be able to see those here on the Patreon Page:


Monday, October 1, 2018

Law of the Jungle


Next up from Victoria Miniatures we have the Arcadian Guard.  As usual, they are available in both male and female squads:


There are plenty of spare bits to go along with every squad, so you can make unique individual figures.  You see fewer and fewer of the "build your own" multi piece figures these days, where you can mix and match torsos, heads, arms, etc.


When I created my Highland guard army, I was utilizing pieces from several different squad types.  There are even sets of kneeling and sitting legs, which were wonderful to create tank commanders and tank riders.


I especially enjoy the command and NCO options.  Lots of personality and character!


Let's see what they look like as a whole unit...


And as a massive horde! :-)  I have two more forces of this size under way.  They will be painted with oils, as these figures were.  I will be making some painting videos of the process.

There are also plenty of videos showing how to approach painting and army on the Patreon Page.  Some of the Victoria Miniatures armies will be shown in tutorials available here:


Sunday, September 30, 2018

Tutorial Series 2: Painting Soviets


Series Two of my Army Painter tutorials was a very different set of videos for me to film.  It was the first time I tried doing a unit painting exercise on camera with oils, and it was the most bases that I filmed under construction!

This was a four part set of tutorials, which has a running time of about 11 hours.  It covers the entire process from basing to painting to snow effects.


I try to show you how I go about making the bases, but also having a conversation about the thought process, and how it relates to the game system, available time and materials cost.


The idea is to present as many options as possible, instead of a "here's the one way you can get this done" approach.  I often experiment with new materials and techniques in each episode along the way to reinforce the multiple option idea.


Painting the unit with primarily the Mig Ammo Oilbrushers was a lot of fun!  I have been using the oils on many of my figures over the last few years, and not only historical minis like these.


As usual, I try to show more ways to get the same result.  For me, the oil paints are a huge time saver, as I am painting a host of other figures at the same time... vehicles, monsters, etc.


This is what the figures looked like after the third episode.  You could stop right here if you wanted, but I just had to do a number of snow techniques!


My goal in the final episode was to demonstrate two primary methods using 2 different sets of materials, and then test out various combinations of them on screen.


I do have an example of this in one of my Facebook Live sessions:


Each time I show a different method, I point out differences in the relative advantages and disadvantages.  In the end, my choice was the combination of techniques/materials.


I am now on Series 3, which is taking on a few more new concepts.  This latest series focuses on "rebuilding" an army from scratch, matching a previously painted army.  It also covers a few techniques in "army painting" form that are normally reserved for single figures.


You can get on the Army Painter pledge for $15, which will get you all the current episodes, as well as other tutorials each month not related to the specific unit painting lessons!  Here's a link to the page:


Saturday, September 29, 2018

Basing the East: Lord of the Rings


The first step in rebuilding my old Easterling army is to create the bases!  Of course, I love basing, so that was going to be very fun.  Since I did the original army, new techniques have been added... especially the "Bark and Branch" method.


As I make the bases, I make sure to point out how the bases must be constructed to match the 'footprint' of the figure, and also be a playable piece based on the rules system as well.

I was really looking forward to seeing what they would look like on the dramatic tree bark bases.


I also wanted to keep the look of the original broken marble/stone bases, so we break out the Sculpey sheets and the carving tools to create them.


A very unique aspect of the Lord of the Rings system is that you need both mounted and unmounted versions of your characters and cavalry.  They can be unhorsed in a few different ways, but they usually survive!

This means mimicking whatever was done with the primary cavalry figure.  I made sure to have a few examples of this, including the Dragon Knight/Captain.


I wanted to do the same for the banner bearer, but in sculpey!  The original pairing was done on broken marble bases, so it seemed quite appropriate to reprise that once more.

Here's a post on those minis from the old army:


Whenever possible, I try to do a few marble painting demonstrations.  This was a perfect opportunity to do so!  It does not take a complicated process to create something amazing, and easy to replicate across an army or unit.


Once the filming of Part 1 was complete, I had a number of figures ready for the subsequent painting episodes.  Just like the first two series, I try to have a conversation about the "currency" of time, and how each choice that you make in basing and painting the army makes it more costly in those terms.

Hopefully these methods give you some ideas, and also allow you to add some extra zest to your units and armies, but leaving you more of that currency to spend on other projects. :-)

With each Army Painter set of videos (about 12 hours of tutorials each), I try to delve into things like Object Source Lighting, Non Metallic Metals, Freehand and other techniques not usually associated with army painting.


Here's a complete view of what was created during the 2+ hours of filming!  The next several episodes will cover all aspects of painting the unit, focusing on matching the color scheme of the original army!

Subscribing to the Patreon Page at the $15 Army Painter level will provide access to all of the new videos, as well as previous series.  That is here on the Patreon Page:


Friday, September 28, 2018

Painting Dark Sword: Anti-Paladin


It has been a lot of fun painting the Dark Sword miniatures for tutorial videos, since they are packed with a lot of fine details which show up on camera quite nicely!

I've been working hard to get a second "palette camera" in place, and this was the first video where I tested it!


That worked out pretty well, and I have made more modifications to it since.  Now, the figure is in a more natural painting position for me, and it takes up a far larger portion of the screen.  Since I am using XSplit to record the videos, I can change the size of the palette screen when necessary, right as I am recording!  That is very cool!


For this episode, I was working with the Reaper Clear and Liner paints, doing a number of glazes.  For the second Dark Sword painting episode, I will do the same figure in oil paints.  I want to do this each month, because I think it could really provide some additional perspective on both mediums.

People can't tell which of my figures are painted in oils or acrylics when they look at them.  Heck, most of the time I can't even remember myself!  It really has more to do with time saving and efficiency.


The Dark Sword pledge is $10, but there are also a few other levels available.  These offer "hard copy" versions of the videos on USB drive, and even the miniatures themselves!!

You can find that on the Patreon Page here: