Wednesday, June 13, 2018

A New Matilda!


I have to say, it was quite interesting to work on the new Matilda "Boss" tank from Victoria Miniatures after painting two historical Matildas for Bolt Action!  While I was able to carry across many of the techniques onto this massive beast, I needed to make a few new twists, and some discoveries along the way!!


In regards to the Vallejo Metal Medium, that proved to be incredibly handy on all the weapon surfaces, as metallics were the order of the day on these.  

It was a material that I liked right away the first time I used it (I have a number of tutorials on that already), and since then I have learned more ways to take advantage of it.


In this case, I was mixing it with the Secret Weapon Miniatures heat paints.  It is a set of 3 (magenta, orange and blue), and I learned that those work best when combined with the metal medium.  

While the heat paints are quite thick, they are very translucent.  This means that the metals will really show through, making your heat effects look like part of the metals instead of something that was merely painted on!


I tried to come up with an insignia scheme that would be interesting, but also had a nod to WW2 historical markings.  Some of you will recognize the diamond, which is one of several shapes used on British vehicles.  There was also a very hilarious accident, in which I tried to replicate the unit type symbol frequently used on British vehicles as well.

If you notice the blue and red chevron/square shape, there's a letter 'V'  I did that because I have already done a variety of numerals elsewhere.  The colors of that square were used to indicate what type of unit is was (infantry support, artillery, transport, cruiser tank, etc,

Well, it was not until later that I realized I had emblazoned the vehicle with several "V" for Victoria on the Matilda!  Complete accident, I swear.


I also used some of the Green Stuff World leaf cutters to make a few leaves scattered around in the areas where debris might collect.  Lots of mud effects were done on the treads of course.  

This is just the first post in a series, because this vehicle comes with a TON or weapon options, including additional sponsons and even a different turret!!  Stay tuned for the next post which will show many more of these very cool options!

Meanwhile, here's a link to the store:


Tuesday, June 12, 2018

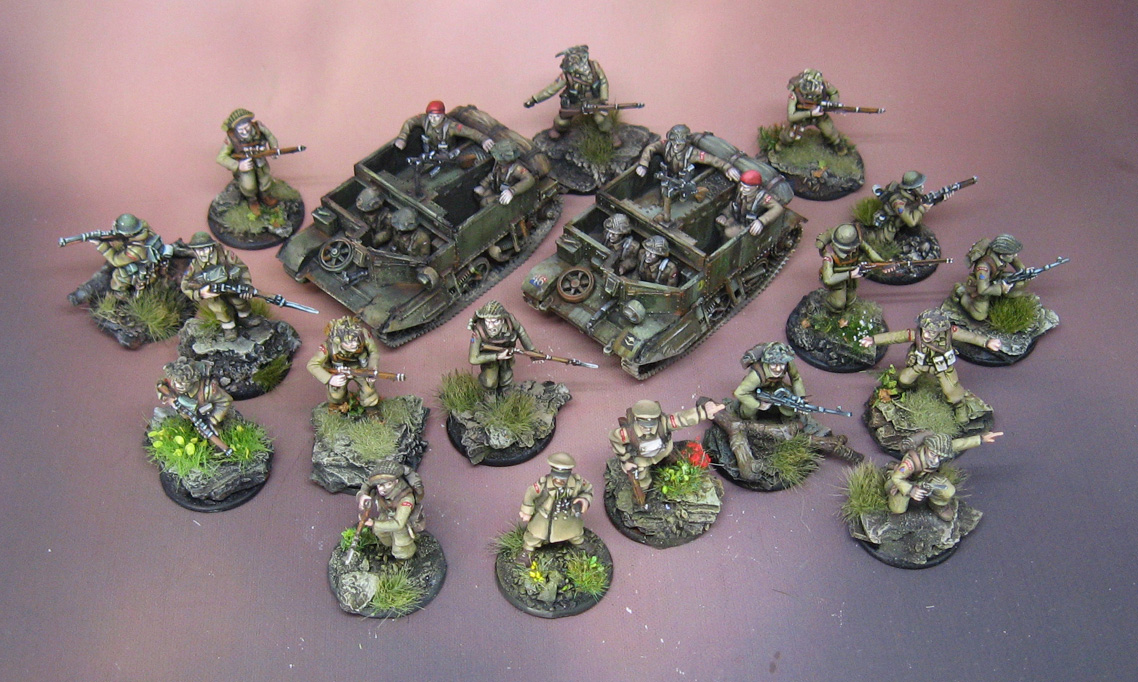
Leading the Way


The early war British forces were an interesting exercise in muted color palette to be sure.  To try and keep the figures interesting from a visual standpoint (and not to get bored!) I attempted to introduce greens and other shades of brown where possible.

Since the bases had plenty of "greenery" on them, it was not going to stand out too much, as the eye would simply blend it all on together.

These HQ figures were among the last of the figures that I worked through.


Most of the grass tufts and flower tufts used on these figures were made with the WWS static grass applicator.  I have done a few articles on how these were made:


This is a fairly large army, and the only way I will be able to show everything at once is in a video of some kind, where I pan across the army and show various elements.  Yet another army that has outgrown all of my photo booths with the exception of the largest 6 x 4 foot photo booth!


As I mentioned, this is one of the first Bolt Action armies that I painted, so it was really an exploration is how to go about painting a historical army.  This was actually painted for someone else, so I did not have the kind of control that I normally would.

I had to fudge a lot of purely historical elements to make things work out as requested.  Ironically this army was completed before my French army!  There is still much to do on that one!


The British forces made their debut on my battle report series with Blood at Arras, and more reports are on the way!  Here's a link to the YouTube channel and the episode:


Monday, June 11, 2018

Hot Stuff


Anyone who knows me also knows that I have lots of fun with flame effects of all types, and Object Source Lighting as well!  This classic Reaper figure was a quick little conversion that I had made for a Salamander army.

I could not resist the juxtaposition of the cool vs warm tones, but also contrasting the very intense fluorescent orange paints from the bright teal colors made using the Reaper Clear paints.

I have used the Reaper clear paints in a large portion of my painting classes, as they can be utilized in so many ways.


You can employ them as a glaze, since no amount of thinning with regular water breaks them down.  When you add just a touch of lighter and somewhat more opaque color to them, they will become a very rich and intense middle tone as you see here in the teal colors.

I have done a number of demonstrations of the flame technique on Facebook live:


He's also here:


Sunday, June 10, 2018

Cold Steel


This was one of the earlier "oil then acrylic" pieces that I made a while back.  Since this set of figures, I have done more and more of the figure with oils.


While it depends on every figure (and what kind of deadlines are in effect), I do enjoy working entirely with oils on figures.  They don't have to be completely finished before the paint dries... which can be a few hours or days depending on how thin the paint was.


I discovered that once oil paint dries, it is quite handy to apply new layers of paint and feather them out, almost like applying weathering powders.  Since the layers underneath are dry, you won't effect them directly.


This is something that I am doing more and more, which was an unexpected surprise.  Now I plan for this process, which makes it possible to work on even more figures at once.  Previously, I thought that I should gather up as many figures as possible to take advantage of the ability to wet blend for many hours.

Now that I am planning for the paint to dry, but continue to work on the figure, it opens up many more possibilities.

I am sure this process will continue to change rapidly as I discover something new every time I work with the oils!

Stay tuned, as always!


Saturday, June 9, 2018

Field Requisition


This Soviet WW2 character figure from Black Tree Designs makes a very nice addition to my Winter Russians.  He's out grabbing a bite, so to speak, grabbing a chicken from some nearby village.

One has to keep up one's strength in the winter! :-)


I've done a number of articles on the urban winter basing, using the Sculpey and other materials.  Here's a previous post:


This was painted in regular acrylics as opposed to oils like the rest of the army, since that is what I had on hand at the time.  I will be painting many more of the Black Tree Designs figures, which will let me do some Facebook live, Twitch and other video sessions.

I have more Russian figures coming, adding to the early war period.  This includes Naval Brigades for Sevastopol and NKVD.  There are also some new releases in the mix, with a few HMG and AA batteries and crews.

I am especially looking forward to working on the casualty figures, which should add a tremendous effect on the battle reports.  These will be more than just terrain, they should also provide an interesting post game analysis as I can see where the most bloodshed occurred over the course of the game!

As far as I know, only Black Tree Designs makes that type of figure.


This blog post goes into more detail about the Soviet bases.  I am hoping to do a live session or a YouTube tutorial as I finish off the rest of the army!


Friday, June 8, 2018

Pretty in Pink


We near the end of the Clan Escher Necromunda gang, and one more hairdo!

She was part of the squad which was painted with oils, as featured in this Facebook Live session:


I have been gathering up entire squads of figures, from fantasy, sci-fi and other genres.  These will be a big part of the upcoming painting tutorial videos that I am creating right now.  

New pledge levels have been added to the Patreon Page to reflect this, especially in the "army painting" category.  The idea is to record a multi part video series which demonstrates in detail the process of painting and basing a squad or unit of figures.

While there are a lot of videos out there showing how to paint one piece of a figure, or one in isolation, there is not a lot of content out there which covers painting multiple figures, especially to the highest levels.

These will be done in both oils and acrylics, showing how a variety of materials can be used.  That should give you many more options in your own approach.  I want to include the basing in order to show the best way to create playable bases for your figures that still look like tiny dioramas.

At the lower pledge levels, you will get links to the videos as usual on YouTube.  Higher levels include "hard copy" versions on USB drives, and even the miniatures themselves.

I will be introducing this more thoroughly in a separate post next week!

Here's a link to the page:


Thursday, June 7, 2018

What Lurks Under the Sea


This is certainly one of the more unusual beasties that I have painted in the last 17 years!  It is one of several creatures that were part of a kickstarter a while back.  Here's a link to the campaign:


Once I received the new Mig Ammo OilBrushers, I had to test them out right away!  This seemed to be an interesting test subject, among other things.


I had been saving this figure and a few others for the arrival of the new OilBrushers, and there are 21 new colors, most of them more intense and saturated.  The first set of 21 was more in tune for weathering and working in earth tones, greens, and so on.


I wanted to show some of the main reasons that I like to use oil paints... chief among these is the extended drying time.  Through several hours of painting, I was able to blend areas to very smooth finishes very easily.

This was possible even long after the initial layers had been painted.  I also demonstrated how much less paint application is required when you work with oils.


There is a Facebook live session which shows the conclusion of the painting process... that link is here:


Before I went live on Facebook, I recorded the first few hours of the painting process, along with a discussion of the new Oilbrushers.  This recording has since been edited and processed, and is now a brand new Painting Pyramid tutorial video.

I recently posted the link to my Patreon page, which is available to my subscribers.  New pledge levels have also been added, and more are on the way!  Check that out here: