Tuesday, August 8, 2017

Opening a New Front


A few weeks after making those terrain stands that you saw in yesterday's post, I finally had a few hours to put foliage on them!  That process was very similar to how I made those original "swamp" style trees, but with more precision and strength.

I was able to place the spray adhesive far more effectively, and in smaller areas, concentrating the amount of glue into a limited area.  Also, I had learned that I could use almost any color of moss, because it was all going to be covered with various shades of flock!


This method not only created a better appearance in terms of color and shading, but it created a "leaf like" texture that was far better than anything I had been able to do trying to stick clumping flock to plastic trees.


Using the natural tree branches meant that each one was unique, and would not have that obvious plastic tree shape.

The logs which you saw in the previous post looked great on the water/saw mill1


In Bolt Action, you really need to know the exact outline of the forest zones.  With this method, you get a clearly defined edge, but from a view like this, you don't really notice the isolated sections one bit!  It creates a very nice panorama.


Even now, I have some new things that I want to try out on the bigger trees.  That would be to glue some of the dried foliage pieces from the craft store onto the larger trunks.  You have seen those be used on my bases, but I feel like adding those extra "branches" will make the tree canopy stronger, and add realism too!
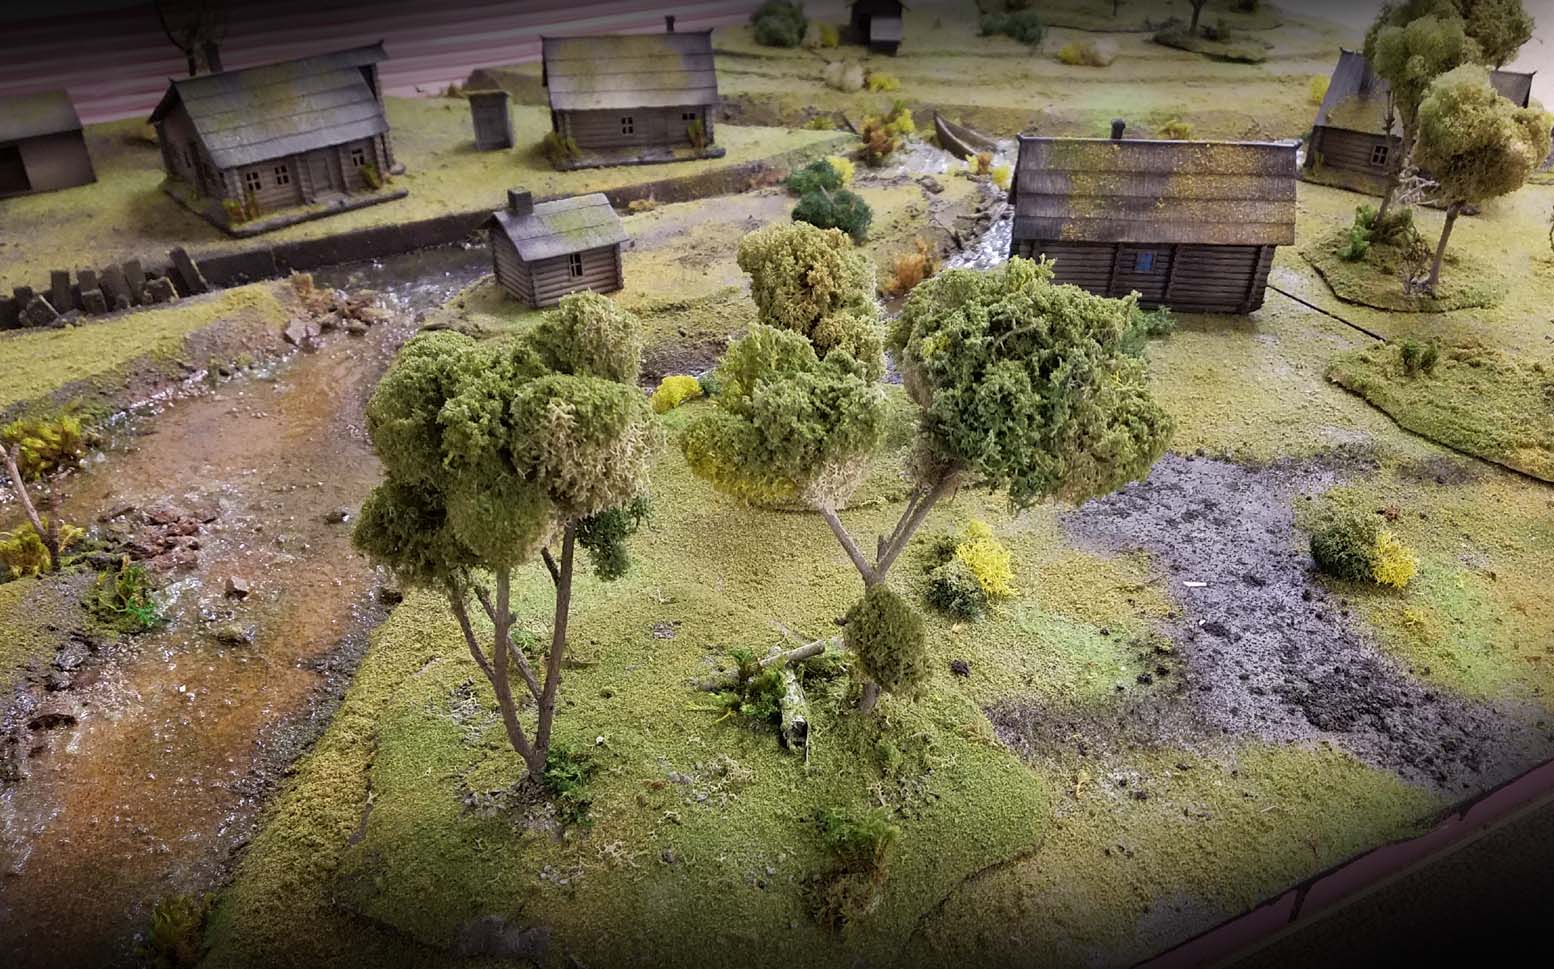

We can still have our swamp board, which will mimic the huge Pripyet Marshes that dominated the landscape of western Russia.


Between the very rustic buildings, the rivers, and the tree stands, this should be the most realistic and challenging board that I have ever played on!  The idea was to match the very difficult terrain, with poor roads, few bridges, and other rough terrain.


Roy was VERY happy to see his first completed squad of Soviets hit the table.  They blended in so well with the terrain, it was actually quite difficult to see them when it came time to put those guys back in the box!


We got the T-34/85 painted up quickly, and that just had to join them on the table as well.


Once Gencon and Nova have passed, all the units will have been painted, the final terrain pieces made, and then the Eastern Front campaign shall begin!!!


Monday, August 7, 2017

Forest Fires


Most of you have probably seen the first series of posts on the terrain board that has been under construction.  That will serve us for multiple theatres... everything from France, to England, and several locations in Russia.

Part of that series focused on tree stands, but those were meant for marsh and swamp boards.  I have a link to one here:


The methods that I used on those stands were brand new, as were most of the materials!  So, I decided to make more "regular" forest stands for France and other locations.


These will also be a bit more rugged than those original boards, because I learned a few things in the construction of those swamp stands.  When I made these, I had more oxide paste and other materials on hand.  I also had a longer time frame in which to work.

Since these images were taken, I have done all of the actual foliage on all six of these tree stands.  This time around, it was a lot easier, as I had learned many lessons on how best to use the spray adhesive and the moss clumps.

My latest batches of trees look very realistic, and they will only get better!  A post on that is coming up this week.


You can see more of those materials in this shot, done prior to the primer painting.  I even used some tin foil to create a bomb crater!  That is big enough to fit most of a squad.


For future winter boards, we are experimenting with a variety of pine trees.  While I will be making my own from scratch, I found a bunch of these on Amazon.  The side benefit were all of those "log" pieces, which are perfect for our water/saw mill.


This is a set of terrain that I picked up at a raffle, and it will be modified to fit our urban boards, specially made for Stalingrad, Budapest, Berlin, etc.


Speaking of Stalingrad, the upcoming Soviet army is almost ready for priming.  I have a few more add on figures and weapon teams which I will base live on facebook so that you get a better look at that process.


I also have a wide range of Soviet vehicles, which will mostly get the winter camo treatment.  Others will be more generic, so they can fill in slots for other sections of the front, and seasons.


I have also begun to add some specialized German units, such as Charlemagne Division, early war Waffen, motorcycle troops, and much more!  Stay tuned...


Sunday, August 6, 2017

Leaping out of the Box


Here's a few more recent Red Box Games Cavalry figures.  


They remind me of the Chaos Marauder mounted figs, but with a little more armor :-)


Having them balanced on one leg such as these can make them a bit of a challenge to base, as the figures are metal.  I ended up putting two pins in the one foot in an effort to prevent spinning.


The snow bases were done to match everything else that has been done for this massive army!


One last peek...


Saturday, August 5, 2017

High and Mighty


The Kurgonava sisters are in charge again!  This was part of the original Raging Heroes campaign, and thus is now part of the metal range.


I have always had fun painting the Raging Heroes minis, especially the Wereshewolves!


The base was fun, of course, part of my usual blasted concrete Sci-fi series.  These can be seen in more detail on my Painting Pyramid video series, which has 12 different basing topics!  There are two specifically on Sci-fi basing.

As usual, they are available on USB drives (each one is 100 minutes long)


Does anyone have a light?


Friday, August 4, 2017

Basing Das Biest


One of the most unique experiences of working with the Bolt Action armies has been the basing of weapon teams and artillery pieces.  You have seen a few of the smaller and mid size guns, but now I am working my way towards some of the heaviest pieces, like this German howitzer.

The materials were pretty basic... wood glue, super glue, oxide paste, and pieces of tree branch.  This time around I was also using some cork and other elements to enhance the "diorama" look of the base.


I do have a blog post article on basing the French 75mm gun, which gives you a good sense of what's involved.  Eventually I will try to do one of these artillery basing sessions live on Facebook.  Here's a link:


This view shows some of the added elements, like some vehicle stowage, machine guns, ammo crate and more.


The heavy cork was used to create the mound of earth in the front section of the gun emplacement, along with the wood glue and oxide paste.


The inset shows the use of leftover round sprues to create spent shell casings and even a few ready rounds in the ammo crate!  I tried to match the shell that was in the loader's hands as close as possible.  I used a small emery board style sander to shape the nose of the shell.

You can see how I tried to make a very active site, surrounding the crew with various items.


Here's what it looked like before I started priming it...


As usual, I brought out the Stynlrez primers from Badger to do my initial layers of painting.  While I do this for infantry and vehicles, it is even more handy for pieces such as this, where there are a lot of hard to reach sections, rough textures, and potentially some fragile bits too.


This illustrates the difference that this "pre-shading" makes.  It is much easier to work from this point, where the gun can be removed and painted, leaving easier access to the crew and the rest of the base.


There are more light and medium pieces on the way, including our Early War American weapon teams.  A whole range of French, Italian and Russian teams are in the works too, including urban winter and desert themes!  Stay tuned...


I will probably paint these live on facebook, taking you through the process!


Thursday, August 3, 2017

Here comes Barney!


Just when I think I have done every kind of crazy thing possible in miniatures, you have this!

I was handed a group of toy plastic dinosaurs with a request to snazz them up a bit, and certainly make them a much brighter color scheme!  The comparison was to my Lizardman army, where I really went wild with some colors...


I thought it might be really interesting to paint "real" dinosaurs with the fantasy style Lizardman colors.  After a brief google search, I located some interesting patterns that were actually associated with dinosaur species.  Despite the name of this post, the one color that I was going to avoid would be purple.  I did use a tiny bit of it as an accent around the eyes and mouth.


I used one of my large filberts on this guy, since he was fairly large, easily twice the size of a Carnosaur.  I worked very quickly, which allowed me to do some neat blends with the greens, and then into the subsequent layers of reds.

The same bright yellow was used to highlight the greens and the reds, which provided some de-facto color unity between what are normally opposite tones.  While these are bright, contrasting colors, they are not completely overpowering.  A few spots were added for a bit of interest.


I put Secret Weapon Miniatures water effects over the mouth, eyes and claws to give them a different texture.  None of these will have bases, by the way, as per request.  It would have been interesting to build a diorama around them!

Stay tuned for more :-)


Tuesday, August 1, 2017

Lavender Chieftan


I was not really sure how I would approach this figure, even when I started painting it.  In fact, the overall color scheme changed more than once during the process!  That is a huge advantage in the Shaded Basecoat technique, where all you are doing it blocking in lights and darks as rapidly as possible.


A side advantage of this approach is that you don't have hours of time invested in painting any one part of the figure in those early stages, so completely changing the colors is not a hassle, and you feel more free to make the changes needed.


While we can usually guess what color scheme might work best on a figure before we start painting it, I think that everyone runs across a few that end up not working as the original plan intended.  Being able to quickly adjust that on the fly, and experiment right there on the figure itself can be very handy!


Since a lot of the shading is done through glazing and tinting, you won't be piling up lots of paint and losing details.  Most of the time it is about shifting color of some areas... but I have switched colors entirely, as in going from a "white" wolf to one that was essentially black :-)