Wednesday, December 28, 2016

Glazing the Germans


I wanted to get into a few step by step articles on the winter German troops to get you through the post Christmas fatigue.  This is still not a pure start to finish article, but for now it will give you a decent idea of how I have been approaching the historical figures.

As I mentioned in the first Heer post, I have been using the Badger airbrush to create the Shaded Basecoat stage of the infantry.  Steps one and two illustrate that, while step 3 shows that more specific colors have been added to areas such as rifle stocks, skin tones, etc.

Stage 4 shows that the overall Shaded Basecoat is complete, and glazing can begin!


This image shows an unglazed figure to the right, while the figure on the left has a few quick glazes and tints.  I guess the best way to describe the glazes to folks who paint more vehicles as a filter, with the darker shading provided by those deeper panel line washes and dark washes.


Once again, a set of figures at the completion of the Shaded Baescoat. 
Just as you would with as vehicle, the colors are lighter than the final result.  

The idea is to allow me to match colors more easily by tinting and glazing, instead of having endless layers of progressively lighter colors.  It takes far less time, and it definitely makes the colors easier to remember.  Simplification is the key!


This figure has those glazes and tints, along with the deeper darks and more details in the middle tones.  That zone between light and dark colors is where I try to create the most interesting and subtle variations.


The first glazes were done on the bases.  Nothing fancy on the colors, but the goal is to set up the snow effects.  This means including some warmer browns and greenish tones to make the snow look "colder".


Some of this glazing is moved up onto the boots and leggings as well, sticking with those warmer tones.  As I mentioned previously, that will make the final snow application seem 'cooler' by comparison.


I am also putting a few glazes on the camo cloaks, helmets and other white surfaces.  This has less to do with making them darker, but adding some interest by tinting them.  Some glazes have more greenish hints, while others are more tan.  Doing so will make the other parts of the uniform and gear stick out less.

For instance, some of the colors of the packs AT weapons and gun stocks are quite warm.  A few hints of tan on the white will make them seem more a part of the figure and less like they were stuck on as an afterthought.


Glazes are placed on the gear next, such as the rifles and other weapons.


This might be a nice view of those pieces of equipment before and after glazing.  Think of it as if you were adding filters or washes to a vehicle!


The insert gives you a closer look at some glazing on the white areas, which is also used on the gloves, and even on the pants and faces.


I have a greenish black glaze set up for the areas of the uniforms that were painted medium to light green.


Finer glazes are applied to the faces and other small detail areas.


Once all the glazing is complete, I like to go back into those mid tone areas (those colors that fall in the middle between the highlights and shadows) and add extra touches of color, or simply clean up glazes that might have left rougher patches.


I also add my brightest highlights.  Having worked on the entire miniature at the same time (instead of one isolated portion), I get a better look at how the figure appears as a whole.  If I only worked on the white sections, any color I painted after that would have looked very dark!

By working on every section equally, I get an overview of how the white looks compared to the base, or the skin, etc.

Final precise details such as the eyes are among the most important!


It looks like these guys are read for some snow!  Stay tuned, because the next episode will take you through the Secret Weapon Miniatures crushed glass technique.


Tuesday, December 27, 2016

Up close and personal


While I don't suspect this weapon team will take out many tanks, they do offer a reasonable threat to light transports such as soft skinned trucks and open topped Hanomags.


I love my 47mm Anti Tank gun team, and the mobile version mounted on the Laffly, but this is much easier to conceal.  Adding the small team factor, it will probably take 7's to hit them.


I finished the basing on these guys before I had the Mig AMMO mud, so they don't have the splashy mud effects on them.


These smaller weapon teams are a of fun, especially on the oval bases!


The view from above shows a team ready to hunt down those pesky soft skinned vehicles!


Monday, December 26, 2016

Cold Ones on the Run!


It's been a very long time since these guys have been the focus of the blog!  In fact, the last images of these Cold One riders were probably posted nearly five years ago.  That's when the blog first began!


I will be posting more of the Lizardmen over the next few months, as the five year anniversary of the blog approaches.  Yes, by then it will have nearly 3600 posts, and close to 4 million views.  Yikes!!


The unit of Cold Ones was entered in my very first Games Day back in 2007.  They won a Silver Demon for Fantasy regiment, which was very cool.  You can tell that these are older, given the metal Saurus sitting on the back of the old timey Cold One.  

I was still learning how to do the basing for units, making something interesting that would still allow them to rank up and fit on their movement trays.


They didn't do very well in my games unfortunately.  For whatever reason, I would fail nearly every stupidity test.  Yes indeed... roll 3D6 and pick the 2 lowest, and I could not manage a "9" or less!  Ouch.

Their final game saw them go stupid for the final 5 turns, leaving them stranded in a forest.  My opponent didn't even bother to do anything to them, since they did quite well at taking themselves out of the game.


He's also here:


Sunday, December 25, 2016

The Rhino Bash!


Here's a collection of images showing off one more of the Mierce Miniatures rhinos!  These big guys were truly colossal, and lots of fun to paint.  The base is roughly 60mm.


As I have mentioned in previous posts, Mierce is pretty unique in that each faction has its own "super monstrous" infantry.  Usually, such creatures are ogre sized or slightly bigger.  There are entire units of these beasties available!


I also marvel at how the sculptor is able to turn a large bulky four legged monster into something bipedal and 'agile' 


Making "hands" out of elephant feet and rhinos is not all that easy, so many kudos!


The armor is also nicely crafted, which allowed me to do some fun color variations that played off the colors of the skin and fur.


You can see more of the gang here:


One more look at Rhino guy... and have a great Christmas as well!  Many thanks for checking out the blog.


Saturday, December 24, 2016

The Big Bad Bugs


The Isorians have some big critters backing them up in the form of the Tsan Ra Phase Squad.


All the same color choices and techniques were used on these larger figures as the standard Isorian troopers


The base  was created by using scrap MDF wood from a few buildings.


Here's a link to the first of those painting articles.


Friday, December 23, 2016

Dark Sister


I did a series of conversions to create Hecatrix Blood Brides for my old Dark Eldar army which were a lot of fun, and worked out pretty easily.  This involved chopping off the hands of a few metal Dark Elf figures, and putting a splinter pistol in their place!


It certainly created the effect that I wanted... they were certainly different from the regular Wyches, but conveyed the feeling they were a good deal nastier.


She's also here:


One more look from ground level!


Thursday, December 22, 2016

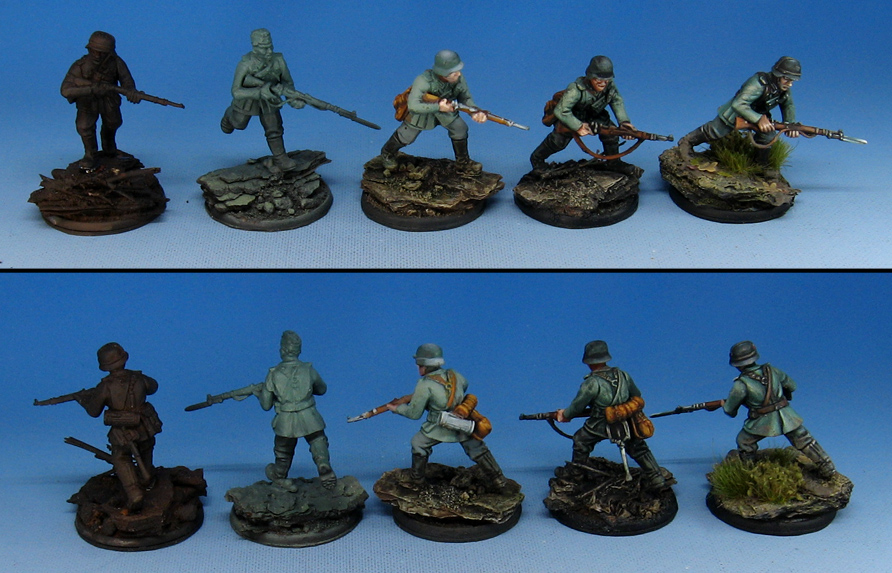
A few Steps


This article is basically a preview to future, more genuine step by step articles that I will be working on.  I realize these figures are all different poses, but thus is the nature of Bolt Action armies!

None of my figures have two poses or equipment sets that are the same, but that's almost more important, because you need to be able to adapt and translate a color scheme across a wide variety of poses to paint an army... just like this early war Heer force.

In this image, you see the most basic steps side by side, from the initial primer painting to the glazing to the finish.

The "center" figure shows the ends of the Shaded Bascoat stage.  This is very crucial, because from there I work with a variety of glazing and tinting to get to that all important uniform color.


When I first start applying the primer, I am using a Badger airbrush, mixing the Badger black and orange primers together.  This creates a default underpainting, which I can let show through, or paint over completely if need be.


The next stage is done by running a few different primers and colors through the airbrush, depending on the army.  Since the early war Heer are in the field green, I emphasized those colors more, creating a lighting pattern along the way.  I worked in lighter shades, mostly with various primer colors.

Badger has six different primer colors, in black, white, grey, yellow, green and orange.  This means you can get a wide array of colors, using nothing but primer!  Heck, it worked so well on the vehicles, I thought it would be just as effective on the infantry.


To get to the Shaded Bascoat stage, I went in and added mid to light tone colors in specific areas, such as the rifle, face, hands, and other equipment.  This takes very little time, but is great for setting up those later glazes and tints!  I can also use the greenish colors as the underpainting, making the skin colors seem more realistic.


The fun really begins with the glazing!  This is where I can not only add shadows and darks, but tint the uniform parts as needed.  For instance, a blue/black glaze was applied over the helmets and the boots.

This is a much faster way to paint armies, and it means that you don't have to sit there and struggle as you are layering up paint on 10-15 figures at a time, hoping that your paint does not dry out, run out, or the kids are trying to set fire to the dog, etc.

I get interrupted in my projects all the time, but I can step away for months from a given project and never lose my place, so to speak.  I can pick up where I left off, no matter where that might be.


To finish off the figures, I go back into the middle tones, add a broader array of tones, more highlights, and make other adjustments.  I also add any decals or freehand insignia, the mud effects, and so on.

Last but not least, the flock!  Again, I will be doing several more articles on these various stages, along with google hangouts and you tube videos.


Here's a side by side of the very beginnings and the completion.  It's amazing how just a few key steps can make a very fun result, and not drive you insane along the way!  I have had a great deal of fun painting all of these historical figures, to which the Shaded Basecoat and glazing methods are extremely effective to render.  Stay tuned for much more...