Wednesday, December 14, 2016

Temple Guard


This Saurus Temple Guardian was made with a few different kits and bits.  The body is that of a 'regular' Saurus warrior, with the head and shield from the Temple Guard sprues.


The weapon is the shaft of a normal Saurus warrior, with the Temple Guard piece on the top.  The Temple Guard arms were far too beefy to simply use their original halberds.  It would have been impossible to make that look like it belonged... a bit like a Saurus arm on a Skink!


So, this was a fun way to use up bits that I already had, and extra Saurus bodies that were no longer needed.  It also made a nice, unique pose for a Temple Guard unit!


He's also here:


Tuesday, December 13, 2016

Tank Buster II


This was a very interesting combination project, which utilized the 47mm Anti-tank gun from Mad Bob Miniatures and some converted metal French miniatures from Warlord Games.


The crew figures are converted from the standard  French infantry box.  One of them was loading a rifle, and with a bit of cutting and chopping, I was able to place a shell in his hands!


I borrowed a few other hands from the plastic British infantry set, such as the pointing hand for the gun commander.


I have done a few other articles on this piece, showing how I made the base, and images of the unpainted, converted figures.  The shells that you see on the ground are polystyrene tubing, which was cut and filed to shape.


Prior to the application of the foliage, I used the Mig AMMO mud products to create that second level of texture.  I have discovered that placing the lighter and heavy mud on the bases is very distinct from the painted sand and gravel, and has such a similar feel and texture to actual mud, I just had to use it!

This can look extremely muddy, but that is toned down once the foliage is placed on top.  At that point, it is more of a suggestion of upturned dirt and mud!


I leave you with these final images.  Once again, I suggest checking out Mad Bob Miniatures, for all sorts of early war vehicles and artillery pieces!


Monday, December 12, 2016

The 300


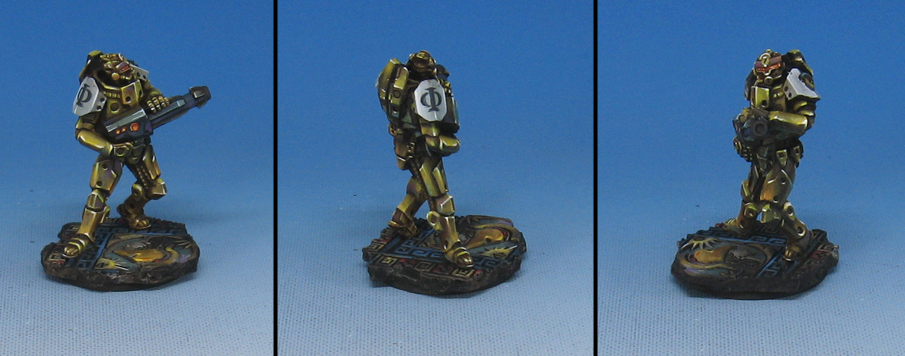
Time to check out the next color scheme for the Gates of Antares Algoryns.  Once I started making bases using the mosaic tile texture roller from Green Stuff World, I thought of this Spartan Hoplite theme.  

Just like the previous ice theme, the faceted armor is ideal for some gold/bronze non metallic metal


The keys to the NMM technique are not very complex... high contrast and lots of reflected light/color.  You can see in these images that parts of the metal appear reddish, while other areas are a greenish gray tone.  This is the kind of thing that makes the armor look metallic, as opposed to nicely shaded yellow armor.


High contrast is also essential, as is reflecting the "environment" around the figure.  In this instance, the base.  These views give you a better look at the texture of the base.


The shoulder symbol was taken from the base, of course.  There are enough textures available from that mosaic tile roller to create unique bases for an entire army!


Here's a few ground level views to show you the shading and glazing of the armor on the legs.  Just like the armor on the back, the tones change from reddish to greenish.  I even used some fluorescent paints in the mix to give the colors and extra boost.  That is vital when you want to indicate gold, which tends to be extremely vibrant.


Sunday, December 11, 2016

Deadly Frogs!


While I almost never got a chance to use these Chameleon Skinks in my tournament armies, I did manage to squeeze them into some regular games, and some special scenarios.

I painted each one in a different color, but I basically rotated the colors of the poisoned frogs they were carrying!  This guy was the most muted of the twelve that I painted.


He's also here:


Saturday, December 10, 2016

Polar Vortex


Since we are expecting another polar vortex to hit soon (that is, after we are buried in 4-9 inches of snow!), it seems appropriate to post the first of the Winter Germans from Bolt Action.


These are certainly the most unique of the figures I have painted for Bolt Action thus far. I am enjoying the effort of getting more interesting colors in the white sections of the uniforms.  This means incorporating a lot of muted tans, greens and blueish gray.

Working in those subtle tones makes the "white" less boring, and helps to give the figure more shape and contrast.


The original structure of the basing is just like the early war German, British and French figures.  The only exception is that I have added some winter tufts from Army Painter, and finished it off with the crushed glass snow technique from Secret Weapon Miniatures.


I will be doing some articles on how these guys are painted, and the snow as well.  Hopefully some of this will be done live as well in the form of some google hangouts.  Things are finally set up for that kind of event, where I have multiple figures at each stage of completion.

Stay tuned!


Friday, December 9, 2016

Angry Angel


This conversion bash was created for the Sisters of Battle contingent of my Adepticon 2014 40k tournament army. I wanted a unique set of Seraphim, and I happened to have some old VOID miniatures handy.

I have already posted the images of the Archangel figures in previous articles, but there were a few other VOID minis that were changed into those Seraphim with a few extra bits.


It's pretty easy to spot the Blood Angel wings, as well as the bolt pistol and chainsword.  There was not much time to spend on each conversion, so it was nice to be able to get these unique figures done in a relatively short time frame.


The view from above shows a little bit of the marble base.  All of the Sisters had marble bases, so as to separate them from the Imperial Guard allies.


She's also here:


Thursday, December 8, 2016

Jungle Wars


This particular skink marked an interesting point in my painting years ago.  As a whole, the Lizardman army was the laboratory where the Shaded Basecoat technique was first created.  I had to paint hundreds of these skinks, and a faster method had to be discovered.

One of the hidden results of this development was my work in the mid tone areas.  Once the original lighter colors of the shaded basecoat are in place, darker glazing and tinting is added.

This created an unexpected, but ideal, environment for adding really interesting lighter tones on figures like this guy.

While most of the colors are warm greens and tans, you can see that some blue-green colors have also been added.


Instead of trying to mix this into endless layers of paint (working dark to light), I could now work from the middle out.  This means that interesting 'opposing' colors can be blended into the existing darks.  The majority of the shading is in place, so that meant I could focus on putting that lighter greenish blue around the warmer greens to add more shape and detail.