Tuesday, September 8, 2015

Getting ready for a snowball fight.


Today we have a few sets of group shots.  One of the figures in them would be the figure which needed to be matched as well as possible.


I don't think I have included any of these types of figures in the group shots previously.  The thought had occurred to me, but I always forgot!


The last batch should have a few of the 'matching' shots :-)


I have been noticing several differences in the metal versus the restic versions on these minis.  It is a little easier to paint the restic, since it it much lighter!


The view from above...


Coming right for you!


Stay tuned for much more!!


Monday, September 7, 2015

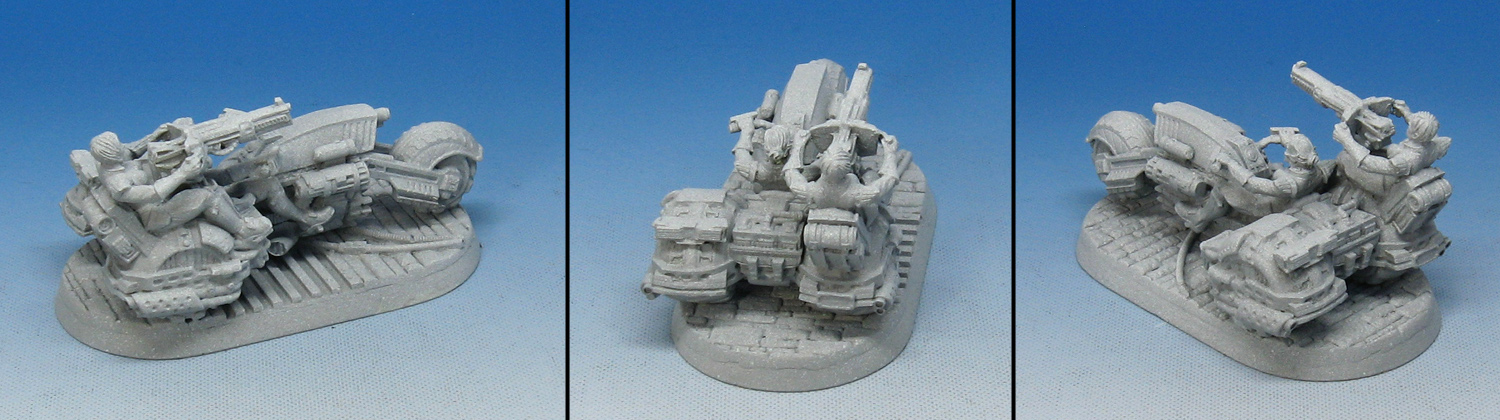
The real Hell on Wheels!


Check out this amazing bike from Raging Heroes!!!


It's a favorite of mine from the Toughest Girls of the Galaxy kickstarter.


There are more fun details than you can even count.  I'm going to have a LOT of fun painting this.


Also, it's clear that great care was taken in how the pieces were 'cut' and cast, since something as epic as this might have been a nightmare to assemble.

It was surprisingly easy, and it is really solid once built.  That's fantastic!  I know they worked very hard on these kits, and it does show in the final results.

This is set on a larger DragonForge Designs bike base, so that it will fit the wider footprint.  I have some other bikes that are being prepped, and those can fit on more 'standard' format oval bases.


If a tree falls in the forest...

I'm sure that a few of you recall the step by step posts that I made of the original tree stands that I created for our games of Wild West Exodus.  A little while back, as I was working on some other similar projects, I decided to see if I could do some winter effects on larger scale terrain pieces (as opposed to simple bases)
 
That meant spreading out all of the supplies again... various tree branches, gravel, glue oxide paste, knives and so on.

 
The DVD protectors are left over from the thousands of disks that I purchased for the kickstarter videos.

 
Just as I do when placing bark on a regular base, I use a combination of super glue and paste.  The paste acts as mortar, filling in the inevitable gaps.

 
The branch is positioned inside a notch cut in the bark, which offers some additional stability and strength.

 
A few smaller pieces of bark are added, as well as one more fallen log.  This offers a more interesting visual, and more cover!

 
The Oxide Paste is still used as 'mortar' filling in the largest gaps.

 
More texture is spread out onto the rest of the disk with the paste.  This is more efficient than gluing a ton of extra rocks and gravel, and it gives me one more texture as well.

 
Speaking of gravel, I have quite a collection that has been acquired over the years.

 
While the Oxide Paste is still wet, I mixed in some Elmer's glue.  This is what will hold down the gravel which I am going to add.

 
I always place the biggest rocks first, and work progressively lighter.  Otherwise, the fine ballast would cover all of the glue, and I would have to keep adding new glue for each layer.

 
Instead, I have fresh glue available for my second application, typically a medium ballast.  A little more is applied in this second round than the heavy ballast.

 
Finally the sand and ultra fine ballast is added.  This tends to fill in everything very nicely, and looks a little more natural.  Now your rocks will have natural 'clusters' around the tree stand.

 
I work my way around the stand quickly, but I don't try to cover too large of an area at once.  I learned the hard way that as you apply the glue into nooks and crannies, you have a tendency to tip the thing over, and all the glue starts running off.  It becomes a major mess at that point!!

 
Here's what we have so far.  I have some more episodes coming that demonstrate standing stones, cork, pieces of actual slate, and so on.
 
Once all of them reach this stage, I will move on to the painting and applications of snow and flock!!
 
Stay tuned..


Sunday, September 6, 2015

A dangerous ride...

 
Another Tharn wolf rider for you today.

 
The Privateer Press cavalry figures definitely have a unique sculpting feel to them.  I have been searching for just the right words to describe what that is...

 
In any event, I hope you enjoy it! :-)


Pick up sticks

 
Here's another one of those guys carrying a bunch of pointy sticks!

 
These were all painted to match previously painted figures by another artist, as has been the case for this entire set.

 
I would have liked to introduce some secondary and tertiary colors into areas like the skin in particular, but I must stay within the boundaries which have been established.


Saturday, September 5, 2015

The Blue Mile


More blue marble bases, which means there must be more Holy Order of Man figures on the way!!


This base is meant for a second Tumbler.


The two small bases are for additional Spica hired hands, while the medium sized base is for Mimreg Zain.


I am very glad that I chose to position broken pieces of columns and statues on the bases.  It gives them a slightly different feel than previous armies I have based in this manner.


There are only a few figures left to go before I can shoot some very grand army photos!

Stay tuned.


The tufts of many colors


Here's something new from Kings Hobbies and Games.  Tufts!!!  Tufts in all colors, for all seasons.

Here's a link:


I really love the color variety, since the number of genres I work in has expanded exponentially.

I have a number of jungle theme projects under way which will greatly benefit from the green sets.


This view gives you a sense of the height of the tufts.  There is a bit of difference from one tuft to the next, which is good.  Some are also more fluffy than others. 

With this many colors to choose from, I can now mix and match and blend tufts and foliage from other companies as well, which is not always easy for me to do right now.


Also, the size and shape of these tufts will come in very handy for the future Flames of War projects!!


I am very eager to use the front two colors in this image.  They should see action right away on a number of Wild West Exodus figures :-)


Finally, we have the winter tufts.  I will be using this in combination with the Army Painter winter tufts, and Secret Weapons crushed glass snow.  You have seen this kin d of experiment before on a small scale, but soon it will be tested on ever increasing scales!!

Stay tuned...