Tuesday, August 18, 2015

Double the fun


Even though these two pieces were painted many months apart, I thought a set of photos with them side by side might be interesting.

This, of course, is Francine James, the meanest Lady Gambler in the Wild West, and the Pirate Queen.  Both are Reaper miniatures.


Each mini diorama is created with similar techniques, but the story and setting are obviously quite different!


These top views give you a better look at the gambling table, and how the Pirate Queen was set in relation to the wheel.


It is completely by chance that red was the predominant color of their outfits.  Again, they were painted many months apart!


So, I hope you enjoyed this little review of the Seven Seas and the Wild West!!


They always play with the Boxes!


Boxes aren't simply for the enjoyment of kids and kitties... they are for adults too!!

Let's continue with the construction of Boxington.


After the walls were attached, I needed to create a roof. Normally it would be covered in some kind of shingles to give it texture and additional strength.

However, I had less than an hour, and only these materials at hand.

I thought that some corrugated metal texture might provide something interesting, so I peeled off the outer layers of paper from a few panels of cardboard.


These were cut to size, and attached lightly at the top of the roofline.


We learned early on in our games of Wild West Exodus that the roofs need to be removable.  To make the roof solid enough to do so, I needed to add a few triangles which matched the pitch of the main roof line.

These also had to be slightly shorter, so that figures inside the building would not interfere with the placement of this roof once they were inside!


The first wedge is in place, and you can see how it is about a half inch short of the point where it would meet the side walls.


A handy dandy roof!!!!


One removable roof, ready for gaming.


I wanted to make a few more buildings, but I could tell that I was going to run out of cardboard.  I decided to make a longer building with a room separator inside.  That would give the roof a little support.

It's also possible to have room to room fights in WWX, so I wanted that option to be available.


Interior roof struts being added for that stability...


Two buildings in a little over 40 minutes!!


To add a little spice to my magnetized box/building, I cut out a façade to put on top.  This was not only decorative, but sized in order to allow a figure with a rifle to take cover behind it and still see out.

Why not take advantage of that flat roof!


In the final minutes I had left, I cut out some fences using the scraps, and painted a very quick sign for the Six Shooter Saloon.


This supplemented the buildings and trees that I had available to create a decent board for the demo game.


Lawmen and Warrior Nation fighting it out in the streets of Boxington!!

When will the violence end?


Monday, August 17, 2015

Terezina


I don't remember which of the painting videos I had considered using this figure, but I decided to combine her with a base that I made in the filming of the Marble, Tile and Cobblestone bases.


I only used 6 colors for this piece, a tan, a sienna, a blue, a light green and a bit of white.


She's also here:


Sunday, August 16, 2015

Welcome to Boxington!


It looks like my MacGuyver reputation has taken a new leap after this emergency project the other day.

The situation:  Away from the studio, and must put on a decent sized demo game in a few hours.

What you don't have is enough terrain.


What you have are a few boxes, such as this one that I use to carry my magnetized figures.  However, even this wouldn't be nearly enough.


Now I have a bigger box, some tape, a tube of super glue, and a pair of scissors.  And sunglasses.


The box is quickly broken down into panels...


Which must be turned into buildings in a matter of minutes.

Those of you who have seen my "Home Sweet Home" terrain building video might recognize some of these steps, such as creating the roof angle and wall height.


Front and back pieces are cut, but we need some doors and windows.


The side pieces are cut a tiny bit shorter than the sides of the roof gable sections.

I learned the hard way long ago that if you don't do this, your roof will hit the top of those side walls and not set correctly.


A handy exacto blade lets me cut those windows, set to match the height of the WWX figures in question.


If I had more time, I would have tried to fool around with decorative elements such as window sills and shutters.  However, time was way too short for such things.


The tiny amount of super glue and tape would have to be enough to attach the wall segments together.


Just about there!  The next set of images will show how a removable roof was created, a second building, and even some fences.  I think I have a few shots of the buildings in use as well!


A stroll in the woods

 
Here's another stage completed on the diorama base.  I added additional texture to the Sand Paste by gluing some more ballast.
 
Not only does this provide that extra texture, it also gives a little more structure and strength.

 
This gives the incline a nice cascade effect.

 
To help establish the water effect out in front, I thought I would add some pieces of wood, like the little stump in the corner.

 
This is what we have so far.  I will be using mica flakes and some other leafy textures, since I want to establish a fall theme.  The water will also have leaves floating in it, which will be an entirely new effect for me!!

 
As I mentioned in the previous post, I am going to add more of the small branches.  A few will even be added to the main trees.

 
These next few steps are going to be more chaotic.  Parts will be getting painted while additional effects are added in.  It will also be super messy!  So, get ready... it's gonna be a wild ride!!!!


Saturday, August 15, 2015

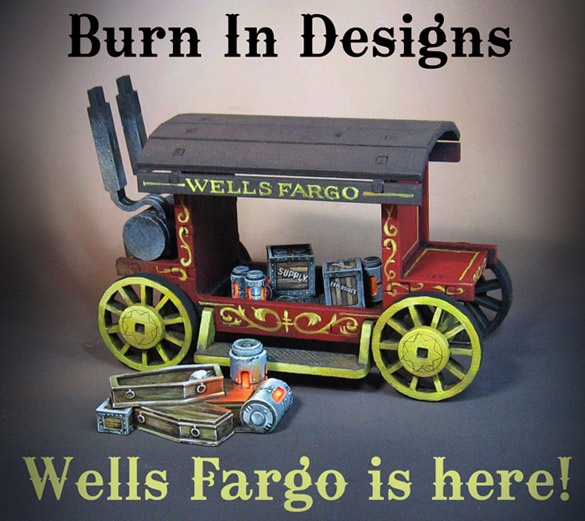
The Wells Fargo wagon!


This little self propelled wagon from Burn In Designs will be hauling some very valuable cargo into Wappelville today.


Somehow I thought that it might be fun to look up some pictures of Wells Fargo wagons of the period and paint this up in that color scheme.


Such a valuable cargo deserves a significant escort!


Looks like it has dropped off the new caskets at the Final Slumber funeral parlor.


An Interceptor leads the way, making sure the street is clear of Jesse and Carpathian's minions.


Even a UR-30 Lawbot is prepared to protect and defend this delivery.


Another delivery is being made at the General Store, a one stop shopping bonanza out West.


Will there be more gunplay on the streets of Wappelville?


Stay tuned... rumor has it that Carpathian intends to hijack this shipment and carry it off to Payson.