Thursday, March 19, 2015

Holy Order of Man?


We haven't seen something from the ancient Holy Order of Man for a while, so let's look at Sircan Nura.  This will be a new character for the Holy Order post Kickstarter.


I don't think I have seen a beta test card for her yet, but I'm sure she will be ready to whack some Watchers!


I would really like to see this new piece next to the Abner and Zain which I painted a while back.


Of course, even better when painting her for my own posse!!!


Wednesday, March 18, 2015

The city of brotherly love


Well, that would definitely not decribe Wappelville, especially when this Band of Brothers is on your tail!


This is Wyatt, Virgil and Warren Earp, ready to lead the Lawmen in their quest to stamp out all crimes and misdemeanors in Wappelville.


I went with the white coats to continue my color scheme for the army.  The Ghost Lawmen of Wappelville indeed...


Each of them offers some interesting individual leadership attributes.  However, I am looking forward to a larger game where all three will patrol the streets of Wappelville together.


They stand in front of the Wappelville Jail, ready to administer the justice delivered by the gavel of Judge Stern.


But the Earp Brothers do not stand alone...


The Law Army of Wappelville grows by leaps and bounds.  Truly indicating that Statehood cannot be far behind!


Wild Wolves...


Now here's something I have not had a chance to see since it was in the tournament last year!

This was my unit of Rough Riders.

It was a heavily converted unit, utilizing GW and Gamezone wolves, Secret Weapon bases and basing products, and of course Victoria Miniatures!


I used a variety of Victoria Miniatures kit pieces, mostly the Highland Moss Guard.  Victoria also has power lances designed for Rough Riders, so I had to make use of those!


It was a very fun unit, which was led be Mogul Khamir.  It actually wiped out a squad of Space Marines on the charge in the second game.


To make the sitting poses fit on the wolves, I made a saddle blanket, which did the trick.  It served dual purpose, as it allowed me to continue my tartan patterns onto these figures as well!


This was a very fun unit to create and paint.  Mr. Justin's fine urban rubble bases were perfect.  I added some tires to them, barbed wire, extra skulls, and more.


So, pay a visit to Victoria and Mr. Justin in the Dealer's room at Adepticon, or check out the figures here:


Closing in on the end...


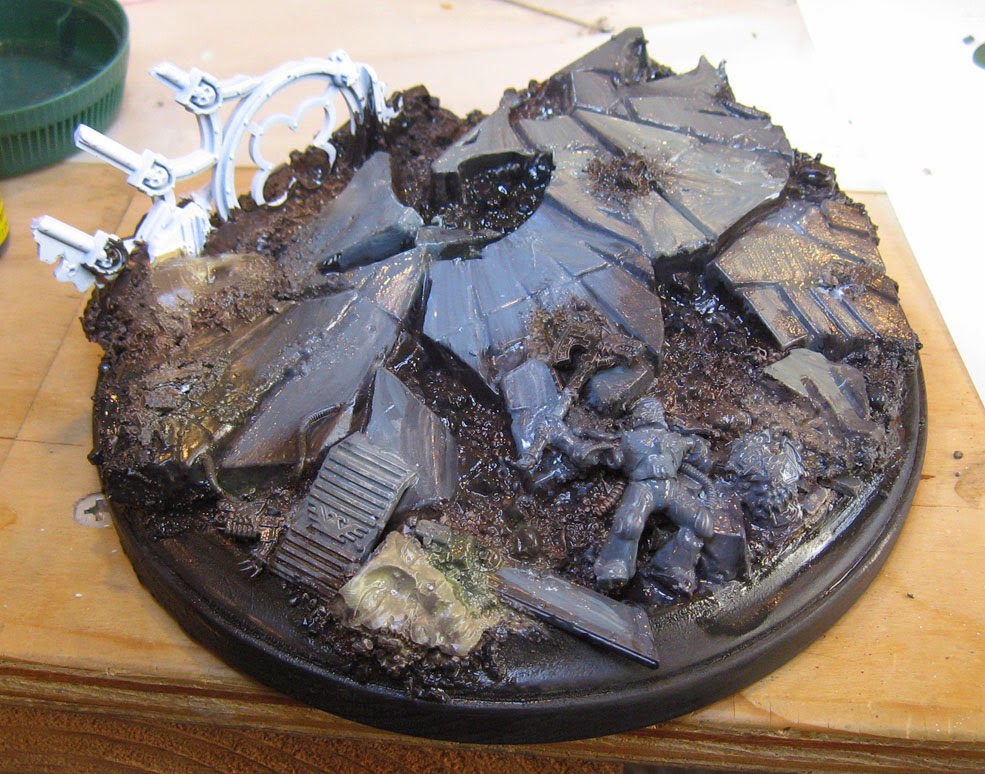
There were a few other touches that I added before I did the glazing on the big base.  These were in the form of highlights and even some painting of cracks in the stones.


There were also a few more skulls that needed a touch of color.  These were the one that were sculpted into the original plastic pieces.  I was far more aware of all the Secret Weapon skulls that I added :-)


So NOW we are ready to go...


The usual suspects, Secret Weapon washes.  My Vallejo washes were still back at the studio, so a few of Joe's GW washes joined in on the fun!


As always, an array of colors out on the palette so that I can create new mixes and work just as quickly as I did with the Shaded Basecoat applications.


The casualty also got it's own series of glazes...


In areas where I went with a warmer dark, I enhanced that with a more reddish glaze color.


I did the same with the cooler areas, usually mixing blue and brown together, as opposed to just using black.  This not only makes more interesting dark shades, but it can extend the life of your washes, and you don't need to buy endless jars of black :-) 


This was the trickiest piece to do the glazes.  What was applied to one side of the piece wanted to leech into the other side.

So, I had to apply these more carefully... a little bit drier.  I also kept a soft tissue on hand to either wipe away any excess or to do a little mixing on the surface.  


I tried to make sure that all the glazes on the casualty were a bit more muted, and even had some of the glaze colors from nearby areas.  This would keep that color continuity going.


At this stage, I can get into more refinement and detail.  I began to finalize the cracks in the main stone sections...


This is about the only detail I will add on the stone sections, as I want to add rust and blood.  Once those final few effects have been added, I will look over the whole base once again to see what might need more emphasis and what might need to be toned down.


Now for a set of photos to give you an idea of how these base looks before those special effects.


It's been very fun to work on Joe's big base.  Just like any project, I learn a little something new each time!


I will do one final article on the base to show you how I approached the rust, blood, and possibly even some dust.

One reason the base was done in the limited palette style was to allow the huge demon figure to 'shine', as it will feature some very highly saturated red colors.


Tuesday, March 17, 2015

Meet Stompy


Well, you have seen the basing project, and even the first few stages of painting the Great Elk.  Now you get to see it all together!!


This is the Great Elk of the Warrior Nation, one of their heavy supports.


This is, as might imagine, a brutal monster, which has colossal hitting power and a 3 inch halo!  I'm certainly looking forward to that :-)


As gigantic as the base was, I never anticipated that the 'miniature' would make it look so small!  Wild!


I am so glad that I chose to create this vignette with the ruined Fire Bringer and the hapless gunslinger.  I don't think he's got enough RJ-1027 in that pistol to do much harm before he gets flattened by Stompy!


I have played with a number of vehicles in my previous armies, and even some monsters (Lizardmen and Tomb Kings), but they pale in comparison to this beast.


Stompy will also be my entry in the Crystal Brush, intended for the Fantasy/Steampunk large creature category.  I'm hoping that he does not have to go in the open category.


This looks so fun from just about any angle, it made all the hours of work on the base worthwhile.  I really tried hard to position it to get the best visuals, but also keep it as "out of the way" as possible for when we are playing games.


So, when you see him up for the voting process at some point, you will have a pretty good idea of what went into making this thing a reality.  Stay tuned for much more!!!


Second helpings on the base


Rapid fire progress continues on the base.  As you can tell by the glistening paint, I have been able to work fast enough so that the paint can be pushed around on the surface and mixed together.


Just as I did when painting in the darker colors, the light colors are varied.  In some places, I used more of a warm grayish green, while in others I went with a blue gray.


It's important to note that I generally placed the cooler light colors next to the warmer darks, while reversing that with the warmer lights next to the cooler darks.

This provides additional contrast to the usual light vs dark contrast.


When you do that, you can generate a lot more interest and depth across a large, complex surface which will have a relatively limited palette.


This view gives you a decent idea of what I have been attempting to do.  In some areas there is much more contrast... while in others there is very little.

Doing so makes life much easier on the viewer, as I let one or two things catch their eye and draw them in closer.  A better approach then punching them in the face with a blizzard of things that they 'must' look at immediately.


At this point, I am also working a bit slower.  Instead of constant wet blending, I am using more of a 'scumbling' technique shown here.

 The idea is to press the somewhat drier brush into the surface.  It will create a tiny bit of texture, which will be handy when trying to give the impression of stone...


More refinement, more light colors added.


Some of the other pieces on the base are getting colors that are even warmer, such as the statue heads.  Those are tans and reddish browns, just to let them separate from the main stone pieces.


One of the last things I did during the Shaded Basecoat phase of the base was to paint the casualty.


A little bit of yellow was added to the casualty.  A touch of yellow, as he's a Space Wolf.  Still, this has to be a toned down yellow, so as not to create too much of a distraction.  

Some yellow will be used on the Angelic figure, which will help to spread that around.


He's just about ready to go, so I moved on to the broken wall segment.


The broken wall was painted a bit lighter in some places, forcing the highlights on the upper surfaces.  The vertical pieces need to be more in shadow, so it creates more of a silhouette impression when the figures are placed on the finished base.


Just about set!  Only one more piece which I almost forgot about...


One wee little helmet painted, so now it's on to some glazing!!!