Thursday, July 17, 2014

Hanging out in the desert


OK... more testing of the Hangar 18 backdrops!

I started out by taking pictures on the standard fade.  Even this was just a fantasy a few weeks ago.  Having the huge backdrop was fantastic!


I could do so many more angles.  Normally, if I try to get "adventurous" with my angles, I end up with exposed corners that have to be retouched out of the image.


Let's see how this looks on one of the other backdrops.  I was REALLY eager to see how this one would work with my Tomb Kings!  For obvious reasons. :-)


This was an objective marker that I made out of one of my terrain pieces.  That same sphinx was everywhere, including on my scratch built Screaming Skull catapult.


One last view.  The browns really play off the greens.  I will be trying this out with two other back drops, so look out for that!


Speaking of scratch built catapults... here it is!


Check it out in brown!  Again, lots of new shots to test out, and a whole army to do that with!!!!


Stay tuned!


Poised to fire!


As I mentioned a few times during the assembly phase of the Krios, I learned that the gun is supposed to be able to change its angle.


While I was trying to get the mass of pieces to stick together, it seemed like a pretty impossible task.  There was a lot holding the sections together towards the front, but not much in the back, where a lot of the weight would be.


I had used to green stuff to close the gap on the axle of the gun, and it's a good thing that I did.


That extra green stuff provided the contact needed to keep the gun in place once raised.  So, be aware of that!


I just had to see what the tank would look like on one of the other Hangar 18 backdrops!  Tomorrow I test out some more with the Tomb Kings.


What I have noticed about the Hangar 18 backdrops is that they can diffuse the shadows created by my lights.  Granted, I use three of them to counteract the shadow effect, but I would still get a little of that on my printed backdrops.


It is interesting to see what colors look very different here, as opposed to the blue/white fade!


The raised gun.  It really makes it look like a WWI artillery piece. :-)


Ready, aim FIRE!


It was very tough to get any pictures of the pilot... sorry!


A few views from above.


These used to be impossible to do... at least not without tons of retouching work later in Photoshop.


It's so nice to just snap the pictures and crop away the vast unbroken field of backdrop!


Wednesday, July 16, 2014

Riding along on the crazy train...


Back to the engine of the Siege Train.  I am getting more into the glazing at this point, which you see here, using some Reaper Grey Liner.


For the glow of the lights, I brought out the Vallejo fluorescent paints.  I used the yellow, which was for the most intense glow.  Around the edge, I used a higher chroma reaper yellow...


The idea was to paint the darker color transparently around the edges, to make the lights look lighter.


I also wanted to see what some rudimentary rust and weathering might look like.  There are some deep crevices on it, and I want to be sure that the rust does not look like red glow!


A bit more on the front section... working on some of the edges and details.


I also worked on the back of the train.  Weathering will be even more important here.  Otherwise, it will be a bunch of rather uninteresting grays.


I decided that the roof of the train was going to need more weathering... and some freehand.


And here it is!  Since this is a Union Siege Train, I tried to make it like the US of the Union buckles.


There will be other freehand as well, like these small numbers.


Some work on the upper conduits.


Cleaning up more edges, creating more darks here and there.


I thought it would be fun to put the Wild West Union logo on this side.


I put some more rust effects towards the bottom and the wheels.  I don't want to get too crazy here, since I want to wait until the other sections are painted to this degree... and the rail sections as well!


Some rust effects on the roof!


Where it stands right now.  Time to bring the other sections in line with this one!


They get into everything...


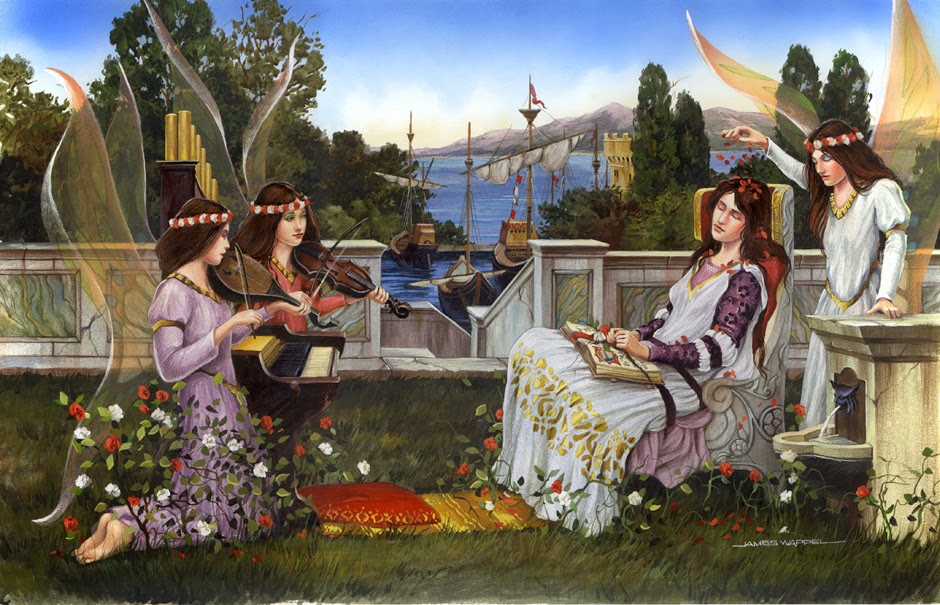
Just like the Arthurian series, I had been trying to find all the images from the homage to John William Godward, one of the last of the Pre Raphaelite artists.

At long last, they are discovered!  And I forgot at least 2 of them entirely!

This was actually one of the last of the series, called Caught in the Act.  Yes, lots of marble, and pesky baby dragons!


Then we have Pool Side Fun, where I had a blast with the reflections in the water.  You will notice that the same dragons keep popping up over and over...


Next up is The Favorite, which was the first in the series.  It is where I first got hooked on painting marble!


The New Toy.  I really enjoyed playing the various colors of marble off the different fabrics.


This was the final painting in the series, called Fairy Symphony.


And Little Rascals.

All of these were watercolors on hot press watercolor board.


Tuesday, July 15, 2014

Climb aboard the Siege Train. Powered by...


While the original concept art did not show any glowing conduits, you know me and my appetite for such things.

Having read some of the back story of the Wild West Exodus universe, I know that a new 'power source' was discovered, and that it glows red.  So, I located a few spots on the engine that I thought might be fun.

With all the dark colors, and varying shades of gray, the extra interest added by such a glow could be very important.


As usual, out come the Vallejo fluorescent paints.  Keep in mind that while they are very thick consistency, they are very transparent.


You also have to be very aware of what colors you are using to lighten them.  Be sure to use high saturation yellows, and stay away from white.  You will be a weird pink glow instead. :-)


You can see the glow effect start to emerge.  I have to remember that all the dark surfaces near it will get darker, thus magnifying the effect.


Also, I will be doing some glazes on the glowing conduits themselves, which will make the lights that much lighter.


Final bits on the lights.  Now to work on the wheels and the back of the engine.


Here are a few more views of the nearly completed Shaded Basecoat stage.  I have tried to leave myself as much room as possible in the value scale to do more contrasts.


The reason I do the Shaded Basecoat is that it gives me a lot of flexibility as I move forward.  I can change things here and there... I am not locked into a certain path.


Even my initial glazes made quite a difference... those coming up next!  Keep this view in mind when you see the Glazing images.