Wednesday, June 11, 2014

The first round of bases


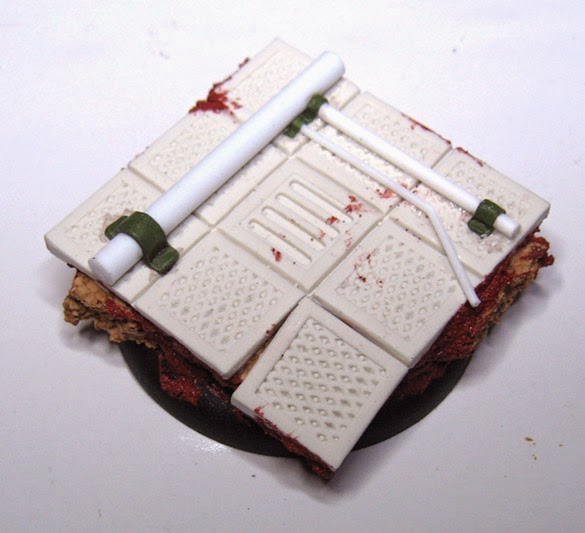
Hey folks!  I just made the first round of bases with the Happy Sepukku moulds!

I thought I would choose one of the sci-fi moulds, and see how I could incorporate that into my existing techniques


As you know, I use sculpey, cork, plasticard, and polystyrene tubes.  The Happy Seppuku moulds are meant to eliminate the need to constantly buy more plasticard textures.

What I loved about these was the possibility of chopping them up into smaller sections.  Sure enough, it worked like a charm!


I thought that I would do a few combinations with cork to start.


As you can see, I "broke" off one of the panels, and used oxide paste to secure it in place.  Then it was time to add some polystyrene tubes!


Tubes added... looking good!


I did some more smaller bases, once again chopping the big panel into smaller chunks.


Adding tubes along the way...


Here's the whole collection!  The silver bullets (irony, yes) are from Secret Weapon Miniatures.  You have seen me use those many times now.

By the way, I also added some green stuff brackets to attach the tubes.


My next post will show the process of painting these guys!


Tuesday, June 10, 2014

Playing with purple


There were a number of different topics that I left out of the original set of videos, since the idea was that once I had the means and knowledge of how to make them, I could add more titles as time went on.


There are lots of colors that I want to cover, and I thought this could be a fun exercise in purple.  Besides, I need to find just the right miniature to use! :-)


I did lots of cool vs warm purples, and played with saturation as well.

She is now here:


More of the Good Earth


The Oxide Paste and Dark Earth products came out again for some more terrain bits.

While these are obviously very tiny, this could easily be scaled up to 28mm size.

Some bunkers...


And the desert sands!


It was very strange to be making this tiny church after the 'giant' cathedral that I made for Adepticon!


The bunkers and blockhouses painted and flocked.


I had to go much more simple with the designs on these, since I needed somewhere for the minis to stand.  I wanted to do a very fancy version, but space was just too limited.


Still, they get the point across, and you won't want to leave your units standing in front of these for too long!


Troops taking cover!


Monday, June 9, 2014

Playing in the sandbox


In preparation for the Mediterranean campaigns, I have started to paint some American and German tanks in desert scheme as well.


I have gone with more weathering for my versions.  Part of this is to hide some of the mould lines, but also to lend a better sense of scale.  That tends to make super tiny things seem a little less small :-)


Most of the color transitions were done with glazes.  I wanted to have more of a warm, sepia color in some areas, but more greenish brown in others.


I also went back in with some light colors mixed with the glazes to reinforce the middle tones, as usual.


I look forward to doing more of the desert theme, but also trying out the weathering on Western Front Panzers and Shermans...


The Great Experiment begins! Press Test.


It seems like this is what you have all been waiting for... getting down to business with the sculpey and the moulds.

For the newcomers not quite familiar with how sculpey works, it is a clay that you can bake in just about any kind of oven.  When I am working with my basing techniques, I almost always use the regular sculpey.  Not Super Sculpey, not Sculpey III... just regular old white sculpey.

It is by far the easiest to carve and cut, and in this case, much easier to press the moulds into!


We have some tools... the rollers, some ceramic tiles, and the pasta machine.  Oh, I'm sorry... clay extruder.  I just didn't know those came with recipes. :-)


To make sure that I would get a sheet of sculpey that would be about the same size as the moulds, I pressed it out by hand into a rectangle.  If I left it as more of a tube, the machine would just make the tube much longer... not widen it!


Here goes!  Through the pasta extruder/clay machine.  Al Dente indeed!  It is best to use the thickest setting.


A sheet that is long enough and wide enough to fit two moulds, ready for pressing!  


I thought I would give some of the sci-fi moulds a try for this first pressing.  They had some complex textures that I felt would be good for the "press test", and offer many possible basing concepts right off the bat.


The first mould.  To make sure I pressed as evenly as possible, I used my rubber jeweler's block.  However, I could have used one of the ceramic tiles as well.  It's important to press evenly, or the texture will not come out right.

I didn't put the clay in the freezer this time.  I wanted to see what would happen if I just pulled it away.  That actually worked out better than I had anticipated.


On to the next texture.  This type of plating didn't have as much variety in texture as the first mould, but the rivets seemed to present a challenge.  I was glad that they appeared to render OK.


One more texture!  I felt that this one wold be a challenge, once more due to the rivets.

Pressing with just the right amount of oomph would be critical, so that I didn't distort the rivets.  I suppose I could have put this in the freezer as an insurance against messing up the rivets as I pulled the mould away, but that was not too much of an issue.


Out comes the toaster oven so that I can bake the sheets!


Stay tuned to find out what happens after the steel plates are pulled from the cauldron of the forge!


Sunday, June 8, 2014

The Desert Rats


Here and there I have put a few spots of paint on the British units from the Medeterranian expansion.  First, an example of the infantry.


I will be taking a few of these and converting them to have berets, which should be fun!


Now some Crusader tanks for support!


I had seen a few reference images of a desert camo scheme, and that seemed to be the best idea, as opposed to simple tan.


I did stumble across a happy accident as I painted them.  As I was painting one of the tanks, I dropped it in my paint water!  This has happened a number of times when I am holding a figure that is not pinned or attached to something else.

While the water was still on the tank, I took some of my darker colors and placed them on the tank, allowing the water to do the blending work for me!  That was a very pleasant surprise.


I also used some of the markings that I had discovered.


I look forward to doing the rest of these, and the terrain sets that will go with them!!!


Don't worry, be happy!


Hey folks!  Here's a fantastic new material, one that will make quite a nice addition to the tool kit!

These moulds are from Happy Seppuku, and they are the result of a recent kickstarter. As you can see, there is a wide variety of textures to choose from.


First, I will show you some images of the base texture stamps.  These are some wonderful textures, and the moulds are of a substantial size.


With each grouping, you will find something to suit just about any miniature.  I love the various wood, tile and cobblestone textures.  Those cobblestone textures always take me a lot of time to create, so those will be even more helpful!


And here they are!  These are large enough to cover an entire large creature base, or a typical 20 man unit... or darn close to it! :-)


My plan is to roll out my sculpey sheets, as usual, and press these moulds into it.  I can't wait to see how these first tests go!  Like any experiment, there may be some trial and error to get things just the way I want.


The moment I set eyes on these, I realized that my need to keep buying new sheets of plasticard textures may have ended!  I was going to make some of my own press moulds of deck plating texture, but that is always a hit and miss prospect.

Once again, my plan is to roll out the sculpey, press in this texture, and then work with it once it is baked.


How about this for some riverbed texture, or even lava?  Fun!!!

I should also mention that once the sculpey has been pressed into the molds, I will put them in the freezer to make them as solid as possible.  This should make them really easy to pop right out of the moulds.


These items will probably require green stuff or maybe apoxy sculpt.  Probably green stuff, with more yellow than blue so that I can pick up all the texture.

Just like the sculpey, I will put these in the freezer so that I can pop the green stuff out of the mould and continue casting.  Just check out that pirate theme texture!!!  Yar!!!


More choices for your steampunk and 40k figures.  Perrhaps even some Zombicide.

Wonderful gear textures, saving me the need to search through those science catalogs for the plastic gears.  Some very handy 40k textures as well, which I can't wait to use!

I think I will be able to make some fun urban rubble settings for Zombicide!!

Obviously, my ideas for the use of these moulds is somewhat different than the approach shown by Happy Seppuku.  They have lots of images on how they use the moulds on their website.

Their technique is to lay out the green stuff on an idividual base, and then press it into the moulds.

In the coming days and weeks, I will be showing you pictures of the results I get from the sculpey experiments.  Stay tuned!

Here is a link to their site: