Sunday, June 8, 2014

The Desert Rats


Here and there I have put a few spots of paint on the British units from the Medeterranian expansion.  First, an example of the infantry.


I will be taking a few of these and converting them to have berets, which should be fun!


Now some Crusader tanks for support!


I had seen a few reference images of a desert camo scheme, and that seemed to be the best idea, as opposed to simple tan.


I did stumble across a happy accident as I painted them.  As I was painting one of the tanks, I dropped it in my paint water!  This has happened a number of times when I am holding a figure that is not pinned or attached to something else.

While the water was still on the tank, I took some of my darker colors and placed them on the tank, allowing the water to do the blending work for me!  That was a very pleasant surprise.


I also used some of the markings that I had discovered.


I look forward to doing the rest of these, and the terrain sets that will go with them!!!


Don't worry, be happy!


Hey folks!  Here's a fantastic new material, one that will make quite a nice addition to the tool kit!

These moulds are from Happy Seppuku, and they are the result of a recent kickstarter. As you can see, there is a wide variety of textures to choose from.


First, I will show you some images of the base texture stamps.  These are some wonderful textures, and the moulds are of a substantial size.


With each grouping, you will find something to suit just about any miniature.  I love the various wood, tile and cobblestone textures.  Those cobblestone textures always take me a lot of time to create, so those will be even more helpful!


And here they are!  These are large enough to cover an entire large creature base, or a typical 20 man unit... or darn close to it! :-)


My plan is to roll out my sculpey sheets, as usual, and press these moulds into it.  I can't wait to see how these first tests go!  Like any experiment, there may be some trial and error to get things just the way I want.


The moment I set eyes on these, I realized that my need to keep buying new sheets of plasticard textures may have ended!  I was going to make some of my own press moulds of deck plating texture, but that is always a hit and miss prospect.

Once again, my plan is to roll out the sculpey, press in this texture, and then work with it once it is baked.


How about this for some riverbed texture, or even lava?  Fun!!!

I should also mention that once the sculpey has been pressed into the molds, I will put them in the freezer to make them as solid as possible.  This should make them really easy to pop right out of the moulds.


These items will probably require green stuff or maybe apoxy sculpt.  Probably green stuff, with more yellow than blue so that I can pick up all the texture.

Just like the sculpey, I will put these in the freezer so that I can pop the green stuff out of the mould and continue casting.  Just check out that pirate theme texture!!!  Yar!!!


More choices for your steampunk and 40k figures.  Perrhaps even some Zombicide.

Wonderful gear textures, saving me the need to search through those science catalogs for the plastic gears.  Some very handy 40k textures as well, which I can't wait to use!

I think I will be able to make some fun urban rubble settings for Zombicide!!

Obviously, my ideas for the use of these moulds is somewhat different than the approach shown by Happy Seppuku.  They have lots of images on how they use the moulds on their website.

Their technique is to lay out the green stuff on an idividual base, and then press it into the moulds.

In the coming days and weeks, I will be showing you pictures of the results I get from the sculpey experiments.  Stay tuned!

Here is a link to their site:


Saturday, June 7, 2014

She is very devout


Here's a test run for one of the entries I want to create for Reapercon next year.  I wanted to get used to the sculpt, so that I can plan out any kind of freehand or effects.


There are a lot of fun things going on with this sculpt by Bobby Jackson.  A lot of action with the bits of the cloak, how the arms are positioned, and so on.


This marble base is a tiny version of the much larger vignette that I have planned.  There are sketches that I posted right after I got back from Reapercon!  You can go check those out if you like.

She is also here:


Friday, June 6, 2014

Today we remember...


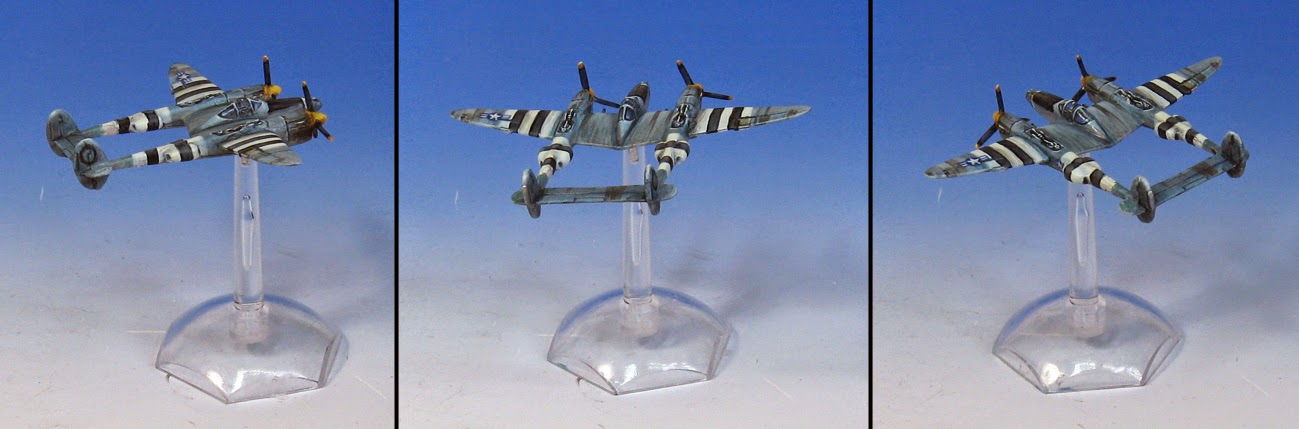
I thought it would be appropriate on this 70th anniversary of D-Day to post something I have never tried before... tiny planes!  This is an entirely different experience.


It requires a completely different mindset and approach.  As tiny as the Memoir 44 infantry is, this plane is even smaller!  Simply figuring out what all the little parts are can be a challenge in itself.


Some of you might also notice that I decided to sneak in some metallic paints!  Yes indeed.  I did that in a few ways... mixing in a blue/silver color with my bluish grays.  I also did a few transparent glazes of metallic in certain areas.


As you can see in these views, I attempted to make the silver facing the ground warmer, or more of an earth tone.  

It was a little bit difficult at first, I must admit, since I never work with metallic paints.  I have done so in this 'mixed' fashion.


A few more views... the next one will show you what I was trying to replicate.


And here we have it.  Now I can't wait for it to fly around and do some damage on the battlefield!!!


Why 2K?


Well folks, I had hoped for something more fancy for the 2000th post on the blog!  Yes, indeed folks.  In just 26 months of blogging, I have reached the two thousandth post!

However, in some ways, a work in progress style post, with a wee touch of 'how to' thrown in, is pretty appropriate.

All the while I was working on this, all I could think of was the Raging Reds video that I filmed for the kickstarter.  So many people have asked me how to lighten reds without them turning pink.


As you can see, this brighter red is being lightened with a touch of orange.  Had this been more of a burgundy, I probably would have selected a grayed down lighter green.


This is the big thing right here.  If you use too much yellow to lighten the red, it will simply become orange.  Use white, and it still will turn pink and chalky.

Therefore, I take this opportunity to use one of those bright flesh tone colors that is lousy for actually painting skin. :-)

This has a tiny bit of color to it... some red, in fact.  This helps to lighten the color further, but not become chalky.


This view of all the pieces shows you how that plays out on the figure itself.


I am still using the filbert brush and the #8 round craft brushes at this shaded basecoat stage.


I am also experimenting with some glow on this vehicle, so that it will look a little different than all the other versions you tend to see.  Obviously, I have one of the Vallejo fluorescent colors out on the palette!


I mixed in a sky blue to tone this down a bit.


As I started to mix in an off white, I had to be sure to toss in enough of the fluorescent green to keep the intensity going.  All I am trying to do at this point is jam all the bright colors down into the recesses.


Time to work on the cowlings again.  I mixed a tannish color with a blue gray so that the glow color would be replicated in a small way.  I will impart some more of the tan in other areas, so that it starts to look even more like brass or bronze.


I took the extra cowling piece and set it on top just to get a few ideas of what I would have to do on it.  Should I paint a lot of reflected glow on the underside?  Or would that be too visually confusing?  Wait and see.

And, many thanks for checking out the blog!  I will try to continue to have fun, informative variety coming your way as often as I can!!!!!!!


Thursday, June 5, 2014

Mages and elves oh my!


Another small collection of Reaper minis from the vault.  These guys were painted about 5-6 years ago.


I know I have painted this Ardynn the Slayer a few times.  He was the subject of a diorama once!


There was always something about the wraiths and spirits from Reaper that is very fun.  I think I could have even more fun painting this with all the techniques that I have learned since then!


Reaper minis always shine!


It's been a while since I posted a Reaper Miniature (which means a few days!), so we have Aviriel Tellerion, Elf Paladin.  One more very fun sculpt from Werner Klocke.


I went with the classic deep blue/gold contrasts here, keeping things simple.


She was actually part of a group of Reaper minis, shown here.  I will see what images I can find of the other members of the party!