Monday, October 8, 2012

Lorna the Huntress diorama


Tonight we have another blast from the past.  This is a little diorama that I created back in 2004, the Year of Dioramas.  It is made from sculpey.


To get the rock texture, I took some real rocks (decorative stones) and pressed them into the unbaked sculpey.  Cathy developed this technique, and it has been invaluable over the years.


I sculpted the statue head for this piece, but the standing stone was originally done by Cathy.  She made it from sculpey, and then we created a press mould of it.  That allowed us to press in some sculpey and bake it over and over again. Very handy!


Lorna (a Reaper classic) was designed to come off the diorama for some role playing...


I added a little shield for fun...


Believe it or not, there are still many more of these dioramas that are yet to be posted.  Some of them are quite elaborate!  Stay tuned...


Meet Batu Qorchi!! Khandish charioteer


Well, here we have a painted Khand chariot at last!  The driver is named Batu Qorchi, which translates in the Mongol language as "Loyal quiver bearer".  


It was very fun to see this all together once all the parts had been completed.  Sometimes it is difficult to make everything mesh together shading and color wise when you paint so many pieces individually.


I am glad that I have been making all the horses different breeds and colors.  I think the "official" paint jobs are all black or dark brown.  That is fun once in a while, but not all the time!


I also had been itching to get my base covered with some flock and static grass.  The shading had been set up specifically to accent the lighter grass and flock.  I had also made the cracks in the tiles a bit wider, since I knew I wanted to fill in with the flock.  That makes a very cool effect, and it is one that will be used a lot on the display board!. :-)


I also had a lot of fun with the various hues on the purples!  Plenty of opportunities to get variation with so many surfaces.


I must say, I prefer my converted Tomb King chariots.  The guys look better inside them in terms of scale, and they are easier to paint.  Perhaps the "official" versions are smaller so they can be squeezed onto the 60mm base.  I was also able to add trophy heads, which is the most important thing!


In case you have not seen the original WIP images of the conversion, you can see the Tomb King chariot quite clearly.  I had to saw off about a half inch from the yoke, and another half inch from the chariot itself.  That got it just about down to the size that would fit on a 60mm base.


Converted Khandish Chariot: work in progress


After getting the Easterlings up to speed, and working on the King's chariot, it was time to focus on the remaining Khand Charioteers.  This is one of two conversions I made using a Tomb King chariot and some Rohan horses.

There is a previous thread that discusses the process of making these conversions.  For now, let's look at some images of the painting process.  The shaded basecoat stages are finished, and some shading has been tested in a few areas to lock down the colors.


I wanted to get through the base first (made from bulletin board cork and sculpey).  I had the usual green, black sepia and reddish brown set of glazes out on the palette.  Working various colors in the shadows can help create a lot of depth, and keep things from getting too monotonous color wise on such a big surface.


Time to do some serious shading on the chariot itself, focusing on the all important trophy heads!!


I was very happy with the terracotta /orangey shades on the wooden surfaces like the yoke and chariot frame.  It set off the blue/purples quite nicely.


I finish off the trophy heads, solidify the shadows and highlights on the chariot wheels, and even get into some of the freehand on the chariot.


I do some shading on the quivers (Tomb King archers) and the fur)  During this time I have also been putting layers of glazing and shading on the driver.  He is very similar to the King, so I didn't want to get too redundant putting that in this thread as well.


The chariot body gets some more shading, setting up the eventual lighter colors.  My plan here is to have the  shade colors be warmer, but do some lighter areas that are tinted blue.


I have also been working on the banner.  The final colors on the banner will be much different in the finished images I will be taking tomorrow.  There will be some final touches on this figure tomorrow, and the flock / static grass will be added as well.  Stay tuned!  He even gets a name...


Sunday, October 7, 2012

The Mag Mile, miniature style... :-)


I just noticed these when I was searching my image files for something else.  Many of these Magnificent Ego miniatures were sculpted by Gael Goumon.  The Gnome hero is definitely a favorite of mine! :-)


Wrath of Kings: Dragon Legion


Well, it was a very busy day yesterday!  Today we have some Wrath of Kings.  This time, it is the Dragon Legion, and these are their basic troops.  Many of you probably saw the little post I did earlier about their bases...


Saturday, October 6, 2012

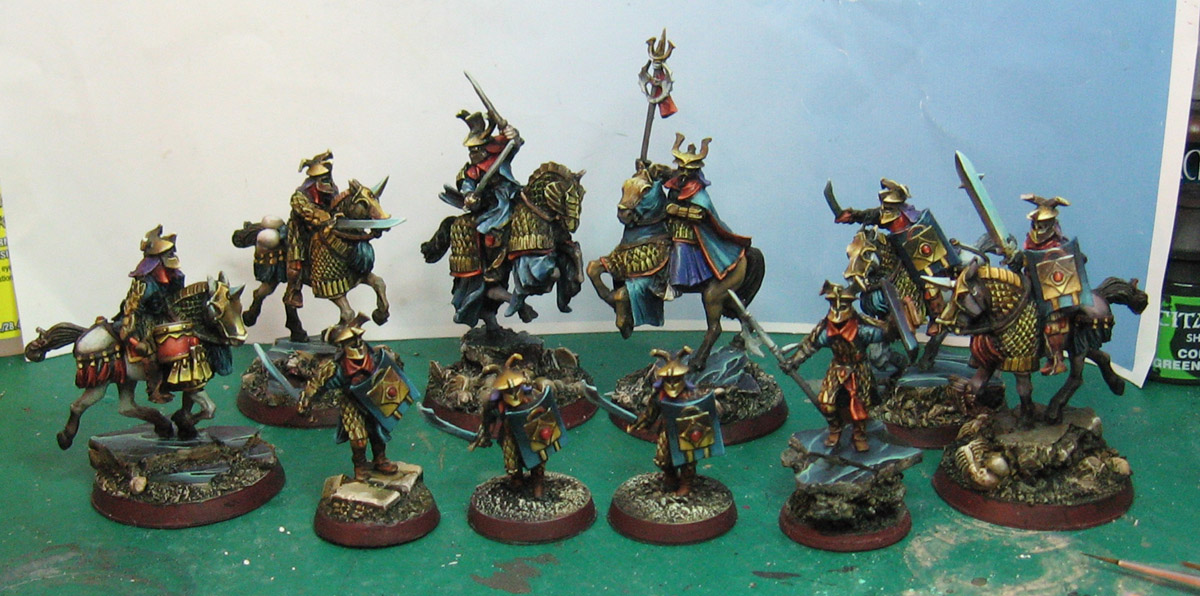
Shading and glazing the Easterlings: work in progress


Once I had the shaded basecoat fully prepared for this next stage, it was time to break out the glazes!!
Here are a few shots so you can see what they looked like before the glazes were applied:


I did some work on the reds since you last saw these guys...


I started by doing some glazes on this Black dragon knight.  Most of the focus was on the armor.  I made sure to vary my colors, some more greenish, some with purple mixed in with the sepia, and so on.


More work on the armor.  While I was at it, I also did some purple glazes on my reds to darken them, and some brown/black mixes on the leathers.


So, the infantry has their metals completed.  On to the horsies!


The first horse was the drummer.  Varying the armor glazes was a little easier here, since the areas were bigger than the infantry.  This image also shows you the washes and glaze colors that I used.


The horses sure look different once they have been shaded, don't they?


Once the armor was done, it was time to shade the horses.


Then I took the dark blue glaze and did all the cloaks and tunics...


Now we have some images to show  the final results of this phase...


At this point, I have to go back and do some reflected light and establish the brightest highlights.  Stay tuned!!


I do hope these posts are helpful.  Since I am busy painting away at these figures, I don't always get the pictures that I want, as the figures are the priority. :-)