Saturday, October 6, 2012

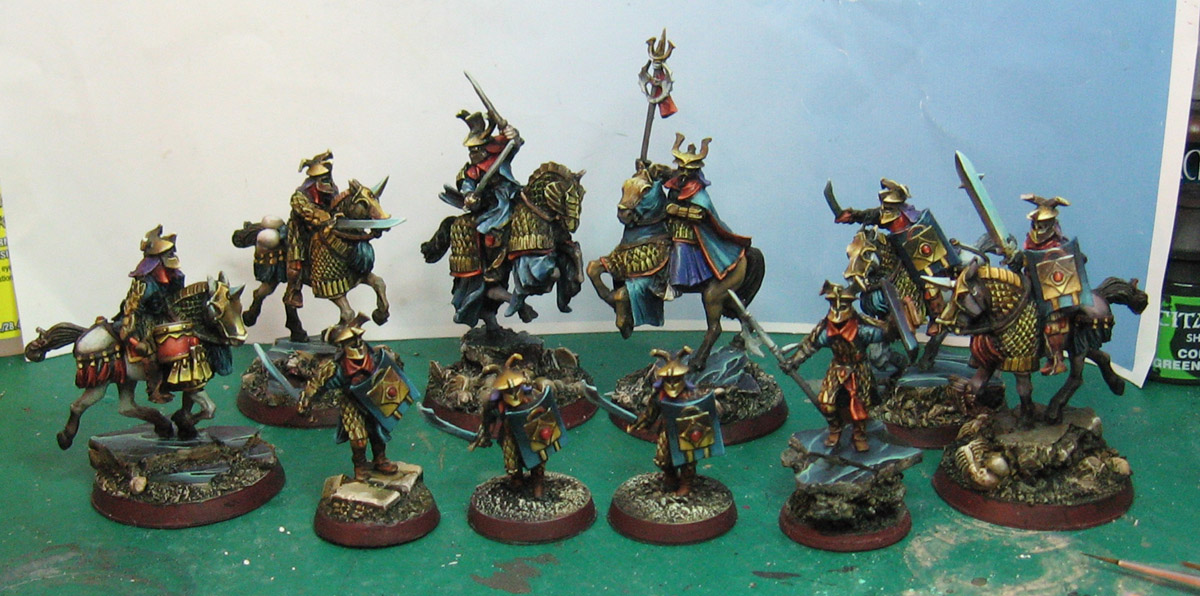
Shading and glazing the Easterlings: work in progress


Once I had the shaded basecoat fully prepared for this next stage, it was time to break out the glazes!!
Here are a few shots so you can see what they looked like before the glazes were applied:


I did some work on the reds since you last saw these guys...


I started by doing some glazes on this Black dragon knight.  Most of the focus was on the armor.  I made sure to vary my colors, some more greenish, some with purple mixed in with the sepia, and so on.


More work on the armor.  While I was at it, I also did some purple glazes on my reds to darken them, and some brown/black mixes on the leathers.


So, the infantry has their metals completed.  On to the horsies!


The first horse was the drummer.  Varying the armor glazes was a little easier here, since the areas were bigger than the infantry.  This image also shows you the washes and glaze colors that I used.


The horses sure look different once they have been shaded, don't they?


Once the armor was done, it was time to shade the horses.


Then I took the dark blue glaze and did all the cloaks and tunics...


Now we have some images to show  the final results of this phase...


At this point, I have to go back and do some reflected light and establish the brightest highlights.  Stay tuned!!


I do hope these posts are helpful.  Since I am busy painting away at these figures, I don't always get the pictures that I want, as the figures are the priority. :-)


The Axles of Evil ride again: Yes we Khand.


We head back to Middle Earth for round two, and we also head back to the Domination scenario, which is the first of the official scenarios that we tested.  For those who have not been following these battle reports, all of them are 600 points.

Rich rolled out yet another new army, this time with Gimli and Boromir (and Pippen tossed in for good measure).  His model count was down to 28 from the previous 41, but now he had a lot more might on his side.  I didn't have any individual characters that could kill off either of those guys very easily!  Prior to the game, I assumed that I would have to count on the spread out objectives minimizing the impact of the two big heroes.  They could only contest two of the 5 scoring counters, and my higher mobility and hitting power should let me clear out the remaining three for the points.

Here is the board layout.


We deploy.  As usual, once a unit is stuck in that forward deployment zone, everything else kinda has to go there as well.  I make sure that the drum is right in the middle of everybody, thus giving me that +3 move.  Everything Rich has is right on the line.  I put the King and his men all the way to the left, giving me the option of zooming towards the two objectives on that side of the board (hopefully spreading out Gimli and the rest of the Gondorians), or smashing into that unit with the cavalry.


The way things work out, I send a few non-shield pikemen towards the two objectives in my deployment zone, along with some Black Dragons in case Rich send guys after them.  Everything else goes for broke in a mad charge against the Gimli unit on the left.  I had enough movement to cover the 8-10 inches between us, and I figured this Big Gamble would lead to a quick win or a very rapid defeat!


My initial charge does not go all that well.  I either lose fights, or don't get kills.  My Kataphract captain is unhorsed, leading to a rather odd situation where I have 2 Easterling captains standing right next to each other!  This leads to counter charges by Rich, led by Boromir and a Gondor captain.  I lose 7 of those 50/50 rolls in a row for contested heroic actions!  Yikes!

However, the counter charges don't go as well as they could have (even though Gimli would kill off 2 chariots), letting me survive long enough to regroup.  I also start walking the extra warriors from my held objectives to outflank the Gondor counter charge.


I keep hammering away at the Gimli unit on the left, getting off as many chariot and cavalry charges as I can. Meanwhile, the 2 Black Dragon captains are busy fending off all sorts of attacks.  One of them even fends off an assisted attack by Boromir!  Shielding gave him 4 attacks, and when combined with defence 7 and fate, it kept him alive!


My move towards the flank of the Boromir unit did peel off a handful of Gondor, which proved to be key.  It reduced the amount by which I was outnumbered, letting me slowly turn the tide in the big scrum at the crossroads.  Boromir and 2-3 additional guys were fighting just one of my guys at a time, which gave me the 1 on 1 or two on one matchups that I needed.  The captain in particular were huge, since they could withstand those assaults much better.


The Gondor knights that went towards my objectives did not fare well.  Even though I had some bad turns trying to kill them, they eventually started to fall, becoming more and more outnumbered and surrounded.


While Gondor was holding out by the crossroads, things were getting worse and worse.  They had used up just about all of their might, Pippen was dead, and there were enough mobile units left for me that could easily run towards the 2 objectives in the Gondor deployment zone.  Gondor was going to be broken this turn, which spelled doom for Boromir and Gimli.

What remained of the Gondor forces would have to be near Boromir to stay around (all the captains were dead), which meant that they could only claim 1 or possibly 2 objectives.  In the meantime, all I needed to do was run to the other 3-4 objectives to get the win, as I would not need the leadership bubbles.


This battle reinforced my doubts about expensive, named heroes in low point games where you are using the official scenarios.  Those characters do a lot of good things, but they can only be in one place, and the scenarios either make you have to be in multiple places, or even keep you off the board for the entire game!  It makes it so much easier for me to avoid any big character on foot, as everything I have moves so fast.

Rich had a lot more fight skill 4 in this game, which is a big reason why the initial combats did not go well for me. He cleverly placed them in front of the lower fight skill spearmen, which I try to do with my own Black Dragons as well.  This makes me worry about what an army of fight skill 5+ elves might do.  I think I will run a test battle of my two armies fighting each other.  Stay tuned!

Afterwards, I tried to get in some work...


While Cathy joined the Malifaux guys for her first official game!!


She would prove victorious, capping a glorious day for Team Wappel!!


Friday, October 5, 2012

From war to the painting table: Easterling Work in progress


OK!  When the Easterlings are not busy killing the "good" guys, they are being prepared for the tournament from a painting standpoint.  Here we have some early stages of the shaded basecoat on the cavalry.  I am trying to use my colors to distinguish Black Dragons from regular Easterlings, plus have them work with the colors of the Khandish allies.


I didn't want to have boring, "pure" golds, so I was mixing green and red together for my first layers.  I then started mixing in yellows, flourescent yellow, and even some space wolves grey to get variety.


I also worked on the horses, and the cloaks.  Once I had the cavalry pretty well set, I had to do the same with the infantry.


Here are the Black Dragon warriors.  I will have to do some extras of these guys to put on the board in case the Kataphracts are unhorsed.


More work on the cavalry, getting everything lightened up to the same level.


Same thing for the Infantry.  At this point, I decide to incorporate some red into all the Black Dragons.


As soon as I started getting the reds in place, I knew that it was definitely worthwhile!  Then I realized that I wanted to make a war drum for one of the cavalry (my figures are all the old metals).  I took some of my lizard bits and fashioned this.  I cut off the sword, and made a nice drumstick for him!


Then it was time to put some added touches on the other cavalry.  I had some skulls and heads that would help make these guys look as fierce as they had been in combat!!


I moved on to the bases, making some nice dark marble.


Just like all other shaded basecoats, I had to prepare the bases for all the darker shading glazes...


They sure look different when they are shaded, don't they?


I used a black, a sepia, a green and a brownish red for the dark glazes.  I even had a paper towel handy to dab away places where I wanted things to remain lighter.  That works very well on such rough surfaces!


Now I can start placing the figures onto their bases...  I will be sure to post the images of the dark glazes for the armor and cloaks.  The same process will also happen with the more 'standard' red Easterlings and their pikes.


Mortimer was very happy when his Puppets War figures arrived in the mail!  He could not wait to assemble them.  He might even let Cathy use them once in a while...


The Axles of Evil: Thundering hooves sound the Death of Gondor


Today's first match was back to the Khandish / Easterling alliance vs Rich's Gondor.  You can see the forces arrayed here.  You can see the Kataphracts, the Black Dragons, and the chariots, led by the King.


Rich's army, featuring the thrice killed Faramir, as well as some rangers.  He borrowed some army of the dead to go along with his Dol Amroth knights.


I was curios to see how this would work, as he outnumbered me 41-23!  The scenario was To The Death, where it is basically a kill 'em all sort of deal.  In some ways, his massive outnumbering could work to my advantage if I could isolate sections of his army.  Rich deployed his rangers in the woods (huge surprise!).


Here is the rest of the deployment.  My whole army deployed in or behind the building, while Rich had units up front on either side.


I knew he wanted to shoot the snot out of me with the archers, so I figured I would hide as long as I could until I could engage him, and make the bows useless.  Since I had the drum, I could move 13 with the mounted units, and 9 with my infantry!


On the first turn, I made a big move towards his Faramir lead troops.  I wanted to see what he would do with those guys.  I had no intention of going after them, since I could never get the numbers over there.  Instead, the ghosts and swans seemed like a tastier target...


I was still able to keep the building between me and the archers.  For good measure, the War priest cast fury.


Once the Faramir units went backwards, trying to draw me out, I decided to use the drum and go student body right, after the Ghosts and Swans.  I left behind all the heavy hitters behind the building so that he could not ignore that flank.  It was risky, since dividing the army in front of a numerically superior foe is a no no!  Also, I was leaving behind my fury, whcih would have given me protection from terror and random bow fire.


However, I was able to keep enough terrain between me and the archers to minimize any potential damage.  Also, I moved out the King's men on the left to draw some bow shots into the multi-wound, fate and fury bunch... Rich had a lot of unfortunate rolls, to say the least.  You can tell by all the "fired"


The Good force got priority, but I used might to charge the AoD and Swans.  I failed 3 tests, but enough guys made it so that the pikemen could pile in!  The King;s men went back behind the house.


The fights didn't go as well as planned for me this turn, but I was now surrounding the Ghosts and Swans.  The next turn would be the Big One as Faramir's boys continued to skedaddle to the rear...


Here it is.  I passed all the fear tests, as my guys wanted to say hi to Casper the friendly ghost.  Some Swans won combats by sheilding, but that was more delaying the inevitable.


The Army of the Dead showed all their weaknesses, which is the low fight skill and no protection against massed strength 4 attacks.  In some cases, I was rolling 6 to 12 wounding dice.  Not much can survive that!


What remains of the Ghosts and Swans is getting hammered.  The Swan captain miraculously survives, but is using fate, which still counts as victory points in this scenario.  My King stays lurking behind the building, preventing any shots coming his way.


The end comes quickly for the last of the Ghosts and Swans.


I do a final charge on the right, and whack the lone Gondor warrior on the left.  It's all about piling up casualties at this point, and staying in combat to eliminate bow shots.  More bad rolls for the archers render them a major bust.


The Faramir units high tail it towards the building, so the King keeps backing up, with the thought of moving to the one side of the building at the crossroads to hit the smaller Gondor unit with no Faramir.  That would get them to a break point, and provide more easy kills.


Now that the last Swan knight is dead, all of my units do a massive drum fed move to the right.  Now the archers are in big danger, and they even start to fall to chariot bow fire!


At this point, Faramir had had enough, and headed back to Minas Tirith.  There was not much need to play out the rest of the game, since I had amassed a 15-2 lead in kill points!  The strength of men (if it ever existed) was fading fast! 

This was the nail in the coffin, so to speak, of the Army of the dead.  For the high points cost, you can easily counter any advantage with a combination of much lower priced units.  Sadly, these will likely only see the table again in a special scenario that we create ourselves.

The stunning mobility of this army was the key.  I could move so fast, staying away from his nasty units, away from bow fire, and getting into position to isolate and destroy smaller chunks of the opposing army.  While I was outnumbered by almost 20, the extra attack generated by the cavalry and chariots actually make that number even.  When they start knocking guys down, it actually gives me a huge numerical advantage at the point of attack.