Sunday, May 18, 2014

A Minx coat ;-)


OK folks, I think some of you have heard that I am painting this very fine sculpt for the upcoming kickstarter from Minx Studios.

To make it even more special, I used one of the fantastic new plinths from Secret Weapon Miniatures to create a decorative base.

Step one was to grab some tin foil!


Then a bit of 'pre-sculpting' with the foil to make sure everything will be in the right position, angle and so on.


Over the top of the tin foil will go some of my favorite sculpting material, particularly for this type of base.  This is Apoxy sculpt.  I have done a number of posts on this material, and how I use it to create a variety of rocky bases.

It has many fantastic properties.  It is incredibly strong, but you can carve and sand it if necessary.
Using a little more water with it will make it more malleable, but it will not disintegrate. 


A thin sheet of the Apoxy sculpt is placed over the tin foil.  This does a few things.  First, it saves a lot of apoxy sculpt!, Second, you can actually use some of the rough texture of the crunched foil to make some very nice rock textures.

It also makes the whole piece a bit lighter, and easier to place the figure as well.


This is what it looks like after pressing it down in a few places with my fingers.


Using a few basic flat sculpting tools, I attempted to create strata in the rock face, as close to the concept art as possible.


These pictures show more refinement in the textures.


The sculpting phase is complete!  Once this sets up, I will add rocks and gravel, and other extras such as skulls, branches, etc.


This is the information on the Kickstarter, which is not far away!!!  Check it out!

Go Hawks.


A true Cylon at last!!!


Well, before we get to that, another set of Reaper minis.  These are some older sculpts, but still very fun!  Obviously, I had a blast with the tattoos!


That, and a wee bit of plaid.


I have some more of these on the way...


Chop chop!


Yes, for the first time in nearly forever, I got to be an actual Cylon.  Drawing standard loyalty cards certainly never worked for me.  I think 22 of 24 loyalty cards over the years were "You are NOT a Cylon" card.  Taking Baltar or Boomer made no difference.


Even taking Cylon leaders didn't work, as my agenda was always to help the Humans survive.
Bummer!

Until now.  Finally, the destruction of the meat bags was my life's goal!


I had some fellow Cylon partners in this noble quest.  Hank played Callie, who put a cap in Baltar's face at one point, and Cathy, who was Chief.

I was campaigning for Callie to run for office against Baltar, but she chose a more direct route to Colonial One :-)

This was the "Cavil/Callie" 'can'paign poster.


Saturday, May 17, 2014

The other scratch build with a little bit of painting


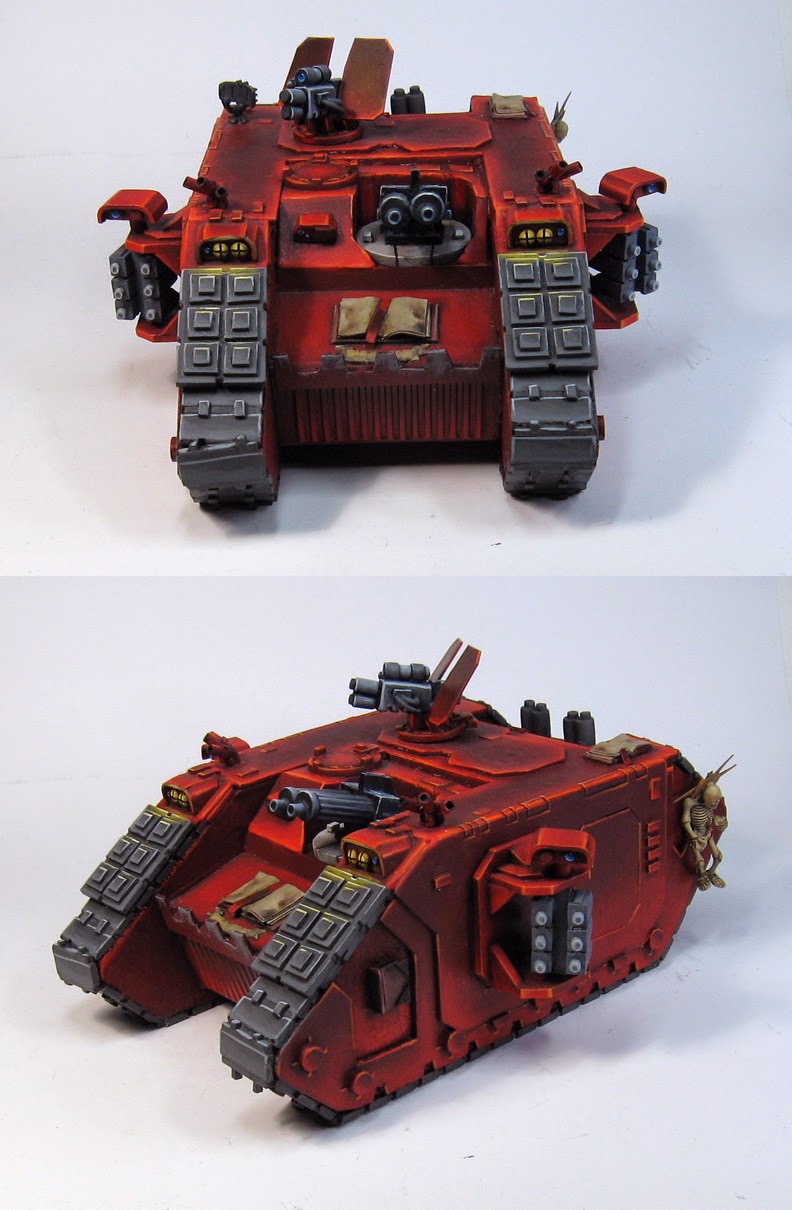
Yet another painting work in  progress.  This one is barely 40% painted.  Lots to do on it, but you get the idea!


This was for the beloved Demonhunter army, which was all done in these bloody reds.  You can see the rest of that army in the Demonhunters section, and read all about the Brotherhood of the Sacred Chalice.


As you can see from the original pictures showing the scratch build, I switched these sponsons to bolters from the original lascannons.  That was the whole idea behind the project :-)


The Assault cannons were actually made from plastic wall hangers!


All the rest was done in pink foam, matboard, and sculpey.

More to come as I continue the process on these guys!


Putting a hex on your minis


Or is that minis on a hex?

Anyway, this is the next stage in developing the stands of Memoir '44 miniatures... the infantry in particular.

Just like Warhammer Fantasy, set up can take a while, since each infantry unit has four figures.  When you have the average 7-9 units to pull out of the box each time, you start to get bored placing all those figures.

So, I figured we would do the same thing that I do with my WFB units.  They are all magnetized on the movement trays, which are in turn magnetized to the container.

Thus, set up is little more than pulling the movement tray out of the box and placing it on the board!

Fortunately, I have many scraps of matboard around, and it is the same thickness as the terrain hexes.  I traced them out onto the matboard...


And brought out the sand and gravel!


Time to do some cutting.  The metal ruler and some cork comes in very handy!


We have a pile of hexes, all ready for units.


The magnets are self adhesive, so I went directly to gluing on the rocks.


I had to forgo some of my heavier rocks, due to the tiny size of the figures.


It didn't take long to get the whole batch covered in gravel!


We wanted to test and see what the rocks and sand would look like on the figures themselves...
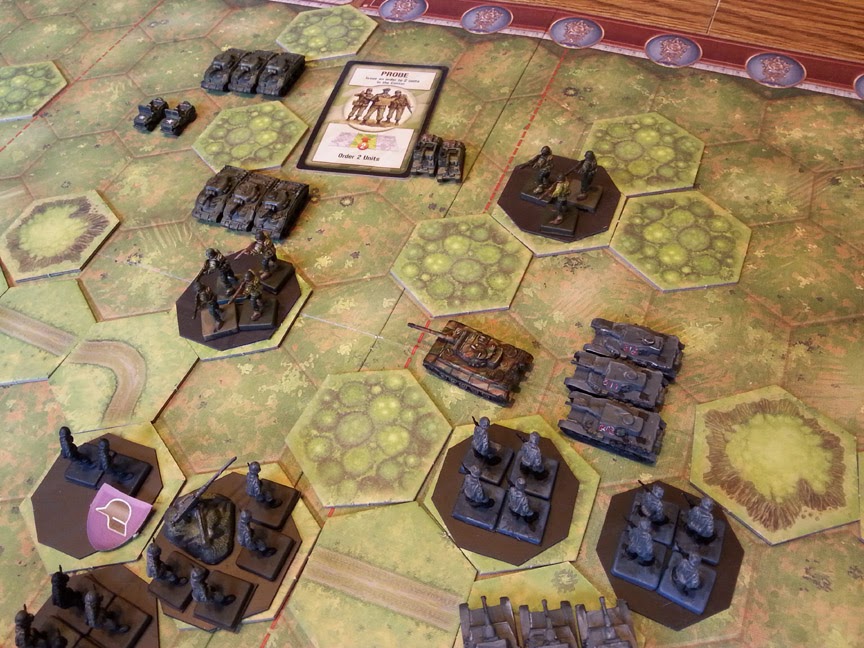

And it seemed to be very cool!


On future stands, I will add extras such as road signs and other elements.  There will be further posts showing what these look like painted, and with flock, grass, foliage, etc., added.  Stay tuned!!!!


Friday, May 16, 2014

Work in progress... the beginnings of color on the scratch built raider.


Here are some images of the partially painted Land Raider scratch build (see previous posts for images of the unpainted vehicle).  It is about 50% complete.

Again, all of the weaponry was made with the extra firm gray sculpey.  It worked very well for that process!


The sponsons and turrets are all removeable, and can turn in any direction.


The various parts and weapons can be exchanged with the other land raider, which was given storm bolter sponsons.


Eventually, I will get to finish this guy!  I have a TON of freehand to do.  It will be a lot more like the eggshell Grey Knight Land raiders you saw at Adepticon.


It was fun to actually take some pictures of this.  I had not even looked at it in years!  It was tucked away in a cabinet... so far back that I had not noticed it was even there!


When I do finish this off, I will take many more images for you!


Right down to the last man...


When we last saw our intrepid Axis partners, things were looking a wee bit dicey.  Since it only took four victory points to secure an Allied victory, each unit was of vital importance.

I was unable to move the heavy German units on the right very far, since the order cards just weren't there.

However, that would soon change, as they launched an all out attack on the US infantry squads.


The damage was not as much as I had hoped.  Fortunately, the US was not able to do much in response... leaving them even more vulnerable to my heavy units.


Just the trick!  A massive attack, spearheaded by all the armor I could bring to bear.

The American units would suffer heavily, and the survivors were forced to flee!


This put a serious dent in the Allied offensive, and gave me a chance to re-position my units.


Yet another all out advance.  Even the infantry units join in.  The S.S. squad valiantly assaults the tank unit, wiping it out!  


More American infantry units suffer major losses and retreat.  These critical delays allow me to press my own offensive.


Alas, the S.S. unit ends up sacrificing itself in an effort to take out the mobile artillery.


Worried about the heavy losses they had taken, and the menacing approach of Tiger and Panzer units, the survivors of the American infantry dig in.


However, my spotters notice this action, and give advance notice to my own troops.  Clearly more well trained and battle hardened, my own units dig in for an even more solid defensive posture.


This meant that I could unleash my Tide of Iron without the worry of giving up those last few victory points.  That is, unless the Capitalist Pigs are able to eliminate those Italian units which have been trapped in the town.


The Americans attempt to bring in their own feeble Sherman tanks in a desperate move to eliminate on of the dug in German units.


Somehow, that unit survives!  This means that I can set up one last final push...


Look out!  The US have a prime chance to kill off that last member of the infantry squad stares death in the face... and death blinks!!!!


Now for my Ace in the Hole.  A card that allows me to move any four units of my choice.  This spells doom for the Americans, as I can now surround one hapless mobile artillery unit.

They are so frightened by the encounter, that they become mobile enough to flee off the board... thus ensuring an Axis victory!

Rich did a great job writing this scenario, finding as much balance as possible.  I really should have lots, but 4 key cards allowed me to stave off destruction and launch those deadly counter-assaults.