Sunday, September 1, 2013

Preparing for war (or weathering)


I shot these images as I was working on the freehand for the Weathering video.  There is nothing that works in such a mutually supporting way as freehand and weathering.

When you combine the two together, each effect becomes somewhat more realistic.

This is where is gets started, blocking in the design.  You can see that I was working from one of the large bases from the Sisters Army.


The blocked in designs are refined with some more shading, more colors, and some text.


Refining begins in earnest, adding some of the torches and flames as well.


Additional designs, such as the numeral, as also added.


Can't forget the other side.  Some fun lettering!


More lettering and some safety stripes.


Just about everything ready to go for some weathering!!!  Stay tuned.


Using those extra pieces!


OK, here we go.  I spent about 8 hours filing and prepping stuff today, so I worked in some of the terradon conversions.  I put together the Rippers, carefully trying to keep the left over terradon bitz close at hand.


If you remember the previous post, I had 3 terradons that still did not have a fully sculpted face or rear legs.  I had hoped back in the day that I could sculpt some different legs for these which would extend out from the body, instead of being flat against it like the original sculpts.


I was also hoping to save a lot of time on sculpting by putting the terradon faces on the bodies as well.  I somewhat hesitantly chopped of the half sculpted heads, and hoped for the best!


To my shock, the legs were the exact size and shape that was needed!!  That is amazing, since these things were first sculpted about 3 years ago!  Wow.


With just some rough trimming, I was amazed to see how my tin foil and Apoxy Sculpt terradons worked with these new plastic pieces.


I then proceeded to do this on each figure.


The pieces fit just fine, even though each of my sculpted poses was quite different.


The next challenge to overcome was getting the flaming bolas to fit on my regular skinks that I was saving for things like converting skink characters.  A snip here and some glue there, and it worked!!


After I worked on some other prepping for a few hours, I went back to do some more trimming and filing of the neck joints.  I will be doing collars, feathers, and other decorations that will easily bury any irregularities. 


As I moved on to each terradon, I became more excited as I realized that this was going to work far better than I could have hoped.


There was one last anxious moment.  Would the skinks fit on the backs of these new terradons, and could I make one of the arms be at such an angle that I could sculpt a rope or reigns of some kind to attach to the collar.

Sure enough, they were right on schedule!


This was making me very happy!  I needed that, since it has been a brutal couple of months.

I have some green stuff work to do on other projects, and more basing.  So, I will try to add a few bits of that on the terradons here to keep them moving along.  Then I will add all sorts of extra bits that I have saved and gathered.


I used the special character figure on one of the terradons that had the most dramatic pose.  He was the only skink that would have even come close to working.  To my surprise, once again, the plastic sculpt fit almost perfectly, looking very natural!

Since the rocks hanging from the legs have an empty socket for the plastic mount, I will be able to pop these back and forth between my terrain pieces and their normal bases.  It just gets better!


Saturday, August 31, 2013

The final group shot


Here we go!  The last group picture.


A very interesting squad to paint, to say the least.


A very fun little project.  As I have mentioned before, painting 'neutral' white on anything is a massive rarity for me.


This makes a fair amount of White Scar marines that I have painted thus far.


Drivin' along...


Comin' right at you!


Along the way...


To create the setting for the 'Weathering and Battle damage' video, I had to carefully prepare another Secret Weapon APV so that I could show several aspects of that technique on one mini.  Many thanks to the good folks at Secret Weapon once again for allowing me to use such a great product!


I wanted to show how to do some of the physical effects, not just the painting.  So, I designed some plasticard armor skirts that would not only give more surfaces to paint, but much more to chop up with an exacto knife!


After doing some damage effects on those plasticard pieces, I did do a few little bits of chipping and cutting on the main resin vehicle.


Everything was set up pretty nicely, so then I had to paint the vehicle itself, so that I could spend as much time as possible on the effects.


These subsequent images will show the 'shaded basecoat' process.  Yes, I do that, even on vehicles :-)


That means, of course, working lighter than normal, with the plan of adding more darks via glazing.


This was just about the end of that phase.  It sure looked a lot different from the white and grey object I had seen for so long!


I added some more very bright highlights, and then started to plan out where the freehand would go.  That was an important thing I wanted to show with the weathering.  Having some weathering on top of freehand work makes both things look even more realistic.

The other idea was to do the weathering using a different set of materials on either side of the vehicle.  In other words, one side done with only paint, the other side with weathering powders!

Stay tuned for the next set of images that I shot of the freehand and the glazing process.  There were so many images from each part of this individual project, I had to break it up into several posts.


Friday, August 30, 2013

Those terrible terradons


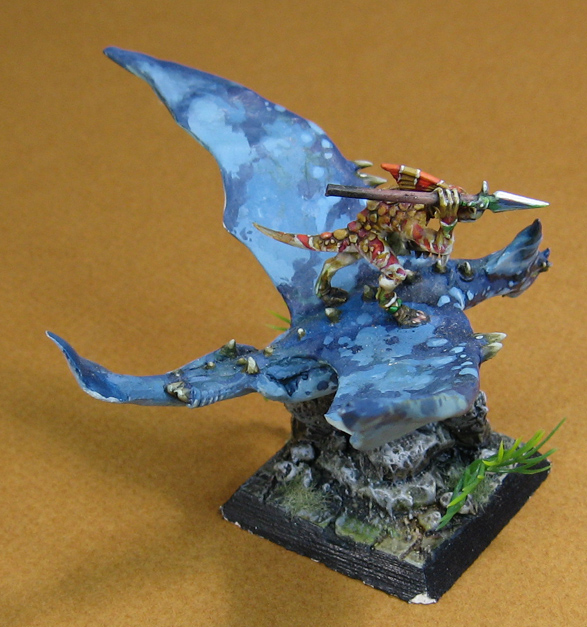
With the new Lizard book and a batch of new Terradon/Rippers in hand (as well as some new totems for them to use as aeries), I resurrected the scratch building program of Terradons that was under way years ago.

The painted version on the left was the first completed sculpt.  I used a majority of Apoxy sculpt, with green stuff and brown stuff for details.

In these next few images, you see that I am just getting to that final detail phase.


Showing the underside of the sculpt...


From the side.  I will be adding many more details to the faces with green stuff, such as a tongue, teeth and some eyes.


This next batch never even got that far.  That is good news, since I have 3 sets of Terradon bits that I can use to complete them!  Heads, legs with rocks hanging from them... flaming bolas... you name it!


Here are some more views of the painted scratch sculpt.


I will probably use regular skinks again, but substitute the flaming bola arms for the javelin.


I loved the base on this one!  I think the subsequent bases will reflect the new terrain that I have been building.  I might even have some pieces of the top of a temple pyramid, etc.


These pictures of that first sculpt in its last stages shows you what is to come for the 3 WIP Terradons in progress.


At long last... last bike


Last of the bikes!


As I have mentioned before, the odd phenomena of getting the routine of these down pact just in time for the squad to be finished strikes again. :-)


With each bike, I was able to 'cut to the chase' more and more.  You really learn to break down each piece, no matter how small, and learn the best and most efficient way to reduce it.


Since I had never painted any sort of space marine bike at all, or hardly even seen a finished one in person, it was yet another challenge.


There have been lots of challenges over the last many months, and I have had to adapt and learn very new concepts on the fly day after day.  It has fried my brain a bit, since I managed to lose a half dozen things in the last 24 hours. 

They were all ultimately found, but it was driving me berserk!  Ask Cathy :-)