Pages

Thursday, February 28, 2013

Ragnar Runecaster from Celtos


Here's one more vignette from Celtos.  The character is a dwarf named Ragnar Runecaster.  It was done with the same technique as the Cernunnos.  White sculpey was textured by pressing actual rocks into it prior to baking.

This allowed me to put one boulder on top of the other and build up the height of the formation.

I also sculpted the water texture with the sculpey.


Once it was baked and painted, I put some layers of gloss varnish over the water to give it some extra sparkle.


Some close ups of the mini...

I remember having lots of fun working with a whole range of blue/black colors on the raven the staff and the axe.


The Aberration completed


OK, you saw the step by step, now it's time for the finished views!!!


This was the most challenging of all the Grotesques thus far.  Lots of extra stuff on a figure that already has lots of extra stuff!!!


The views from above...


Everybody waiting for their Lucky Charms breakfast!


Wednesday, February 27, 2013

Painting the Aberration one by one...


A big part of the Grotesque squad is the Aberration. I am hoping that the scissorhand will help out in those close combat situations.  This all started out in the usual way, starting off with middle and light tones. preparing the way for the subsequent darker glazes.


Still laying out the colors at this point.


I did some lightening on a few areas...


I put some fluorescent color mixes on a few of the tubes...


And put some ochre colors on the spine, which is one of the more crucial areas I have to set up, as it really sets the tone for the miniature.


Let the glazing begin!  I had a whole series of glaze colors on the palette...sepia, black, brown, purple, burgundy, blue, etc.  You can see that I did dark glazes on as many surfaces as I could, moving rapidly from one element to the next.

When it came to doing the glazes on the exposed spines, I didn't do too much, as something special was planned for that!


For this stage, I took Vallejo transparent red and mixed that with some Reaper blue liner (a semitransparent color as well), keeping some watered down GW violet nearby to lighten the mix.

The darkest parts had the most blue in the mix, which was between each segment of the spines.  More of the transparent red was used as I worked away from the spines.  That same mix was used around the grafted elements, creating that 'rashy' sort of look.  The non-transparent GW violet lightened that mix so that it blended into the flesh tone more easily.


It was time to get some blood on all the sharp stuff, so I went back to that transparent red/blue mix. Some 'ardcoat was added to make it more glossy, and give it a bit more body.


Some more blood on the weapons.  I also added some of that glossier mix to some of the spine.


The less fun part of painting all the vials, tubes and such began in earnest now.  A few of them were glowing, as the previous figures did.  Several of the extra pieces on this guy came from the Parasite Engine kit.


Just about finished!  I painted the hot pants design at this stage.  The design stared out with an orange red mix.


That was lightened with some firey orange, and then some yellow to finish it off.

Since there were so many casting issues with this thing, I put some 'ardcoat over the vials to see what might happen.  It did create some of those spectral highlights, which was good.  The miscast elements had made it just about impossible to paint those in the normal way!


And the base.  It matches the other ones as closely as possible.


For those of you who had not already seen the raw conversion, here it is!


I will post the painted miniature tomorrow!  Stay tuned!


Sons of the Morningstar color scheme...


Here's another addition to the Dark Angels splinter chapter from a while back.  It is a fun color scheme, but I had to set up a whole new group of colors, as the original ones were long gone. :-)


A little group shot...


Cernunnos the Horned One


This was a fun little diorama I did back in the day, featuring another Celtos miniature.  He is Cernunnos the Horned One.  I believe he was part of the Fir Bolg faction.

Once again, this was done mostly with sculpey.  I pressed real rocks into the unbaked clay to create the texture.  If you look in the basing techniques category, you will find several posts describing this process.


This faction was all about swamplands, so I wanted to create a pool area for the water effects.


I built up the rock formation so that it would hold in the water effects material.  I knew it would take a few layers to get the depth I wanted.


I also had to make it deep enough to hold the horse and rider casualties.  The shield is from a Gael miniature.


These views give you a better look at the water and the casualty.


You can see how much I was able to submerge that horse and rider...


And for a close up on the miniature...


Tuesday, February 26, 2013

Ilyad Skeleton Character


We return to the wonderful world of Ilyad Miniatures.  This is yet another example of how nice the sculpting was on these figures.  While the armor and swords were almost always very intricate on these, it was almost easier to paint them than the simpler swords on other miniature lines.


Sometimes undead figures can be more difficult to paint as the sculpting is not so great.  In the attempt to make the armor look aged and damaged, all the detail is muddled.  Not so where!

The base is made from sculpey, as usual. ;-)


I had some fun with a bit of verdi-gris on the armor.


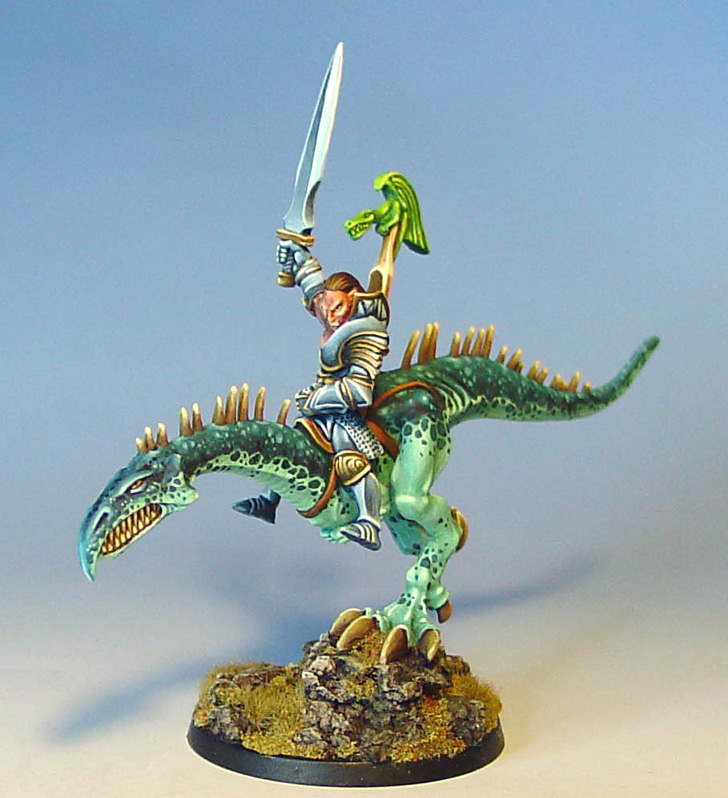
Sidhe Dragon Rider from Celtos


The Celtos miniature range was always a favorite of mine.  I think that Brigade Miniatures purchased that line.  The Sidhe were the Elves.  You have seen a few dioramas that I have posted in the past using the Sidhe.


At some point, I still want to GM a game using the Slaine RPG system.  The Celtos minis are perfect for that!!


I have some more recently discovered Celtos minis coming along soon... stay tuned!


Gunther: Ilyad Miniatures Guardian


This post has some close up images of the miniature I used for the diorama.  Ilyad always sculpted the armor very nicely, without those crazy anomalies that leave you guessing how the heck you are supposed to paint it!

The cloaks were always straightforward as well.  Each figure had a lot of personality to the armor, but they were fun to paint!


Here are some more close ups of the mini and the diorama...


One last view of the mural before all the foliage materials were applied!